This is the multi-page printable view of this section. .
Developers
-
1: Go Quickstart Guide
-
2: Python Quickstart Guide
-
3: .NET Quickstart Guide
-
4: Java Quickstart Guide
- 5: Security Token Service (STS) for MinIO Operator
-
6: JavaScript Quickstart Guide
-
7: Haskell Quickstart Guide
- 8: Rust Quickstart Guide
-
9: Software Development Kits (SDK)
-
10: Security Token Service (STS)
- 10.1: AssumeRoleWithCustomToken
- 10.2: AssumeRoleWithLDAPIdentity
- 10.3: AssumeRoleWithWebIdentity
- 11: Transforms with Object Lambda
- 12: File Transfer Protocol (FTP/SFTP)
1 - Go Quickstart Guide
SILO-verified pin, 2026-09-16: pkg v3.14.1 and mcli 20260916 use
v7.3.1-0.20260915093545-32e1f32cb176. Select it withgo get github.com/minio/minio-go/[email protected]. It retries and propagates S3 errors embedded in CopyObject HTTP 200 responses. Server/Console select their versions independently; see the component matrix.
MinIO Go SDK
SILO implements the S3-compatible server contract, so Go applications can use the upstream MinIO Go SDK directly. The current major module path is github.com/minio/minio-go/v7.
SDK releases and Go requirements evolve independently of SILO. Check the current releases and package documentation before pinning a version.
Install the module
From an existing Go module:
Configure the connection
S3_ENDPOINT is a host and optional port, without an http:// or https:// prefix. Keep credentials outside source control and set S3_USE_SSL=true when the endpoint serves TLS.
Create a bucket and upload an object
Save the following as main.go:
Run it with:
Use the SDK’s API documentation and maintained examples for presigned URLs, object locking, encryption, notifications, multipart operations, and other APIs.
Production checklist
- Use TLS and verify the server certificate.
- Load credentials from a secret manager or protected environment.
- Grant the application only the bucket and object permissions it needs.
- Pin and test the SDK and Go versions together.
- Apply request deadlines and handle retries, cancellation, and incomplete multipart uploads explicitly.
See Identity and Access Management for server-side policy configuration.
2 - Python Quickstart Guide
MinIO Python SDK
SILO implements the S3-compatible server contract, so Python applications can use the upstream MinIO Python SDK directly.
Supported Python versions and SDK APIs can change independently of SILO. Check the current package metadata and SDK releases before pinning a version.
Install the package
Install minio in a virtual environment:
Configure the connection
S3_ENDPOINT is a host and optional port, without an http:// or https:// prefix. Keep credentials outside source control and set S3_USE_SSL=true when the endpoint serves TLS.
Create a bucket and upload an object
Save the following as quickstart.py:
Run it with:
Use the repository’s API reference and maintained examples for presigned URLs, server-side encryption, notifications, object locking, multipart operations, and other APIs.
Production checklist
- Use TLS and verify the server certificate.
- Load credentials from a secret manager or protected environment.
- Grant the application only the bucket and object permissions it needs.
- Pin and test the Python runtime, SDK, and HTTP dependencies together.
- Define timeouts and handle SDK exceptions, retries, streaming resources, and incomplete multipart uploads explicitly.
See Identity and Access Management for server-side policy configuration.
3 - .NET Quickstart Guide
MinIO SDK for .NET
SILO implements the S3-compatible server contract, so applications can use the upstream MinIO .NET SDK without a SILO-specific client fork. This guide uses the stable NuGet package and environment variables for credentials.
SDK release requirements and APIs can change independently of SILO. Check the current NuGet package and SDK releases before choosing a version for your application.
Install the package
From an existing .NET project, add the Minio package:
Configure the connection
Set the endpoint and credentials for your SILO deployment. Keep secrets outside source control.
S3_ENDPOINT is a host and optional port, without an http:// or https:// prefix. Set S3_USE_SSL=true when the endpoint serves TLS.
Create a bucket and upload an object
Create hello.txt, then run the project:
For ASP.NET Core dependency injection and additional operations, use the SDK’s current README. The maintained repository also contains simple and host-based example projects; review their target branch and package version before copying code into a pinned application.
Production checklist
- Use TLS and verify the server certificate.
- Load credentials from a secret manager or protected environment, not source code.
- Grant the application only the bucket and object permissions it needs.
- Pin and test the SDK version as part of the application’s dependency lifecycle.
- Handle SDK exceptions, request cancellation, retries, and multipart-upload cleanup explicitly.
See Identity and Access Management for server-side policy configuration.
4 - Java Quickstart Guide
MinIO Java SDK
SILO implements the S3-compatible server contract, so Java applications can use the upstream MinIO Java SDK directly. The SDK supports Java 8 and later; select a runtime that is also supported by your application framework.
This page was verified with SDK 9.0.3. Check the current releases and Maven Central metadata before pinning a version.
Install the package
Add the dependency to Maven:
Or to Gradle:
Configure the connection
Unlike some other MinIO SDKs, the Java builder accepts a complete endpoint URL, including the http:// or https:// scheme. Keep credentials outside source control.
Create a bucket and upload an object
Use the SDK’s Javadoc and maintained examples for presigned URLs, encryption, notifications, object locking, multipart operations, and other APIs.
Production checklist
- Use TLS and verify the server certificate and trust store.
- Load credentials from a secret manager or protected environment.
- Grant the application only the bucket and object permissions it needs.
- Pin and test the JDK, SDK, HTTP client, and framework versions together.
- Configure timeouts and handle SDK exceptions, retries, streams, and incomplete multipart uploads explicitly.
See Identity and Access Management for server-side policy configuration.
5 - Security Token Service (STS) for MinIO Operator
Overview
Added: Operator
v5.0.0
The MinIO Operator supports a set of API calls that allows an application to obtain STS credentials for a MinIO Tenant.
Benefits of STS for MinIO Operator include:
-
STS credentials allow an application to access objects on a MinIO Tenant without the need to create credentials for the application on the tenant.
-
Allows applications to access objects in MinIO tenants using a Kubernetes-native authentication mechanism.
Service Accounts or Service Account Tokens are a core concept of Role-Based Access Control (RBAC) authentication in Kubernetes.
-
Implementing STS for MinIO Operator allows you to utilize infrastructure as code principles and configuration by using the tenant custom resource definition (CRD) and a MinIO PolicyBinding CRD.
Important
Starting with Operator v5.0.11, STS is enabled by default.
Previous versions of the Operator start with STS disabled by default. To use STS with v5.0.10 or older versions of the Operator, you must first explicitly enable it.
The procedure on this page includes instructions to enable the STS API in the MinIO Operator.
How STS Authorization Works in Kubernetes
An application can use an AssumeRoleWithWebIdentity call including a Kubernetes Service Account’s JWT to send a request for temporary credentials to the MinIO Operator. When linked to a pod, such as through a deployment’s .spec.spec.serviceAccountName field, Kubernetes mounts a JWT for the service account from a well-known location, such as /var/run/secrets/kubernetes.io/serviceaccount/token. The Pod can access those service accounts from that location.
The Operator checks the validity of the request, retrieves policies for the application, obtains credentials from the tenant, and then passes the credentials back the application. The application uses the issued credentials to work with the object storage on the tenant.
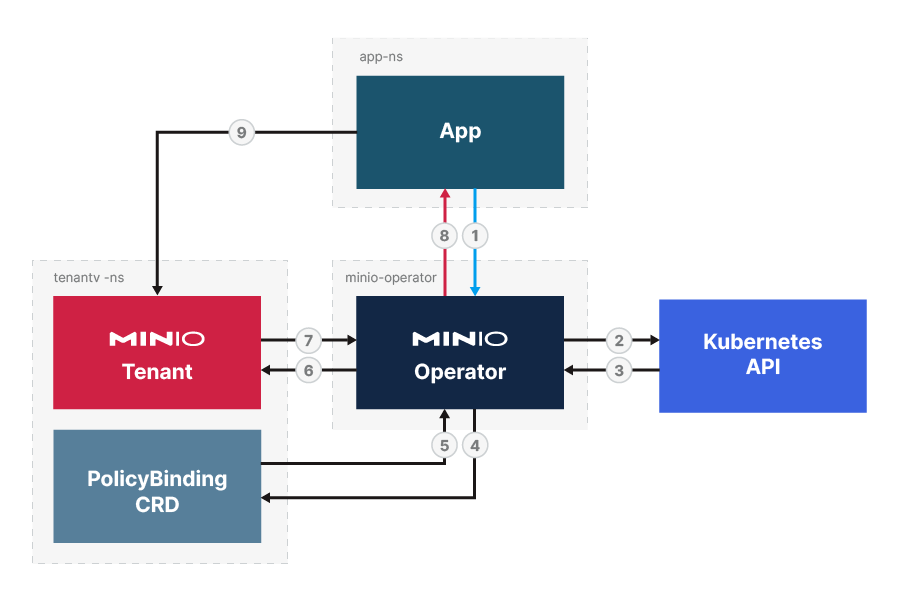
The complete process includes the following steps:
- An application sends an
AssumeRoleWithWebidentityAPI request to the MinIO Operator containing the tenant namespace and a service account to use. - The MinIO Operator uses the Kubernetes API to check that the JSON Web Token (JWT) associated with the service account in the application’s request is valid.
- The Kubernetes API returns the results of its validity check.
- The MinIO Operator checks for Policy Bindings that matches the application.
- The PolicyBinding CRD returns the policy or policies that match the request, if any.
- The MinIO Operator sends the combined policy information for the application to the MinIO Tenant.
- The tenant creates temporary credentials matching the policy or policies for the request and returns those to the MinIO Operator.
- The MinIO Operator forwards the temporary credentials back to the application.
- The application uses the credentials to send the object storage calls to the MinIO tenant.
Requirements
STS for the MinIO Operator requires the following:
- MinIO Operator v5.0.0 or later.
- The deployment must have TLS configured.
- (Required for Operator v5.0.0 - 5.0.10)
OPERATOR_STS_ENABLEDenvironment variable set toon.
Procedure
-
Enable STS functionality for the deployment
NoteNote
This step is optional for Operator version 5.0.11 or later.
-
Replace
minio-operatorwith the namespace for your deployment. -
Replace
deployment/minio-operatorwith the value for your deployment’s MinIO Operator.You can find the deployment value by running
kubectl get deployments -n <namespace>, where you replace<namespace>with the namespace for the MinIO Operator. Your MinIO Operator namespace is typicallyminio-operator, though this value can change during install.
-
-
Ensure an appropriate policy or policies exist on the MinIO Tenant for the application to use for the application
The next step uses a YAML document to map one or more existing tenant policies to a service account through a custom resource called a
PolicyBinding. -
Create YAML resources for the Service Account and Policy Binding:
-
Create the Service Account in the MinIO Tenant for the application to use.
For more on service accounts in Kubernetes, see the Kubernetes documentation.
-
Create a Policy Binding in the target tenant’s namespace that links the application to one or more of the MinIO Tenant’s policies.
-
-
Apply the YAML file to create the resources on the deployment
-
Use an SDK that supports the
AssumeRoleWithWebIdentitylike behavior to send a call from your application to the deploymentThe STS API expects a JWT for the service account to exist in the Kubernetes environment. When linked to a pod, such as through a deployment’s
.spec.spec.serviceAccountNamefield, Kubernetes mounts a JWT for the service account from a well-known location, such as/var/run/secrets/kubernetes.io/serviceaccount/token.Alternatively, you can define the token path as an environment variable:
The following MinIO SDKs support
AssumeRoleRoleWithWebIdentity:For examples of using the SDKs to assume a role, see the Operator v7.1.1 examples.
Example Resources
Service Account
A Service Account is a Kubernetes resource type that allows an external application to interact with the Kubernetes deployment. When linked to a pod, such as through a deployment’s .spec.spec.serviceAccountName field, Kubernetes mounts a JWT for the service account from a well-known location, such as /var/run/secrets/kubernetes.io/serviceaccount/token.
The following yaml creates a service account called stsclient-sa for the sts-client namespace.
Policy Binding
A PolicyBinding is a MinIO-specific custom resource type for Kubernetes that links an application to a set of policies.
Create Policy Bindings in the namespace of the tenant they are for.
For the purposes of the MinIO Operator, an application is any requesting resource that identifies with a specific service account and tenant namespace. The PolicyBinding resource links the application to one or more policies for the tenant on that namespace.
The below yaml creates a PolicyBinding that links an application using the service account stsclient-sa that exists in the namespace sts-client to the policy test-bucket-rw in the target tenant located in the namespace minio-tenant-1. The policies granted in the yaml definition must already exist on the MinIO Tenant.
Reference
6 - JavaScript Quickstart Guide
MinIO JavaScript SDK
SILO implements the S3-compatible server contract, so Node.js applications can use the upstream MinIO JavaScript SDK directly. Use a maintained Node.js release supported by the package version you select.
Install the package
The package includes TypeScript declarations; do not install the old @types/minio package.
Configure the connection
Keep credentials outside source control. Set S3_USE_SSL=true and use the TLS service port when connecting to a secured deployment.
Create a bucket and upload an object
Save the following as quickstart.mjs:
Run it with:
Use the repository’s API reference and maintained examples for bucket policy, notifications, object lock, presigned URLs, multipart operations, and other APIs. Prefer directory-level links over copying assumptions about individual example filenames into long-lived documentation.
Production checklist
- Use TLS and verify the server certificate.
- Load credentials from a secret manager or protected environment.
- Grant the application only the bucket and object permissions it needs.
- Pin and test the SDK version, Node.js runtime, timeout behavior, and retry policy together.
- Handle streams, request errors, incomplete multipart uploads, and shutdown explicitly.
See Identity and Access Management for server-side policy configuration.
7 - Haskell Quickstart Guide
MinIO Haskell SDK
SILO implements the S3-compatible server contract, so Haskell applications can use the upstream minio-hs package directly.
The latest tagged upstream release is 1.7.0, published in 2023, and its package metadata lists GHC 8.10.7 as the tested compiler. Validate minio-hs against your current GHC, resolver, TLS stack, and workload before adopting it. Check Hackage and upstream releases for newer compatibility information.
Install the package
Add minio-hs to the build-depends section of your Cabal package or to the dependency list in package.yaml. For an interactive inspection of the installed API:
Then run :browse Network.Minio in GHCi.
Configure the connection
Version 1.7.0 provides fromMinioEnv, which reads the following credential variables:
S3_ENDPOINT is a complete URL, including the http:// or https:// scheme. Keep credentials outside source control.
Create a bucket and upload an object
Save the following as Main.hs:
Create hello.txt, then run the program with the build tool and resolver selected for your project. The repository’s examples directory and API reference cover streaming, presigned URLs, encryption, notifications, object locking, and other operations.
Production checklist
- Use TLS and verify the server certificate; do not disable certificate validation.
- Load credentials from a secret manager or protected environment.
- Grant the application only the bucket and object permissions it needs.
- Pin and test the GHC, resolver, SDK, TLS, and HTTP dependency versions together.
- Define timeouts and handle
MinioErr, retries, resource cleanup, and incomplete multipart uploads explicitly.
See Identity and Access Management for server-side policy configuration.
8 - Rust Quickstart Guide
MinIO Rust SDK
SILO implements the S3-compatible server contract, so Rust applications can use the upstream MinIO Rust SDK directly. The crate provides an asynchronous, strongly typed request-builder API.
This page was verified with the minio crate 0.4.0. The crate does not currently declare a minimum supported Rust version, so check the current package metadata and API documentation and test it with your pinned toolchain.
Install the package
Add the SDK and Tokio runtime to Cargo.toml:
Configure the connection
S3_ENDPOINT is a complete URL, including the http:// or https:// scheme. Keep credentials outside source control.
Create a bucket and upload an object
Run it with cargo run. The repository’s maintained examples and API documentation cover file uploads, streaming, encryption, notifications, object locking, and other operations.
Production checklist
- Use TLS and verify the server certificate.
- Load credentials from a secret manager or protected environment.
- Grant the application only the bucket and object permissions it needs.
- Pin and test the Rust toolchain, SDK, Tokio, HTTP, TLS, and crypto features together.
- Define timeouts and handle errors, retries, task cancellation, and incomplete multipart uploads explicitly.
See Identity and Access Management for server-side policy configuration.
9 - Software Development Kits (SDK)
MinIO publishes the following Software Development Kits (SDK):
Go
GitHub: minio/minio-go
Latest Version: GOVERSION
Quickstart Guide: Go Quickstart Guide
Reference: MinIO Go SDK API
Download from GitHub
Python
GitHub: minio/minio-py
Latest Version: PYTHONVERSION
Quickstart Guide: Python Quickstart Guide
Reference: MinIO Python SDK
Install Methods
pip
source
Java
GitHub: minio/minio-java
Latest version: JAVAVERSION
Quickstart Guide: Java Quickstart Guide
Reference: MinIO Java SDK
Install methods
Maven
Gradle
JAR
Download the latest JAR file for version JAVAVERSION of the SDK from the Sonatype Maven Central Repository.
.NET
GitHub: minio/minio-dotnet
Latest Version: DOTNETVERSION
Quickstart Guide: .NET Quickstart Guide
Reference: MinIO .NET SDK
Download from NuGet
Run the following command in the NuGet Package Manager Console.
JavaScript
GitHub: minio/minio-js
Latest Version: JAVASCRIPTVERSION
Quickstart Guide: JavaScript Quickstart Guide
Reference: MinIO JavaScript SDK
Install
NPM
Source
Haskell
GitHub: minio/minio-hs
Latest Version: HASKELLVERSION
Quickstart Guide: Haskell Quickstart Guide
Install
Add
minio-hsto your project’s.cabaldependencies section.or
If you are using
hpack, addminio-hsto yourpackage.yamlfile.
C++
GitHub: minio/minio-cpp
Reference: MinIO C++ SDK Reference
Install
vcpkgSource
Rust
GitHub: minio/minio-rs
Latest Version
RUSTVERSION
Reference: MinIO Rust SDK Reference
Quickstart Guide: Rust Quickstart Guide
10 - Security Token Service (STS)
The MinIO Security Token Service (STS) APIs allow applications to generate temporary credentials for accessing the MinIO deployment.
The STS API is required for MinIO deployments configured to use external identity managers, as the API allows conversion of the external IDP credentials into AWS Signature v4-compatible credentials.
STS API Endpoints
MinIO supports the following STS API endpoints:
| Endpoint | Supported IDP | Description |
|---|---|---|
| AssumeRoleWithWebIdentity | OpenID Connect | Generates an access key and secret key using the JWT token returned by the OIDC provider |
| AssumeRoleWithLDAPIdentity | Active Directory / LDAP | Generates an access key and secret key using the AD/LDAP credentials specified to the API endpoint. |
| AssumeRoleWithCustomToken | MinIO Identity Plugin | Generates a token for use with an external identity provider and the MinIO Identity Plugin. |
10.1 - AssumeRoleWithCustomToken
The MinIO Security Token Service (STS) AssumeRoleWithCustomToken API endpoint generates a token for use with the MinIO External Identity Management Plugin.
Request Endpoint
The AssumeRoleWithCustomToken endpoint has the following form:
The following example uses all supported arguments. Replace the minio.example.net hostname with the appropriate URL for your MinIO cluster:
Request Query Parameters
This endpoint supports the following query parameters:
Parameter |
Type |
Description |
|---|---|---|
|
string |
Required Specify the JSON Token to present to the external identity manager. MinIO expects the identity manager to parse the token and determine whether to authenticate client requests using that token. |
|
string |
Required Specify |
|
string |
Required Specify the ARN for the Identity Manager Plugin configuration to associate with this STS request. See Note that MinIO automatically prepends |
|
integer |
Optional Specify the number of seconds after which the temporary credentials expire.
Defaults to
|
Response Elements
MinIO returns an AssumeRoleWithCustomTokenResult object, where the AssumedRoleUser.Credentials object contains the temporary credentials generated by MinIO:
AccessKeyId- The access key applications use for authentication.SecretKeyId- The secret key applications use for authentication.Expiration- The RFC3339 date and time after which the credentials expire.SessionToken- The session token applications use for authentication. Some SDKs may require this field when using temporary credentials.
The following example is similar to the response returned by the MinIO STS AssumeRoleWithCustomToken endpoint:
Error Elements
The XML error response for this API endpoint is similar to the AWS AssumeRoleWithWebIdentity response.
10.2 - AssumeRoleWithLDAPIdentity
The MinIO Security Token Service (STS) AssumeRoleWithLDAPIdentity API endpoint generates temporary access credentials using Active Directory or LDAP user credentials. This page documents the MinIO server AssumeRoleWithLDAPIdentity endpoint. For instructions on implementing STS using an S3-compatible SDK, defer to the documentation for that SDK.
The MinIO STS AssumeRoleWithLDAPIdentity API endpoint is modeled after the AWS AssumeRoleWithWebIdentity endpoint and shares certain request/response elements. This page documents the MinIO-specific syntax and links out to the AWS reference for all shared elements.
Request Endpoint
The AssumeRoleWithLDAPIdentity endpoint has the following form:
The following example uses all supported arguments. Replace the minio.example.net hostname with the appropriate URL for your MinIO cluster:
Request Query Parameters
This endpoint supports the following query parameters:
Parameter |
Type |
Description |
|---|---|---|
|
string |
Required Specify the username of the AD/LDAP user as whom you want to authenticate. |
|
string |
Required Specify the password for the |
|
string |
Required Specify |
|
integer |
Optional Specify the number of seconds after which the temporary credentials
expire. Defaults to
If |
|
string |
Optional Specify the URL-encoded JSON-formatted policy to use as an inline session policy.
The resulting permissions for the temporary credentials are the
intersection between the policy matching the Distinguished
Name (DN) of the The inline policy can specify a subset of permissions allowed by the policy specified in the DN policy. Applications can never assume more privileges than those specified in the DN policy. Omit to use only the DN policy. See Access Management for more information on MinIO authentication and authorization. |
Response Elements
The XML response for this API endpoint is similar to the AWS AssumeRoleWithLDAPIdentity response. Specifically, MinIO returns an AssumeRoleWithLDAPIdentityResult object, where the AssumedRoleUser.Credentials object contains the temporary credentials generated by MinIO:
AccessKeyId- The access key applications use for authentication.SecretKeyId- The secret key applications use for authentication.Expiration- The RFC3339 date and time after which the credentials expire.SessionToken- The session token applications use for authentication. Some SDKs may require this field when using temporary credentials.
The following example is similar to the response returned by the MinIO STS AssumeRoleWithLDAPIdentity endpoint:
Error Elements
The XML error response for this API endpoint is similar to the AWS AssumeRoleWithLDAPIdentity response.
10.3 - AssumeRoleWithWebIdentity
The MinIO Security Token Service (STS) AssumeRoleWithWebIdentity API endpoint generates temporary access credentials using a JSON Web Token (JWT) returned from a configured OpenID IDentity Provider (IDP). This page documents the MinIO server AssumeRoleWithWebIdentity endpoint. For instructions on implementing STS using an S3-compatible SDK, defer to the documentation for that SDK.
The MinIO STS AssumeRoleWithWebIdentity API endpoint is modeled after the AWS AssumeRoleWithWebIdentity endpoint and shares certain request/response elements. This page documents the MinIO-specific syntax and links out to the AWS reference for all shared elements.
Request Endpoint
The AssumeRoleWithWebIdentity endpoint has the following form:
The following example uses all supported arguments. Replace the minio.example.net hostname with the appropriate URL for your MinIO cluster:
Request Query Parameters
This endpoint supports the following query parameters:
Parameter |
Type |
Description |
|---|---|---|
|
string |
Required Specify the JSON Web Token (JWT) returned by the configured OpenID IDentity Provider. |
|
string |
Required Specify |
|
integer |
Optional Specify the number of seconds after which the temporary credentials
expire. Defaults to
If |
|
string |
Optional Specify the URL-encoded JSON-formatted policy to use as an inline session policy.
The resulting permissions for the temporary credentials are the intersection between the policy specified as part of the JWT claim and the specified inline policy. Applications can only perform those operations for which they are explicitly authorized. The inline policy can specify a subset of permissions allowed by the policy specified in the JWT claim. Applications can never assume more privileges than those specified in the JWT claim policy. Omit to use only the JWT claim policy. See Access Management for more information on MinIO authentication and authorization. |
|
string |
Optional The role Amazon Resource Number (ARN) to use for all user authentication requests.
If used, there must be a matching OIDC RolePolicy defined for the RoleArn’s provider by the When used, all valid authorization requests assume the same set of permissions provided by the RolePolicy. You can use OpenID Policy Variables to create policies that programmatically manage what each individual user has access to. If you do not supply a RoleArn, MinIO attempts to authorize through a JWT-based claim. |
Response Elements
The XML response for this API endpoint is similar to the AWS AssumeRoleWithWebIdentity response. Specifically, MinIO returns an AssumeRoleWithWebIdentityResult object, where the AssumedRoleUser.Credentials object contains the temporary credentials generated by MinIO:
AccessKeyId- The access key applications use for authentication.SecretKeyId- The secret key applications use for authentication.Expiration- The RFC3339 date and time after which the credentials expire.SessionToken- The session token applications use for authentication. Some SDKs may require this field when using temporary credentials.
The following example is similar to the response returned by the MinIO STS AssumeRoleWithWebIdentity endpoint:
Error Elements
The XML error response for this API endpoint is similar to the AWS AssumeRoleWithWebIdentity response.
11 - Transforms with Object Lambda
MinIO’s Object Lambda enables developers to programmatically transform objects on demand. You can transform objects as needed for your use case, such as redacting personally identifiable information (PII), enriching data with information from other sources, or converting between formats.
Overview
An Object Lambda handler is a small code module that transforms the contents of an object and returns the results. Like Amazon S3 Object Lambda functions, you trigger a MinIO Object Lambda handler function with a GET request from an application. The handler retrieves the requested object from MinIO, transforms it, and returns the modified data back to MinIO to send to the original application. The original object remains unchanged.
Each handler is an independent process, and multiple handlers can transform the same data. This allows you to use the same object for different purposes without maintaining different versions of the original.
Object Lambda Handlers
You can write a handler function in any language capable of sending and receiving HTTP requests. It must be able to:
- Listen for an HTTP POST request.
- Retrieve the original object using a URL.
- Return the transformed contents and authorization tokens.
Create a Function
A handler function should perform the following steps:
-
Extract the object details from the incoming POST request.
The
getObjectContextproperty of the JSON request payload contains details about the original object. To construct the response, you need the following values:Value Description inputS3UrlA presigned URL for the original object. The calling application generates the URL and sends it in the original request. This allows the handler to access the original object without the MinIO credentials usually required. The URL is valid for one hour. outputRouteA token that allows MinIO to validate the destination for the transformed object. Return this value with the response in an x-amz-request-routeheader.outputTokenA token that allows MinIO to validate the response. Return this value in the response in an x-amz-request-tokenheader. -
Retrieve the original object from MinIO.
Use the presigned URL to retrieve the object from the MinIO deployment. The contents of the object are in the body of the response.
-
Transform the object as desired.
Perform any operations needed to generate a transformed object. Since the calling application is waiting for a response, you may wish to avoid potentially long running operations.
-
Construct a response containing the following information:
- The transformed object contents.
- An
x-amz-request-routeheader with theoutputRoutetoken. - An
x-amz-request-tokenheader with theoutputTokentoken.
-
Return the response back to Object Lambda.
MinIO validates the response and sends the transformed data back to the original calling application.
Response headers
Handlers must include the outputRoute and outputToken values in the appropriate response headers. This allows MinIO to correctly validate the response from the handler.
Register the Handler
To enable MinIO to call the handler, register the handler function as a webhook with the following MinIO server Object Lambda environment variables:
MINIO_LAMBDA_WEBHOOK_ENABLE_functionname
Enable or disable Object Lambda for a handler function. For multiple handlers, set this environment variable for each function name.
MINIO_LAMBDA_WEBHOOK_ENDPOINT_functionname
Register an endpoint for a handler function. For multiple handlers, set this environment variable for each function endpoint.
MinIO also supports the following environment variables for authenticated webhook endpoints:
MINIO_LAMBDA_WEBHOOK_AUTH_TOKEN_functionanme
Specify the opaque string or JWT authorization token for authenticating to the webhook.
MINIO_LAMBDA_WEBHOOK_CLIENT_CERT_functionname
Specify the client certificate to use for mTLS authentication to the webhook.
MINIO_LAMBDA_WEBHOOK_CLIENT_KEY_functionname
Specify the private key to use for mTLS authentication to the webhook.
Restart MinIO to apply the changes.
Alternatively, configure Object Lambda with the MinIO Client command line tool. For more information, see Object Lambda function settings.
Trigger From an Application
To request a transformed object from your application:
-
Connect to the MinIO deployment.
-
Set the Object Lambda target by adding a
lambdaArnparameter with the ARN of the desired handler. -
Generate a presigned URL for the original object.
-
Use the generated URL to retrieve the transformed object.
MinIO sends the request to the target Object Lambda handler. The handler returns the transformed contents back to MinIO, which validates the response and sends it back to the application.
Example
Transform the contents of an object using Python, Go, and curl:
- Create and register an Object Lambda handler.
- Create a bucket and an object to transform.
- Request and display the transformed object contents.
Prerequisites:
- An existing MinIO deployment
- Working Python (3.8+) and Golang development environments
- The MinIO Go SDK
Create a Handler
The sample handler, written in Python, retrieves the target object using a presigned URL generated by the caller. The handler then transforms the object’s contents and returns the new text. It uses the Flask web framework and Python 3.8+.
The following command installs Flask and other needed dependencies:
The handler calls swapcase() to change the case of each letter in the original text. It then sends the results back to MinIO, which returns it to the caller.
Start the Handler
Use the following command to start the handler in your local development environment:
The output resembles the following:
Start MinIO
Once the handler is running, start MinIO with the MINIO_LAMBDA_WEBHOOK_ENABLE and MINIO_LAMBDA_WEBHOOK_ENDPOINT environment variables to register the function with MinIO. To identify the specific Object Lambda handler, append the name of the function to the name of the environment variable.
The following command starts MinIO in your local development environment:
Replace myfunction with the name of your handler function and /data with the location of the MinIO directory for your local deployment. The output resembles the following:
Test the Handler
To test the Lambda handler function, first create an object to transform. Then invoke the handler, in this case with curl, using the presigned URL from a Go function.
-
Create a bucket and object for the handler to transform.
-
Invoke the Handler
The following Go code uses the The MinIO Go SDK to generate a presigned URL and print it to
stdout.In the code above, replace the following values:
- Replace
my_admin_userandmy_admin_passwordwith user credentials for a MinIO deployment. - Replace
myfunctionwith the same function name set in theMINIO_LAMBDA_WEBHOOK_ENABLEandMINIO_LAMBDA_WEBHOOK_ENDPOINTenvironment variables.
To retrieve the transformed object, execute the Go code with
curlto generate a GET request:curlruns the Go code and then retrieves the object with a GET request to the presigned URL. The output resembles the following: - Replace
12 - File Transfer Protocol (FTP/SFTP)
Starting with Operator 5.0.7 and MinIO Server RELEASE.2023-04-20T17-56-55Z, you can use the SSH File Transfer Protocol (SFTP) to interact with the objects on a MinIO Operator Tenant deployment.
SFTP is defined by the Internet Engineering Task Force (IETF) as an extension of SSH 2.0. It allows file transfer over SSH for use with Transport Layer Security (TLS) and virtual private network (VPN) applications.
Enabling SFTP does not affect other MinIO features.
Starting with MinIO Server RELEASE.2023-04-20T17-56-55Z, you can use the File Transfer Protocol (FTP) to interact with the objects on a MinIO deployment.
You must specifically enable FTP or SFTP when starting the server. Enabling either server type does not affect other MinIO features.
This page uses the abbreviation FTP throughout, but you can use any of the supported FTP protocols described below.
Supported Protocols
The MinIO Operator only supports configuring SSH File Transfer Protocol (SFTP).
When enabled, MinIO supports FTP access over the following protocols:
-
SSH File Transfer Protocol (SFTP)
SFTP is defined by the Internet Engineering Task Force (IETF) as an extension of SSH 2.0. SFTP allows file transfer over SSH for use with Transport Layer Security (TLS) and virtual private network (VPN) applications.
Your FTP client must support SFTP.
-
File Transfer Protocol over SSL/TLS (FTPS)
FTPS allows for encrypted FTP communication with TLS certificates over the standard FTP communication channel. FTPS should not be confused with SFTP, as FTPS does not communicate over a Secure Shell (SSH).
Your FTP client must support FTPS.
-
File Transfer Protocol (FTP)
Unencrypted file transfer.
MinIO does not recommend using unencrypted FTP for file transfer.
Supported Commands
When enabled, MinIO supports the following SFTP operations:
getputlsmkdirrmdirdelete
MinIO does not support either append or rename operations.
Considerations
Versioning
SFTP clients can only operate on the latest version of an object. Specifically:
- For read operations, MinIO only returns the latest version of the requested object(s) to the SFTP client.
- For write operations, MinIO applies normal versioning behavior and creates a new object version at the specified namespace.
rmandrmdiroperations createDeleteMarkerobjects.
Authentication and Access
SFTP access requires the same authentication as any other S3 client. MinIO supports the following authentication providers:
- MinIO IDP users and their service accounts
- Active Directory/LDAP users and their service accounts
- OpenID/OIDC service accounts
STS credentials cannot access buckets or objects over SFTP.
Authenticated users can access buckets and objects based on the policies assigned to the user or parent user account.
The SFTP protocol does not require any of the admin:* permissions. You may not perform other MinIO admin actions with SFTP.
Prerequisites
- MinIO Operator v5.0.7 or later.
- Enable an SFTP port (8022) for the server.
- A port to use for the SFTP commands and a range of ports to allow the SFTP server to request to use for the data transfer.
- MinIO RELEASE.2023-04-20T17-56-55Z or later.
- Enable an FTP or SFTP port for the server.
- A port to use for the FTP commands and a range of ports to allow the FTP server to request to use for the data transfer.
Procedure
-
Enable SFTP for the desired Tenant:
Use the following Kubectl command to edit the Tenant YAML configuration:
Replace
my-tenantandmy-tenant-nswith the desired Tenant and namespace.In the
features:section, set the value ofenableSFTPtotrue:Kubectl restarts MinIO to apply the change.
You may also set
enableSFTPin your Helm chart or Kustomize configuration to enable SFTP for newly created Tenants. -
If needed, configure ingress for the SFTP port according to your local policies.
-
Validate the configuration
The following
kubectl getcommand uses yq to display the value ofenableSFTP, indicating whether SFTP is enabled:Replace
my-tenantandmy-tenant-nswith the desired Tenant and namespace.If SFTP is enabled, the output resembles the following:
-
Use your preferred SFTP client to connect to the MinIO deployment. You must connect as a user whose policies allow access to the desired buckets and objects.
The specifics of connecting to the MinIO deployment depend on your SFTP client. Refer to the documentation for your client.
The following example connects to the MinIO Tenant SFTP server forwarded to the local host system, and lists the contents of a bucket named
runner.
The following kubectl get command uses yq to display the value of enableSFTP, indicating whether SFTP is enabled:
Replace my-tenant and my-tenant-ns with the desired Tenant and namespace.
If SFTP is enabled, the output resembles the following:
-
Start MinIO with an FTP and/or SFTP port enabled.
2. Use your preferred FTP client to connect to the MinIO deployment. You must connect as a user whose [policies](/administration/identity-access-management/policy-based-access-control/#minio-policy) allow access to the desired buckets and objects.The following example starts MinIO with FTPS enabled.
NoteNote
Omit
tls-private-keyandtls-public-certto use the MinIO default TLS keys for FTPS. For more information, see the TLS on MinIO documentation.See the
minio server --ftpandminio server --sftpfor details on using these flags to start the MinIO service. To connect to the an FTP port with TLS (FTPS), pass thetls-private-keyandtls-public-certkeys and values, as well, unless using the MinIO default TLS keys.The output of the command should return a response that resembles the following:
The specifics of connecting to the MinIO deployment depend on your FTP client. Refer to the documentation for your client.
To connect over TLS or through SSH, you must use a client that supports the desired protocol. 3. Connect to MinIO
4. Download an ObjectThe following example connects to an SFTP server, and lists the contents of a bucket named
runner.The following uses the Linux uses the FTP CLI client to connect to the MinIO server using
miniocredentials to list contents in a bucket namedrunnerThis example lists items in a bucket, then downloads the contents of the bucket.
This example lists items in a bucket, then downloads the contents of the bucket.
Connect to MinIO Using SFTP with a Certificate Key File
Added: RELEASE.2024-05-07T06-41-25Z
MinIO supports mutual TLS (mTLS) certificate-based authentication on SFTP, where both the server and the client verify the authenticity of each other.
This type of authentication requires the following:
- Public key file for the trusted certificate authority
- Public key file for the MinIO Server minted and signed by the trusted certificate authority
- Public key file for the user minted and signed by the trusted certificate authority for the client connecting by SFTP and located in the user’s
.sshfolder (or equivalent for the operating system)
The keys must include a principals list of the user(s) that can authenticate with the key:
-sspecifies the path to the certificate authority public key to use for generating this key. The specified public key must have aprincipalslist that includes this user.-Ispecifies the key identity for the public key.-ncreates theuser principalslist for which this key is valid. You must include the user for which this key is valid, and the user must match the username in MinIO.-Vlimits the duration for which the generated key is valid. In this example, the key is valid for one hour. Adjust the duration for your requirements.-zadds a serial number to the key to distinguish this generated public key from other keys signed by the same certificate authority public key.
MinIO requires specifying the Certificate Authority used to sign the certificates for SFTP access. Start or restart the MinIO Server and specify the path to the trusted certificate authority’s public key using an --sftp="trusted-user-ca-key=PATH" flag:
When connecting to the MinIO Server with SFTP, the client verifies the MinIO Server’s certificate. The client then passes its own certificate to the MinIO Server. The MinIO Server verifies the key created above by comparing its value to the known public key from the certificate authority provided at server startup.
Once the MinIO Server verifies the client’s certificate, the user can connect to the MinIO server over SFTP:
Require service account or LDAP for authentication
To force authentication to SFTP using LDAP or service account credentials, append a suffix to the username. Valid suffixes are either =ldap or =svc.
- Replace
my-ldap-userwith the username to use. - Replace
[minio@localhost]with the address of the MinIO server.