1) Create a CA Issuer for the minio-operator namespace
This guide disables the automatic generation of certificates in MinIO Operator and issues certificates using cert-manager instead.
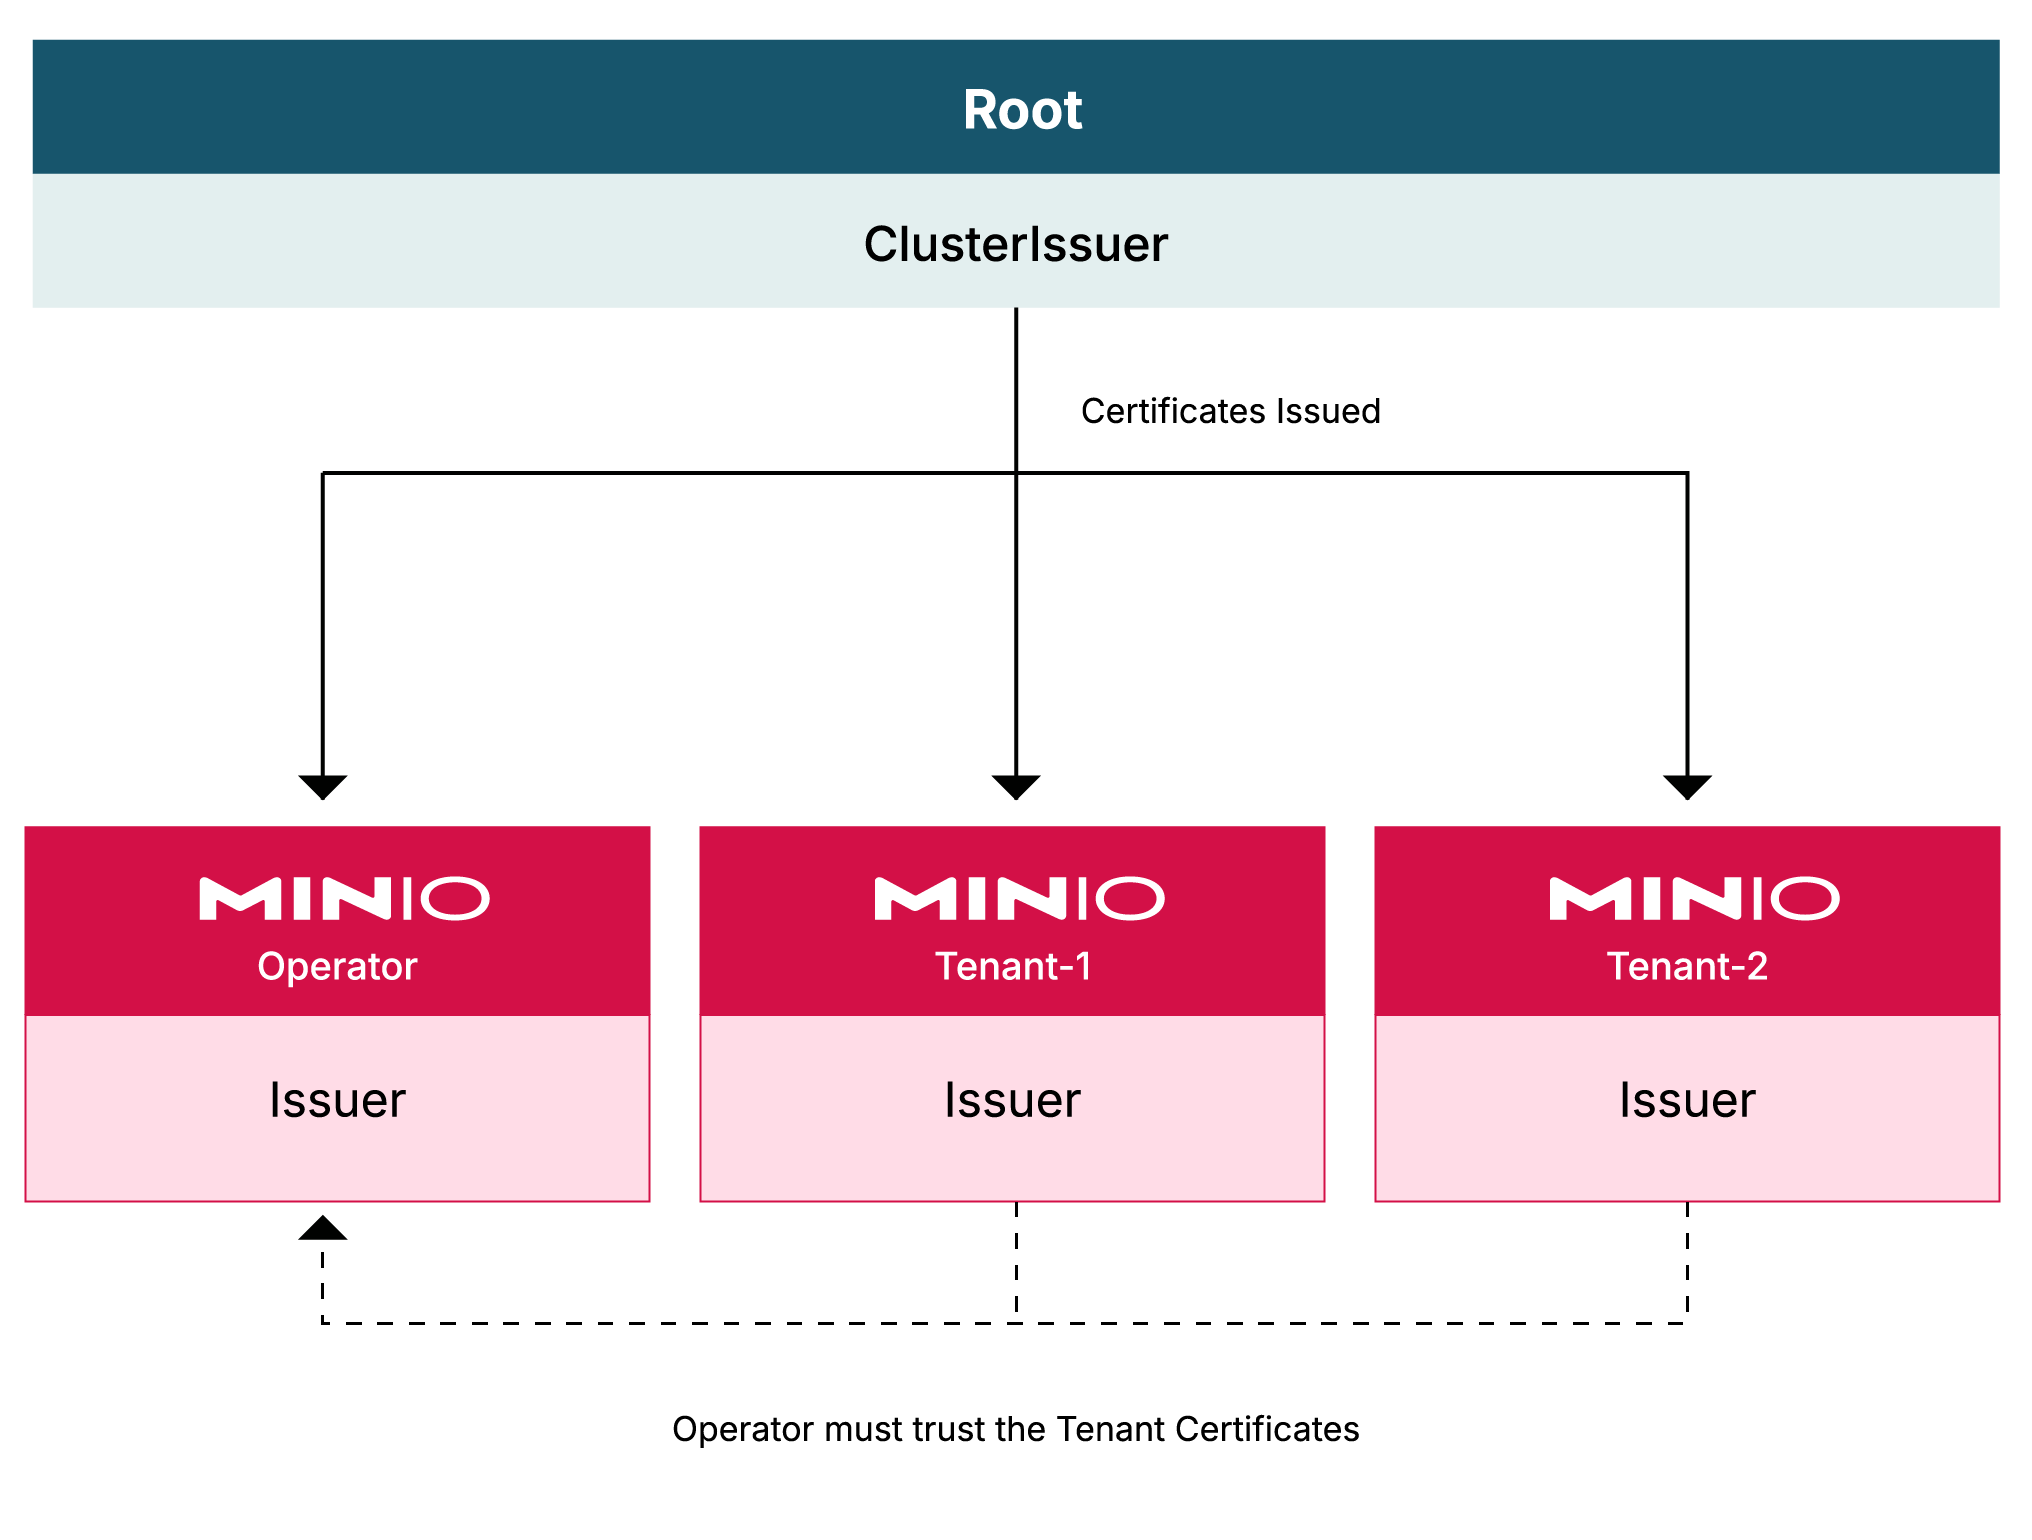
The minio-operator namespace must have its own certificate authority (CA), derived from the cluster’s ClusterIssuer certificate created during cert-manager setup. Create this CA certificate using cert-manager.
Warning
Important
This CA certificate must exist before installing MinIO Operator.
If it does not exist, create the minio-operator namespace
kubectl create ns minio-operator
Request a new Certificate with spec.isCA: true specified.
This certificate serves as the CA for the minio-operator namespace.
Create a file called operator-ca-tls-secret.yaml with the following contents:
The spec.issueRef.name must match the name of the ClusterIssuer created when setting up cert-manager. If you specified a different ClusterIssuer name or are using a different Issuer from the guide, modify the issuerRef to match your environment.
Apply the resource:
kubectl apply -f operator-ca-tls-secret.yaml
Kubernetes creates a new secret with the name operator-ca-tls in the minio-operator namespace.
Warning
Important
Make sure to trust this certificate in any applications that need to interact with the MinIO Operator.
2) Use the secret to create the Issuer
Use the operator-ca-tls secret to add an Issuer resource for the minio-operator namespace.
Create a file called operator-ca-issuer.yaml with the following contents:
Now that the Issuer exists in the minio-operator namespace, cert-manager can add a certificate.
The certificate from cert-manager must be valid for the following DNS domains:
sts
sts.minio-operator.svc.
sts.minio-operator.svc.<cluster domain>
Warning
Important
Replace <cluster domain> with the actual value for your MinIO tenant. cluster domain is the internal root DNS domain assigned in your Kubernetes cluster. Typically, this is cluster.local, but confirm the value by checking your CoreDNS configuration for the correct value for your Kubernetes cluster.
For example:
kubectl get configmap coredns -n kube-system -o jsonpath="{.data}"
Different Kubernetes providers manage the root domain differently. Check with your Kubernetes provider for more information.
Create a Certificate for the specified domains:
Create a file named sts-tls-certificate.yaml with the following contents:
# sts-tls-certificate.yamlapiVersion:cert-manager.io/v1kind:Certificatemetadata:name:sts-certmanager-certnamespace:minio-operatorspec:dnsNames:- sts- sts.minio-operator.svc- sts.minio-operator.svc.cluster.local# Replace cluster.local with the value for your domain.secretName:sts-tlsissuerRef:name:minio-operator-ca-issuer
Warning
Important
The spec.secretName is not optional.
The secret name must be sts-tls. Confirm this by setting spec.secretName: sts-tls as highlighted in the certificate YAML.
Apply the resource:
kubectl apply -f sts-tls-certificate.yaml
This creates a secret called sts-tls in the minio-operator namespace.
Caution
Warning
The STS service will not start if the sts-tls secret, containing the TLS certificate, is missing or contains an invalid key-value pair.
When installing the Operator deployment, set the OPERATOR_STS_AUTO_TLS_ENABLED environment variable to off in the minio-operator container.
Disabling this environment variable prevents the MinIO Operator from issuing the certificates. Instead, Operator relies on cert-manager to issue the TLS certificate.
There are various methods to define an environment variable depending on how you install the Operator. The following steps define the variable with kustomize.
Create a kustomization patch file called kustomization.yaml with the following contents:
The spec.issueRef.name must match the name of the ClusterIssuer created when setting up cert-manager. If you specified a different ClusterIssuer name or are using a different Issuer from the guide, modify the issuerRef to match your environment.
Apply the resource:
kubectl apply -f tenant-1-ca-certificate.yaml
2) Create the Issuer
The Issuer issues the certificates within the tenant namespace.
Generate a resource definition for an Issuer.
Create a file called tenant-1-ca-issuer.yaml with the following contents:
Replace the placeholder text (marked with the < and > characters) with values for your tenant:
<cluster domain> is the internal root DNS domain assigned in your Kubernetes cluster. Typically, this is cluster.local, but confirm the value by checking your CoreDNS configuration for the correct value for your Kubernetes cluster.
For example:
kubectl get configmap coredns -n kube-system -o jsonpath="{.data}"
Different Kubernetes providers manage the root domain differently. Check with your Kubernetes provider for more information.
tenant-name is the name provided to your tenant in the metadata.name of the Tenant YAML. For this example it is myminio.
namespace is the value created earlier where the tenant will be installed. In the tenant YAML, it is defined in the metadata.namespace field. For this example it is tenant-1.
Request a Certificate for the specified domains
Create a file called tenant-1-minio-certificate.yaml. The contents of the file should resemble the following, modified to reflect your cluster and tenant configurations:
For this example, the Tenant name is myminio. We recommend naming the secret in the field spec.secretName as <tenant-name>-tls as a naming convention.
Apply the certificate resource:
kubectl apply -f tenant-1-minio-certificate.yaml
Validate the changes took effect:
kubectl describe secret/myminio-tls -n tenant-1
Note
Note
Replace tenant-1 with the namespace for your tenant.
Replace myminio-tls with the name of your secret, if different.
4) Deploy the tenant using cert-manager for TLS certificate management
When deploying a Tenant, you must set the TLS configuration such that:
The Tenant does not automatically generate its own certificates (spec.requestAutoCert: false) and
The Tenant has a valid cert-manager reference (spec.externalCertSecret)
This directs the Operator to deploy the Tenant using the cert-manager certificates exclusively.
The following YAML spec provides a baseline configuration meeting these requirements:
apiVersion:minio.min.io/v2kind:Tenantmetadata:name:myminionamespace:tenant-1spec:...## Disable default tls certificates.requestAutoCert:false## Use certificates generated by cert-manager.externalCertSecret:- name:myminio-tlstype:cert-manager.io/v1...
5) Trust the tenant’s CA in MinIO Operator
The MinIO Operator does not trust the tenant’s CA by default. To trust the tenant’s CA, you must pass the certificate to the Operator as a secret.
To do this, create a secret with the prefix operator-ca-tls- followed by a unique identifier in the minio-operator namespace.
MinIO Operator mounts and trusts all certificates issued by the provided Certificate Authorities. This is required because the MinIO Operator performs health checks using the /minio/health/cluster endpoint.
Create operator-ca-tls-tenant-1 secret
Copy the tenant’s cert-manager generated CA public key (ca.crt) into the minio-operator namespace. This allows Operator to trust the cert-manager issued CA and all certificates derived from it.
In this example we chose a secret name of operator-ca-tls-tenant-1. We used the tenant namespace tenant-1 as a suffix for easy identification of which namespace the CA comes from. Use the name of your tenant namespace for easier linking secrets to the related resources.
6) Deploy the tenant
With the Certificate Authority and Issuer in place for the tenant’s namespace, you can now deploy the object store tenant.
Use the modified baseline tenant YAML to disable AutoCert and reference the secret you generated.
2 - Deployment and Upgrades
Choose a deployment model, install SILO, and plan upgrades using the exact component versions.
Choose a deployment model, install SILO, and plan upgrades using the exact component versions.
Inherited MinIO Operator instructions do not establish release acceptance for arbitrary upstream versions. The maintained stack is SILO, SILO Console, mcli and silo-pkg; upstream compatibility is best effort.
2.1 - Deploy a Silo Tenant
This procedure deploys a Silo server image as a Tenant managed by MinIO Operator v7.1.1. The upstream Operator repository was archived and made read-only on 2026-03-20, so this is a frozen compatibility baseline rather than an actively maintained Operator path. MinIO Operator, Tenant, the minio.min.io API group, and the CRD field names are upstream Kubernetes contracts and therefore retain their original names.
The verified baseline below creates a four-server Tenant. A single-node topology is useful for local testing, but its production failure model and storage layout are outside the scope of this procedure.
This documentation assumes familiarity with all referenced Kubernetes concepts, utilities, and procedures. While this documentation may provide guidance for configuring or deploying Kubernetes-related resources on a best-effort basis, it is not a replacement for the official Kubernetes Documentation.
Deploy a Silo Tenant using Kustomize
The following procedure uses the base Kustomization template from the MinIO Operator v7.1.1 repository, then replaces its upstream MinIO image default with a pinned Silo image.
You can select a different v7.1.1 example as your starting point, or build your own resources using the MinIO Custom Resource Documentation. No later supported upstream release exists; review any fork, replacement, or CRD change independently before departing from this pinned snapshot.
Warning
Important
If you use Kustomize to deploy a MinIO Tenant, you must use Kustomize to manage or upgrade that deployment. Do not use kubectl krew, a Helm Chart, or similar methods to manage or upgrade the MinIO Tenant.
This procedure is not exhaustive of all possible configuration options available in the Tenant CRD. It provides a baseline from which you can modify and tailor the Tenant to your requirements.
Create a YAML object for the Tenant
Clone the pinned Operator release and use kubectl kustomize to produce a YAML file containing all Kubernetes resources necessary to deploy the base Tenant:
The command creates a single YAML file with multiple objects separated by the --- line. Open the file in your preferred editor.
The upstream template defaults to quay.io/minio/minio. Before applying it, set the kind: Tenant object’s spec.image to the verified Silo release and disable the inherited in-place updater:
Pin the image by tag or digest. If you choose a newer Silo image, review and test that release explicitly instead of inheriting the Operator template’s upstream image.
The following steps reference each object based on its kind and metadata.name fields:
Configure the Tenant topology
The kind: Tenant object describes the Silo workload managed by MinIO Operator.
The following fields share the spec.pools[0] prefix and control the number of servers, volumes per server, and storage class of all pods deployed in the Tenant:
Field
Description
servers
The number of Silo pods to deploy in the Server Pool.
volumesPerServer
The number of persistent volumes to attach to each Silo pod (servers).
The Operator generates volumesPerServer x servers Persistent Volume Claims for the Tenant.
volumeClaimTemplate.spec.storageClassName
The Kubernetes storage class to associate with the generated Persistent Volume Claims.
If no storage class exists matching the specified value or if the specified storage class cannot meet the requested number of PVCs or storage capacity, the Tenant may fail to start.
The amount of storage to request for each generated PVC.
Configure Tenant Affinity or Anti-Affinity
The MinIO Operator supports the following Kubernetes Affinity and Anti-Affinity configurations:
Node Affinity (spec.pools[n].nodeAffinity)
Pod Affinity (spec.pools[n].podAffinity)
Pod Anti-Affinity (spec.pools[n].podAntiAffinity)
For production, configure Pod Anti-Affinity so that the Kubernetes scheduler does not place multiple Tenant pods on the same worker node.
If you have specific worker nodes on which you want to deploy the tenant, pass those node labels or filters to the nodeAffinity field to constrain the scheduler to place pods on those nodes.
Configure Network Encryption
The MinIO Tenant CRD provides the following fields for configuring Tenant TLS network encryption:
Customize the behavior of automatic TLS, if enabled.
spec.externalCertSecret
Enable TLS for multiple hostnames via Server Name Indication (SNI)
Specify one or more Kubernetes secrets of type kubernetes.io/tls or cert-manager.
spec.externalCaCertSecret
Enable validation of client TLS certificates signed by unknown, third-party, or internal Certificate Authorities (CA).
Specify one or more Kubernetes secrets of type kubernetes.io/tls containing the full chain of CA certificates for a given authority.
Configure Silo Environment Variables
Silo preserves the upstream MINIO_* environment-variable contract. You can supply these variables using the Secret referenced by the Tenant CRD’s spec.configuration field, or use spec.env for individual values such as MINIO_UPDATE.
Field
Description
spec.configuration.name
Specify a Kubernetes opaque Secret whose config.env key contains the upstream-compatible environment variables to set.
Use plain text under stringData.config.env, as in the v7.1.1 base template. If you use data.config.env instead, its value must be base64-encoded.
The YAML includes an object kind: Secret with metadata.name: storage-configuration that sets the root username, password, erasure parity settings, and enables Tenant Console.
Modify this as needed to reflect your Tenant requirements.
Review the Namespace
The YAML object kind: Namespace sets the default namespace for the Tenant to minio-tenant.
You can change this value to create a different namespace for the Tenant. You must change allmetadata.namespace values in the YAML file to match the Namespace.
Deploy the Tenant
Use the kubectl apply -f command to deploy the Tenant.
kubectl apply -f tenant-base.yaml
The command creates each of the resources specified in the YAML object at the configured namespace.
You can monitor the progress using the following command:
watch kubectl get all -n minio-tenant
Expose the Tenant S3 API port
To test the Silo client mc from your local machine, forward the S3 API port and create an alias.
MinIO Operator creates Kubernetes Services for the Silo Tenant. Their generated names remain part of the Operator contract.
Use the kubectl get svc -n NAMESPACE command to review the deployed services. For Kubernetes services which use a custom kubectl analog, you can substitute the name of that program.
kubectl get svc -n minio-tenant-1
NAME                               TYPE           CLUSTER-IP       EXTERNAL-IP   PORT(S)          AGE
minio                              LoadBalancer   10.97.114.60     <pending>     443:30979/TCP    2d3h
TENANT-NAMESPACE-console           LoadBalancer   10.106.103.247   <pending>     9443:32095/TCP   2d3h
TENANT-NAMESPACE-hl                ClusterIP      None             <none>        9000/TCP         2d3h
The minio service exposes the Tenant S3 API. Applications should use this service for S3 operations against Silo.
The *-console service exposes the Silo Console. Administrators can use this service for browser-based management.
The remaining services support Tenant operations and are not intended for consumption by users or administrators.
By default each service is visible only within the Kubernetes cluster. Applications deployed inside the cluster can access the services using the CLUSTER-IP.
Applications external to the Kubernetes cluster can access the services using the EXTERNAL-IP. This value is only populated for Kubernetes clusters configured for Ingress or a similar network access service. Kubernetes provides multiple options for configuring external access to services.
For specific flavors of Kubernetes, such as OpenShift or Rancher, defer to the service documentation on the preferred or available methods of exposing Services to internal or external access.
2.2 - Deploy Operator With Helm
Overview
Helm is a tool for automating the deployment of applications to Kubernetes clusters. A Helm chart is a set of YAML files, templates, and other files that define the deployment details. The following procedure uses a Helm Chart to install the MinIO Kubernetes Operator to a Kubernetes cluster.
Warning
The upstream MinIO Operator repository was archived on March 20, 2026. This procedure is pinned to its final release, v7.1.1, as a frozen compatibility baseline. It does not imply ongoing upstream maintenance or support; validate it against your Kubernetes platform before production use.
Prerequisites
See the Operator Prerequisites for a baseline of requirements. Helm installations have the following additional requirements:
Helm (Use the Version appropriate for your Kubernetes API version)
For more about Operator installation requirements, including supported Kubernetes versions and TLS certificates, see the Operator deployment prerequisites.
This procedure assumes familiarity with the referenced Kubernetes concepts and utilities. While this documentation may provide guidance for configuring or deploying Kubernetes-related resources on a best-effort basis, it is not a replacement for the official Kubernetes Documentation.
Install the MinIO Operator using Helm Charts
The following procedure installs the Operator using the MinIO Operator Chart Repository. This method supports a simplified installation path compared to the local chart installation. You can modify the Operator deployment after installation.
Warning
Important
If you use Helm charts to install the Operator, you must use Helm to manage that installation. Do not use kubectl krew, Kustomize, or similar methods to update or manage the MinIO Operator installation.
Add the MinIO Operator Repo to Helm
The archived project repository endpoint at https://operator.min.io currently serves the v7.1.1 charts. Add this repository to Helm:
You can validate the repo contents using helm search:
helm search repo minio-operator
The response should resemble the following:
NAME                            CHART VERSION   APP VERSION     DESCRIPTION
minio-operator/minio-operator   4.3.7           v4.3.7          A Helm chart for MinIO Operator
minio-operator/operator         7.1.1           v7.1.1          A Helm chart for MinIO Operator
minio-operator/tenant           7.1.1           v7.1.1          A Helm chart for MinIO Operator
The minio-operator/minio-operator is a legacy chart and should not be installed under normal circumstances.
Install the Operator
Run the helm install command to install the Operator. The following command specifies and creates a dedicated namespace minio-operator for installation. MinIO strongly recommends using a dedicated namespace for the Operator.
Check the contents of the specified namespace (minio-operator) to ensure all pods and services have started successfully.
kubectl get all -n minio-operator
The response should resemble the following:
NAME READY STATUS RESTARTS AGE
pod/minio-operator-699f797b8b-th5bk 1/1 Running 0 25h
pod/minio-operator-699f797b8b-nkrn9 1/1 Running 0 25h
NAME TYPE CLUSTER-IP EXTERNAL-IP PORT(S) AGE
service/operator ClusterIP 10.43.44.204 <none> 4221/TCP 25h
service/sts ClusterIP 10.43.70.4 <none> 4223/TCP 25h
NAME READY UP-TO-DATE AVAILABLE AGE
deployment.apps/minio-operator 2/2 22 25h
NAME DESIRED CURRENT READY AGE
replicaset.apps/minio-operator-79f7bfc48 222 123m
Install the MinIO Operator using Local Helm Charts
The following procedure installs the Operator using a local copy of the Helm Charts. This method may support easier pre-configuration of the Operator compared to the repo-based installation
Download the Helm charts
On your local host, download the Operator Helm charts to a convenient directory:
The chart contains a values.yaml file you can customize to suit your needs. For details on the options available in the MinIO Operator values.yaml, see Operator Helm Charts.
For example, you can change the number of replicas for operator.replicaCount to increase or decrease pod availability in the deployment. See Operator Helm Charts for more complete documentation on the Operator Helm Chart and Values.
To verify the installation, run the following command:
kubectl get all --namespace minio-operator
If you initialized the Operator with a custom namespace, replace minio-operator with that namespace.
With the chart defaults, the namespace should contain a minio-operator Deployment with two ready replicas, an operator ClusterIP service on port 4221, and an sts ClusterIP service on port 4223. Pod hashes, cluster IPs, and ages vary by installation.
Silo is an S3-compatible object storage server that can run in Kubernetes. The final upstream MinIO Kubernetes Operator release, v7.1.1, can deploy a Tenant with the Silo image when tenant.image.repository is overridden to pgsty/silo and a tested tag or digest is pinned.
These guides assume familiarity with the referenced Kubernetes concepts, utilities, and procedures. They are not a replacement for the official Kubernetes Documentation, and the Silo project does not inherit the former MinIO vendor support matrix for Kubernetes distributions.
The MinIO Operator, its Helm charts, CRDs, and Tenant kind remain upstream contracts independent of Silo releases. The upstream minio/operator repository was archived and made read-only on 2026-03-20, so its release lifecycle is frozen and these guides are a compatibility snapshot.
The archived Operator code provides MinIO-compatible Tenant management and configuration. Validate the pinned Operator and chart against your cluster before deployment or upgrade; there is no ongoing upstream compatibility or support promise.
The CRD provides a customizable entry point for tools such as Kustomize, Helm, and kubectl to deploy and manage Silo-backed Tenants.
Warning
Important
The MinIO Operator Console UI is deprecated and removed in MinIO Operator 6.0.0.
You can continue to use standard Kubernetes approaches for MinIO Tenant management, such as Kustomize templates, Helm Charts, and kubectl commands for introspecting Tenant namespaces and resources.
2.4 - Deploy Silo on RHEL-Compatible Linux
This page documents deploying Silo on RHEL and binary-compatible Linux distributions.
Silo publishes RPM packages and standalone Linux archives for x86-64 and ARM64. The project does not publish a separate RHEL support-lifecycle matrix, so the inherited point-in-time release list has been removed. Use a distribution release still supported by its vendor, keep the kernel and system libraries current, and validate the exact storage and workload configuration before production use.
The procedure focuses on production-grade Multi-Node Multi-Drive (MNMD) “Distributed” configurations. MNMD deployments provide enterprise-grade performance, availability, and scalability and are the recommended topology for all production workloads.
The procedure includes guidance for deploying Single-Node Multi-Drive (SNMD) and Single-Node Single-Drive (SNSD) topologies in support of early development and evaluation environments.
Considerations
Review Checklists
Ensure you have reviewed our published Hardware, Software, and Security checklists before attempting this procedure.
Erasure Coding Parity
MinIO automatically determines the default erasure coding configuration for the cluster based on the total number of nodes and drives in the topology. You can configure the per-object parity setting when you set up the cluster or let MinIO select the default (EC:4 for production-grade clusters).
Parity controls the relationship between object availability and storage on disk. Use the MinIO Erasure Code Calculator for guidance in selecting the appropriate erasure code parity level for your cluster.
While you can change erasure parity settings at any time, objects written with a given parity do not automatically update to the new parity settings.
Capacity-Based Planning
MinIO recommends planning storage capacity sufficient to store at least 2 years of data before reaching 70% usage. Performing server pool expansion more frequently or on a “just-in-time” basis generally indicates an architecture or planning issue.
For example, consider an application suite expected to produce at least 100 TiB of data per year and a 3 year target before expansion. By ensuring the deployment has ~500TiB of usable storage up front, the cluster can safely meet the 70% threshold with additional buffer for growth in data storage output per year.
Consider using the MinIO Erasure Code Calculator for guidance in planning capacity around specific erasure code settings.
Procedure
1. Download the Silo RPM
Download the x86-64 or ARM64 RPM from Download & Install, verify its published checksum, and install it:
sudo dnf install ./silo-*.rpm
Current Silo releases do not publish the inherited ppc64le or s390x package variants.
2. Review the systemd Service File
The .rpm package installs the following systemd service file to /usr/lib/systemd/system/silo.service:
[Unit]Description=Silo Object Storage ServerDocumentation=https://silo.pgsty.com/docs/Wants=network-online.targetAfter=network-online.target minio.serviceConflicts=minio.serviceAssertFileIsExecutable=/usr/bin/silo[Service]Type=notifyUser=siloGroup=siloProtectProc=invisibleEnvironmentFile=-/etc/default/minioEnvironmentFile=-/etc/default/siloExecStart=/usr/bin/silo server $MINIO_OPTS $MINIO_VOLUMES# Let systemd restart this service alwaysRestart=always# Specifies the maximum file descriptor number that can be opened by this processLimitNOFILE=1048576# Turn-off memory accounting by systemd, which is buggy.MemoryAccounting=no# Specifies the maximum number of threads this process can createTasksMax=infinity# Disable timeout logic and wait until process is stoppedTimeoutSec=infinity# Disable killing of Silo by the kernel's OOM killerOOMScoreAdjust=-1000SendSIGKILL=no[Install]WantedBy=multi-user.target
3. Check the Service Account and Permissions
The package installer creates silo:silo but does not start or enable the service. For a new deployment, give that account access to the intended data and certificate directories.
When migrating MinIO, preserve the existing data owner and configure a silo.service user/group drop-in using the package migration guide. Do not recursively change existing data ownership just to rename the service. The following silo:silo examples apply to new deployments; use the selected existing account for a migration.
4. Enable TLS Connectivity
Create or provide Transport Layer Security (TLS) certificates to MinIO to automatically enable HTTPS-secured connections between the server and clients.
Place the certificates in a directory accessible by the silo user/group:
For local testing or development environments, you can use the MinIO certgen to mint self-signed certificates. For example, the following command generates a self-signed certificate with a set of IP and DNS Subject Alternate Names (SANs) associated to the MinIO Server hosts:
certgen -host "localhost,minio-*.example.net"
Place the generated public.crt and private.key into the /path/to/certs directory to enable TLS for the MinIO deployment. Applications can use the public.crt as a trusted Certificate Authority to allow connections to the MinIO deployment without disabling certificate validation.
SILO uses the operating system trust store and the configured CAs directory to verify TLS peers when connecting to other services, such as nodes and replication targets. For a private CA, place its CA certificate in /opt/minio/certs/CAs and make it readable by the service account. Enabling server TLS alone does not enable client-certificate authentication.
For more specific guidance on configuring MinIO for TLS, including multi-domain support via Server Name Indication (SNI), see Network Encryption (TLS). You can optionally skip this step to deploy without TLS enabled. MinIO strongly recommends against non-TLS deployments outside of early development.
5. Create the MinIO Environment File
Create an environment file at /etc/default/silo. The MinIO service uses this file as the source of all environment variables used by MinIO and the silo.service file.
Modify the example to reflect your deployment topology.
Multi-Node Multi-Drive
Use Multi-Node Multi-Drive (“Distributed”) deployment topologies in production environments.
# Set the hosts and volumes MinIO uses at startup# The command uses MinIO expansion notation {x...y} to denote a# sequential series.## The following example covers four MinIO hosts# with 4 drives each at the specified hostname and drive locations.## The command includes the port that each MinIO server listens on# (default 9000).# If you run without TLS, change https -> httpMINIO_VOLUMES="https://minio{1...4}.example.net:9000/mnt/disk{1...4}/minio"# Set all MinIO server command-line options## The following explicitly sets the MinIO Console listen address to# port 9001 on all network interfaces.# The default behavior is dynamic port selection.MINIO_OPTS="--console-address :9001 --certs-dir /opt/minio/certs"# Set the root username.# This user has unrestricted permissions to perform S3 and# administrative API operations on any resource in the deployment.## Defer to your organizations requirements for superadmin user name.MINIO_ROOT_USER=minioadmin
# Set the root password## Use a long, random, unique string that meets your organizations# requirements for passwords.MINIO_ROOT_PASSWORD=minio-secret-key-CHANGE-ME
Single-Node Multi-Drive
Use Single-Node Multi-Drive deployments in development and evaluation environments. You can also use them for smaller storage workloads which can tolerate data loss or unavailability due to node downtime.
# Set the volumes MinIO uses at startup# The command uses MinIO expansion notation {x...y} to denote a# sequential series.## The following specifies a single host with 4 drives at the specified location## The command includes the port that the MinIO server listens on# (default 9000).# If you run without TLS, change https -> httpMINIO_VOLUMES="https://minio1.example.net:9000/mnt/drive{1...4}/minio"# Set all MinIO server command-line options## The following explicitly sets the MinIO Console listen address to# port 9001 on all network interfaces.# The default behavior is dynamic port selection.MINIO_OPTS="--console-address :9001 --certs-dir /opt/minio/certs"# Set the root username.# This user has unrestricted permissions to perform S3 and# administrative API operations on any resource in the deployment.## Defer to your organizations requirements for superadmin user name.MINIO_ROOT_USER=minioadmin
# Set the root password## Use a long, random, unique string that meets your organizations# requirements for passwords.MINIO_ROOT_PASSWORD=minio-secret-key-CHANGE-ME
Single-Node Single-Drive
Use Single-Node Single-Drive (“Standalone”) deployments in early development and evaluation environments. MinIO does not recommend Standalone deployments in production, as the loss of the node or its storage medium results in data loss.
Warning
Important
SNSD deployments do not support storage expansion through adding new server pools.
# Set the volume MinIO uses at startup## The following specifies the drive or folder pathMINIO_VOLUMES="/mnt/drive1/minio"# Set all MinIO server command-line options## The following explicitly sets the MinIO Console listen address to# port 9001 on all network interfaces.# The default behavior is dynamic port selection.MINIO_OPTS="--console-address :9001 --certs-dir /opt/minio/certs"# Set the root username.# This user has unrestricted permissions to perform S3 and# administrative API operations on any resource in the deployment.## Defer to your organizations requirements for superadmin user name.MINIO_ROOT_USER=minioadmin
# Set the root password## Use a long, random, unique string that meets your organizations# requirements for passwords.MINIO_ROOT_PASSWORD=minio-secret-key-CHANGE-ME
Specify any other environment variables or server command-line options as required by your deployment.
For distributed deployments, all nodes must have matching /etc/default/silo environment files. Use a utility such as shasum -a 256 /etc/default/silo on each node to verify an exact match across all nodes.
6. Start the MinIO Deployment
Use systemctl start silo to start each node in the deployment.
You can track the status of the startup using journalctl -u silo on each node.
On successful startup, the MinIO process emits a summary of the deployment that resembles the following output:
You may see increased log churn as the cluster starts up and synchronizes.
Common reasons for startup failure include:
The MinIO process does not have read-write-list access to the specified drives
The drives are not empty or contain non-MinIO data
The drives are not formatted or mounted properly
One or more hosts are not reachable over the network
Following our checklists typically mitigates the risk of encountering those or similar issues.
7. Connect to the Deployment
Console
Open your browser and access any of the MinIO hostnames at port :9001 to open the MinIO Console login page. For example, https://minio1.example.com:9001.
Log in with the MINIO_ROOT_USER and MINIO_ROOT_PASSWORD from the previous step.
You can use the MinIO Console for general administration tasks like Identity and Access Management, Metrics and Log Monitoring, or Server Configuration. Each MinIO server includes its own embedded MinIO Console.
CLI
Follow the installation instructions for mcli on your local host. Run mcli --version to verify the installation. Substitute the installed mcli for the mc examples below; the arguments are unchanged.
If your MinIO deployment uses third-party or self-signed TLS certificates, copy the CA files to ~/.mc/certs/CAs to allow mc
Once installed, create an alias for the MinIO deployment:
mc aliasset myminio https://minio-1.example.net:9000 USERNAME PASSWORD
Change the hostname, username, and password to reflect your deployment. The hostname can be any MinIO node in the deployment. You can also specify the hostname load balancer, reverse proxy, or similar network control plane that handles connections to the deployment.
8. Next Steps
Enable TLS before exposing the service beyond a trusted network.
Configure monitoring and alerting, then test drive, node, and site recovery procedures before production use.
2.5 - Install the Silo Server
Install Silo on a physical machine or virtualized host using the current server artifacts and the platform-specific instructions in this section. The executable, service, package, and environment-variable contracts retain their MinIO-compatible names.
2.6 - Installation and Management
Silo deployment topologies and installation instructions
This section documents installing and managing the AGPLv3-licensed Silo object storage server on Kubernetes and bare-metal or virtualized infrastructure.
The minio executable, MINIO_* environment variables, S3 and Admin APIs, on-disk format, and MinIO Operator resource names are compatibility contracts. The prose uses the Silo brand, while commands and identifiers retain their compatible names.
Silo is an S3-compatible, software-defined distributed object storage server. The download page is the source of truth for currently published operating-system and architecture artifacts.
Silo uses Erasure Coding for object data. You can deploy it using one of the following topologies:
Multi Node/Drive level reliability with configurable tolerance for loss of up to 1/2 all nodes/drives
Primary storage for AI/ML, Distributed Query, Analytics, and other Data Lake components
Scalable for Petabyte+ workloads - both storage capacity and performance
Kubernetes
The archived MinIO Kubernetes Operator v7.1.1 can manage Tenant resources that run a Silo server image. The Operator, its charts, CRDs, and Tenant kind retain their upstream names; its upstream release lifecycle is now frozen.
These retained Operator guides describe a compatibility snapshot. The upstream repository was archived on 2026-03-20, so verify v7.1.1 against your Kubernetes distribution and override the Tenant image to docker.io/pgsty/silo; the Silo project does not claim the former upstream vendor’s platform support matrix.
Silo can run on physical machines, virtualized hosts, or in a container. Consult the current download matrix and each platform page for the verified artifact and scope.
Published artifacts do not establish equal production validation across platforms. Prefer a tested Linux or Kubernetes deployment for long-running workloads, pin exact package/image versions, and validate storage, failure domains, upgrade, and recovery behavior for the chosen topology.
2.7 - MinIO Kubernetes Operator
Silo is an S3-compatible object store. MinIO Operator is an upstream Kubernetes component whose repository was archived and made read-only on 2026-03-20. Its final release, v7.1.1, can manage a Silo server image through the Tenant CRD. The Operator name, API groups, CRD kinds, resource names, image names, and environment variables remain upstream contracts and are not rebranded here.
The pinned v7.1.1 Kustomize manifest deploys the Operator in the minio-operator namespace as one minio-operator Deployment with two controller replicas. It does not deploy a separate Operator Console pod.
This site verifies the Silo image override used by its deployment examples. The archived Operator has no ongoing upstream platform-support or commercial-support commitment, and this site does not create one.
See the pinned MinIO Operator v7.1.1 CRD Reference for the upstream CRD contract.
Operator Prerequisites
Kubernetes Version
The archived v7.1.1 README requires Kubernetes 1.30.0 or later. Use a currently maintained Kubernetes release whose APIs remain compatible, and validate the exact combination in your own cluster. See the maintained Kubernetes releases and the Operator v7.1.1 release; Silo does not publish a broader Kubernetes support matrix.
Kubernetes infrastructure running end-of-life API versions may exhibit unexpected or undesired behavior if used for deploying the Operator.
Kustomize and kubectl
Kustomize is a YAML-based templating tool that allows you to define Kubernetes resources in a declarative and repeatable fashion. Kustomize is included with the kubectl command line tool.
This procedure assumes that your local host machine has both the matching version of kubectl for your Kubernetes cluster and the necessary access to that cluster to create new resources.
The pinned MinIO Operator v7.1.1 Kustomize template provides a reproducible starting point. You can modify that Kustomization file or apply your own patches for your cluster. Do not infer that a newer supported upstream release exists; review any fork or replacement independently.
Kubernetes TLS Certificate API
The MinIO Operator manages TLS Certificate Signing Requests (CSR) using the Kubernetes certificates.k8s.ioTLS certificate management API to create signed TLS certificates in the following circumstances:
The MinIO Operator reads certificates inside the operator-ca-tls secret and syncs this secret within the tenant namespace to trust private certificate authorities, such as when using cert-manager.
For any of these circumstances, the MinIO Operator requires that the Kubernetes kube-controller-manager configuration include the following configuration settings:
--cluster-signing-key-file - Specify the PEM-encoded RSA or ECDSA private key used to sign cluster-scoped certificates.
--cluster-signing-cert-file - Specify the PEM-encoded x.509 Certificate Authority certificate used to issue cluster-scoped certificates.
The Kubernetes TLS API uses the CA signature algorithm when generating a new certificate. ECDSA (for example, the NIST P-256 curve) or EdDSA (for example, Curve25519) can require less computation than RSA. See Supported TLS Cipher Suites for the Silo server’s supported suites.
If the Kubernetes cluster is not configured to respond to a generated CSR, the Operator cannot complete initialization. Some Kubernetes providers do not specify these configuration values by default.
To check whether the kube-controller-manager specifies the cluster signing key and certificate files, use the following command:
kubectl get pod kube-controller-manager-$CLUSTERNAME-control-plane \
  -n kube-system -o yaml
Replace $CLUSTERNAME with the name of the Kubernetes cluster.
Confirm that the output contains the highlighted lines. The output of the example command above may differ from the output in your terminal:
MinIO Operator can generate TLS certificates for Tenant pods using the specified Certificate Authority (CA). Clients external to the Kubernetes cluster must trust that CA to connect to the Silo Tenant endpoints.
Disabling TLS validation is suitable only for controlled testing. Production clients should trust the issuing CA or use certificates issued by a CA they already trust.
Alternatively, generate x.509 TLS certificates signed by a known and trusted CA and pass those certificates through the Tenant CRD. See Network Encryption (TLS) for more complete documentation.
2.8 - Deploy a Silo Tenant with Helm Charts
Overview
Helm is a tool for automating the deployment of applications to Kubernetes clusters. A Helm chart is a set of YAML files, templates, and other files that define the deployment details. The following procedure uses a Helm Chart to deploy a Tenant managed by the MinIO Operator.
This procedure requires the Kubernetes cluster have a valid Operator deployment. You cannot use the MinIO Operator Tenant chart to deploy a Tenant independent of the Operator.
Warning
Important
The MinIO Operator Tenant Chart is distinct from the server repository’s legacy community MinIO Chart. This guide uses the Operator Tenant Chart because it exposes an explicit Tenant image override. The upstream Operator repository was archived on March 20, 2026, so this guide pins its final v7.1.1 chart as a frozen compatibility baseline. Silo does not inherit upstream vendor support commitments.
Prerequisites
You must meet the following requirements to install a MinIO Tenant with Helm:
An existing Kubernetes cluster
The kubectl CLI tool on your local host with version matching the cluster.
This procedure assumes your Kubernetes cluster access grants you broad administrative permissions.
For more about Tenant installation requirements, including supported Kubernetes versions and TLS certificates, see the Tenant deployment prerequisites.
This procedure assumes familiarity with the referenced Kubernetes concepts and utilities. While this documentation may provide guidance for configuring or deploying Kubernetes-related resources on a best-effort basis, it is not a replacement for the official Kubernetes Documentation.
Namespace
The tenant must use its own namespace and cannot share a namespace with another tenant. In addition, MinIO strongly recommends using a dedicated namespace for the tenant with no other applications running in the namespace.
Deploy a Silo Tenant using Helm Charts
The following procedure deploys a MinIO Tenant using the MinIO Operator Chart Repository. This method supports a simplified installation path compared to the local chart installation.
The following procedure uses Helm to deploy a MinIO Tenant with the archived upstream Tenant Chart at v7.1.1.
Warning
Important
If you use Helm to deploy a MinIO Tenant, you must use Helm to manage or upgrade that deployment. Do not use kubectl krew, Kustomize, or similar methods to manage or upgrade the MinIO Tenant.
This procedure is not exhaustive of all possible configuration options available in the Tenant Chart. It provides a baseline from which you can modify and tailor the Tenant to your requirements.
Verify your MinIO Operator Repo Configuration
The archived project’s endpoint at https://operator.min.io currently serves the v7.1.1 chart. If the repository does not already exist in your local Helm configuration, add it before continuing:
You can validate the repo contents using helm search:
helm search repo minio-operator
The response should resemble the following:
NAME                            CHART VERSION   APP VERSION     DESCRIPTION
minio-operator/minio-operator   4.3.7           v4.3.7          A Helm chart for MinIO Operator
minio-operator/operator         7.1.1           v7.1.1          A Helm chart for MinIO Operator
minio-operator/tenant           7.1.1           v7.1.1          A Helm chart for MinIO Operator
Create a local copy of the Helm values.yaml for modification
Open values.yaml in your preferred text editor. Before continuing, replace the upstream server image defaults and disable the inherited in-place updater:
Use a newer tag only after it is published on the Silo download page and validated for your deployment. Do not leave quay.io/minio/minio or latest in a Silo production values file.
Configure the Tenant topology
The following fields share the tenant.pools[0] prefix and control the number of servers, volumes per server, and storage class of all pods deployed in the Tenant:
Field
Description
servers
The number of MinIO pods to deploy in the Server Pool.
volumesPerServer
The number of persistent volumes to attach to each MinIO pod (servers).
The Operator generates volumesPerServer x servers Persistent Volume Claims for the Tenant.
storageClassName
The Kubernetes storage class to associate with the generated Persistent Volume Claims.
If no storage class exists matching the specified value or if the specified storage class cannot meet the requested number of PVCs or storage capacity, the Tenant may fail to start.
size
The amount of storage to request for each generated PVC.
Configure Tenant Affinity or Anti-Affinity
The Tenant Chart supports the following Kubernetes Selector, Affinity and Anti-Affinity configurations:
Node Selector (tenant.nodeSelector)
Node/Pod Affinity or Anti-Affinity (spec.pools[n].affinity)
MinIO recommends configuring Tenants with Pod Anti-Affinity to ensure that the Kubernetes schedule does not schedule multiple pods on the same worker node.
If you have specific worker nodes on which you want to deploy the tenant, pass those node labels or filters to the nodeSelector or affinity field to constrain the scheduler to place pods on those nodes.
Configure Network Encryption
The MinIO Tenant CRD provides the following fields with which you can configure tenant TLS network encryption:
Customize the behavior of automatic TLS, if enabled.
tenant.certificate.externalCertSecret
Enable TLS for multiple hostnames via Server Name Indication (SNI).
Specify one or more Kubernetes secrets of type kubernetes.io/tls or cert-manager.
tenant.certificate.externalCACertSecret
Enable validation of client TLS certificates signed by unknown, third-party, or internal Certificate Authorities (CA).
Specify one or more Kubernetes secrets of type kubernetes.io/tls containing the full chain of CA certificates for a given authority.
Configure Silo Environment Variables
You can set the server’s MINIO_* environment variables using the tenant.configuration field. These names are MinIO-compatible contracts and must not be renamed.
Field
Description
tenant.configuration
Specify a Kubernetes opaque secret whose data payload config.env contains each MinIO environment variable you want to set.
The config.env data payload must be a base64-encoded string.
You can create a local file, set your environment variables, and then use cat LOCALFILE | base64 to create the payload.
The YAML includes an object kind: Secret with metadata.name: storage-configuration that sets the root username, password, erasure parity settings, and enables Tenant Console.
Modify this as needed to reflect your Tenant requirements.
Deploy the Tenant
Use helm to install the Tenant Chart using your values.yaml as an override:
mc aliasset myminio https://localhost:9000 minio minio123 --insecure
You can use mc mb to create a bucket on the Tenant:
mc mb myminio/mybucket --insecure
If you deployed your MinIO Tenant using TLS certificates minted by a trusted Certificate Authority (CA) you can omit the --insecure flag.
See Connect to the Tenant for additional documentation on external connectivity to the Tenant.
Deploy a Tenant using a Local Helm Chart
The following procedure deploys a Tenant using a local copy of the Helm Charts. This method may support easier pre-configuration of the Tenant compared to the repo-based installation.
Download the Helm charts
On your local host, pull the pinned Tenant chart and extract its default values into a separate override file:
Each chart contains a values.yaml file you can customize to suit your needs. For details on the options available in the MinIO Tenant values.yaml, see Tenant Helm Charts.
Open values.yaml in your preferred text editor. Set tenant.image.repository to pgsty/silo, pin tenant.image.tag to a published Silo release, and add MINIO_UPDATE=off to tenant.env, exactly as shown in the repository-based procedure.
Configure the Tenant topology
The following fields share the tenant.pools[0] prefix and control the number of servers, volumes per server, and storage class of all pods deployed in the Tenant:
Field
Description
servers
The number of MinIO pods to deploy in the Server Pool.
volumesPerServer
The number of persistent volumes to attach to each MinIO pod (servers).
The Operator generates volumesPerServer x servers Persistent Volume Claims for the Tenant.
storageClassName
The Kubernetes storage class to associate with the generated Persistent Volume Claims.
If no storage class exists matching the specified value or if the specified storage class cannot meet the requested number of PVCs or storage capacity, the Tenant may fail to start.
size
The amount of storage to request for each generated PVC.
Configure Tenant Affinity or Anti-Affinity
The Tenant Chart supports the following Kubernetes Selector, Affinity and Anti-Affinity configurations:
Node Selector (tenant.nodeSelector)
Node/Pod Affinity or Anti-Affinity (spec.pools[n].affinity)
MinIO recommends configuring Tenants with Pod Anti-Affinity to ensure that the Kubernetes schedule does not schedule multiple pods on the same worker node.
If you have specific worker nodes on which you want to deploy the tenant, pass those node labels or filters to the nodeSelector or affinity field to constrain the scheduler to place pods on those nodes.
Configure Network Encryption
The MinIO Tenant CRD provides the following fields from which you can configure tenant TLS network encryption:
Controls the settings for automatic TLS. Requires spec.requestAutoCert: true
tenant.certificate.externalCertSecret
Specify one or more Kubernetes secrets of type kubernetes.io/tls or cert-manager. MinIO uses these certificates for performing TLS handshakes based on hostname (Server Name Indication).
tenant.certificate.externalCACertSecret
Specify one or more Kubernetes secrets of type kubernetes.io/tls with the Certificate Authority (CA) chains which the Tenant must trust for allowing client TLS connections.
Configure Silo Environment Variables
You can set the server’s MINIO_* environment variables using the tenant.configuration field. These names remain compatibility contracts.
The field must specify a Kubernetes opaque secret whose data payload config.env contains each MinIO environment variable you want to set.
The YAML includes an object kind: Secret with metadata.name: storage-configuration that sets the root username, password, erasure parity settings, and enables Tenant Console.
Modify this as needed to reflect your Tenant requirements.
The following Helm command creates a Silo Tenant using the pinned local chart and reviewed values:
To deploy more than one Tenant, create a Helm chart with the details of the new Tenant and repeat the deployment steps. Redeploying the same chart updates the previously deployed Tenant.
Expose the Tenant MinIO port
To test the MinIO Client mc from your local machine, forward the MinIO port and create an alias.
mc aliasset myminio https://localhost:9000 minio minio123 --insecure
This example uses HTTPS with a certificate that the local client may not trust, so it includes --insecure. If the Tenant presents a certificate trusted by the client, omit that flag. Confirm the service name generated for your Tenant instead of assuming a fixed svc/minio name.
You can use mc mb to create a bucket on the Tenant:
mc mb myminio/mybucket --insecure
See Connect to the Tenant for additional documentation on external connectivity to the Tenant.
2.9 - Deploy Silo on Bare Metal
Silo can run on physical machines, virtualized hosts, or in a container. The current download page publishes server artifacts for Linux, macOS, and Windows on x86-64 and ARM64; follow the platform-specific notes instead of assuming the same production validation on every operating system.
This page documents deploying Silo on Ubuntu Linux.
Silo publishes DEB packages and standalone Linux archives for x86-64 and ARM64. The project does not publish a separate Ubuntu support-lifecycle matrix, so the inherited point-in-time release list has been removed. Use an Ubuntu release still supported by its distributor, keep the kernel and system libraries current, and validate the exact storage and workload configuration before production use.
The procedure focuses on production-grade Multi-Node Multi-Drive (MNMD) “Distributed” configurations. MNMD deployments provide enterprise-grade performance, availability, and scalability and are the recommended topology for all production workloads.
The procedure includes guidance for deploying Single-Node Multi-Drive (SNMD) and Single-Node Single-Drive (SNSD) topologies in support of early development and evaluation environments.
Considerations
Review Checklists
Ensure you have reviewed our published Hardware, Software, and Security checklists before attempting this procedure.
Erasure Coding Parity
MinIO automatically determines the default erasure coding configuration for the cluster based on the total number of nodes and drives in the topology. You can configure the per-object parity setting when you set up the cluster or let MinIO select the default (EC:4 for production-grade clusters).
Parity controls the relationship between object availability and storage on disk. Use the MinIO Erasure Code Calculator for guidance in selecting the appropriate erasure code parity level for your cluster.
While you can change erasure parity settings at any time, objects written with a given parity do not automatically update to the new parity settings.
Capacity-Based Planning
MinIO recommends planning storage capacity sufficient to store at least 2 years of data before reaching 70% usage. Performing server pool expansion more frequently or on a “just-in-time” basis generally indicates an architecture or planning issue.
For example, consider an application suite expected to produce at least 100 TiB of data per year and a 3 year target before expansion. By ensuring the deployment has ~500TiB of usable storage up front, the cluster can safely meet the 70% threshold with additional buffer for growth in data storage output per year.
Consider using the MinIO Erasure Code Calculator for guidance in planning capacity around specific erasure code settings.
Procedure
1. Download the Silo DEB
Download the DEB for your architecture from Download & Install, verify its published checksum, and install it. Use the arm64 filename on ARM64 hosts.
sudo dpkg -i ./silo_*_amd64.deb
2. Review the systemd Service File
The .deb package install the following systemd service file to /usr/lib/systemd/system/silo.service:
[Unit]Description=Silo Object Storage ServerDocumentation=https://silo.pgsty.com/docs/Wants=network-online.targetAfter=network-online.target minio.serviceConflicts=minio.serviceAssertFileIsExecutable=/usr/bin/silo[Service]Type=notifyUser=siloGroup=siloProtectProc=invisibleEnvironmentFile=-/etc/default/minioEnvironmentFile=-/etc/default/siloExecStart=/usr/bin/silo server $MINIO_OPTS $MINIO_VOLUMES# Let systemd restart this service alwaysRestart=always# Specifies the maximum file descriptor number that can be opened by this processLimitNOFILE=1048576# Turn-off memory accounting by systemd, which is buggy.MemoryAccounting=no# Specifies the maximum number of threads this process can createTasksMax=infinity# Disable timeout logic and wait until process is stoppedTimeoutSec=infinity# Disable killing of Silo by the kernel's OOM killerOOMScoreAdjust=-1000SendSIGKILL=no[Install]WantedBy=multi-user.target
3. Check the Service Account and Permissions
The package installer creates silo:silo but does not start or enable the service. For a new deployment, give that account access to the intended data and certificate directories.
When migrating MinIO, preserve the existing data owner and configure a silo.service user/group drop-in using the package migration guide. Do not recursively change existing data ownership just to rename the service. The following silo:silo examples apply to new deployments; use the selected existing account for a migration.
4. Enable TLS Connectivity
You can skip this step to deploy without TLS enabled. MinIO strongly recommends against non-TLS deployments outside of early development.
Create or provide Transport Layer Security (TLS) certificates to MinIO to automatically enable HTTPS-secured connections between the server and clients.
MinIO expects the default certificate names of private.key and public.crt for the private and public keys respectively. Place the certificates in a directory accessible by the silo user/group:
SILO uses the operating system trust store and the configured CAs directory to verify TLS peers when connecting to other services, such as nodes and replication targets. For a private CA, place its CA certificate in /opt/minio/certs/CAs and make it readable by the service account. Enabling server TLS alone does not enable client-certificate authentication.
For more specific guidance on configuring MinIO for TLS, including multi-domain support via Server Name Indication (SNI), see Network Encryption (TLS).
Certificates for Early Development
For local testing or development environments, you can use the MinIO certgen to mint self-signed certificates. For example, the following command generates a self-signed certificate with a set of IP and DNS Subject Alternate Names (SANs) associated to the MinIO Server hosts:
certgen -host "localhost,minio-*.example.net"
Place the generated public.crt and private.key into the /path/to/certs directory to enable TLS for the MinIO deployment. Applications can use the public.crt as a trusted Certificate Authority to allow connections to the MinIO deployment without disabling certificate validation.
5. Create the MinIO Environment File
Create an environment file at /etc/default/silo. The MinIO service uses this file as the source of all environment variables used by MinIO and the silo.service file.
Modify the example to reflect your deployment topology.
Multi-Node Multi-Drive
Use Multi-Node Multi-Drive (“Distributed”) deployment topologies in production environments.
# Set the hosts and volumes MinIO uses at startup# The command uses MinIO expansion notation {x...y} to denote a# sequential series.## The following example covers four MinIO hosts# with 4 drives each at the specified hostname and drive locations.## The command includes the port that each MinIO server listens on# (default 9000).# If you run without TLS, change https -> httpMINIO_VOLUMES="https://minio{1...4}.example.net:9000/mnt/disk{1...4}/minio"# Set all MinIO server command-line options## The following explicitly sets the MinIO Console listen address to# port 9001 on all network interfaces.# The default behavior is dynamic port selection.MINIO_OPTS="--console-address :9001 --certs-dir /opt/minio/certs"# Set the root username.# This user has unrestricted permissions to perform S3 and# administrative API operations on any resource in the deployment.## Defer to your organizations requirements for superadmin user name.MINIO_ROOT_USER=minioadmin
# Set the root password## Use a long, random, unique string that meets your organizations# requirements for passwords.MINIO_ROOT_PASSWORD=minio-secret-key-CHANGE-ME
Single-Node Multi-Drive
Use Single-Node Multi-Drive deployments in development and evaluation environments. You can also use them for smaller storage workloads which can tolerate data loss or unavailability due to node downtime.
# Set the volumes MinIO uses at startup# The command uses MinIO expansion notation {x...y} to denote a# sequential series.## The following specifies a single host with 4 drives at the specified location## The command includes the port that the MinIO server listens on# (default 9000).# If you run without TLS, change https -> httpMINIO_VOLUMES="https://minio1.example.net:9000/mnt/drive{1...4}/minio"# Set all MinIO server command-line options## The following explicitly sets the MinIO Console listen address to# port 9001 on all network interfaces.# The default behavior is dynamic port selection.MINIO_OPTS="--console-address :9001 --certs-dir /opt/minio/certs"# Set the root username.# This user has unrestricted permissions to perform S3 and# administrative API operations on any resource in the deployment.## Defer to your organizations requirements for superadmin user name.MINIO_ROOT_USER=minioadmin
# Set the root password## Use a long, random, unique string that meets your organizations# requirements for passwords.MINIO_ROOT_PASSWORD=minio-secret-key-CHANGE-ME
Single-Node Single-Drive
Use Single-Node Single-Drive (“Standalone”) deployments in early development and evaluation environments. MinIO does not recommend Standalone deployments in production, as the loss of the node or its storage medium results in data loss.
Warning
Important
SNSD deployments do not support storage expansion through adding new server pools.
# Set the volume MinIO uses at startup## The following specifies the drive or folder pathMINIO_VOLUMES="/mnt/drive1/minio"# Set all MinIO server command-line options## The following explicitly sets the MinIO Console listen address to# port 9001 on all network interfaces.# The default behavior is dynamic port selection.MINIO_OPTS="--console-address :9001 --certs-dir /opt/minio/certs"# Set the root username.# This user has unrestricted permissions to perform S3 and# administrative API operations on any resource in the deployment.## Defer to your organizations requirements for superadmin user name.MINIO_ROOT_USER=minioadmin
# Set the root password## Use a long, random, unique string that meets your organizations# requirements for passwords.MINIO_ROOT_PASSWORD=minio-secret-key-CHANGE-ME
Specify any other environment variables or server command-line options as required by your deployment.
For distributed deployments, all nodes must have matching /etc/default/silo environment files. Use a utility such as shasum -a 256 /etc/default/silo on each node to verify an exact match across all nodes.
6. Start the MinIO Deployment
Use systemctl start silo to start each node in the deployment.
You can track the status of the startup using journalctl -u silo on each node.
On successful startup, the MinIO process emits a summary of the deployment that resembles the following output:
You may see increased log churn as the cluster starts up and synchronizes.
Common reasons for startup failure include:
The MinIO process does not have read-write-list access to the specified drives
The drives are not empty or contain non-MinIO data
The drives are not formatted or mounted properly
One or more hosts are not reachable over the network
Following our checklists typically mitigates the risk of encountering those or similar issues.
7. Connect to the Deployment
Console
Open your browser and access any of the MinIO hostnames at port :9001 to open the MinIO Console login page. For example, https://minio1.example.com:9001.
Log in with the MINIO_ROOT_USER and MINIO_ROOT_PASSWORD from the previous step.
You can use the MinIO Console for general administration tasks like Identity and Access Management, Metrics and Log Monitoring, or Server Configuration. Each MinIO server includes its own embedded MinIO Console.
CLI
Follow the installation instructions for mcli on your local host. Run mcli --version to verify the installation. Substitute the installed mcli for the mc examples below; the arguments are unchanged.
If your MinIO deployment uses third-party or self-signed TLS certificates, copy the CA files to ~/.mc/certs/CAs to allow mc
Once installed, create an alias for the MinIO deployment:
mc aliasset myminio https://minio-1.example.net:9000 USERNAME PASSWORD
Change the hostname, username, and password to reflect your deployment. The hostname can be any MinIO node in the deployment. You can also specify the hostname load balancer, reverse proxy, or similar network control plane that handles connections to the deployment.
8. Next Steps
Enable TLS before exposing the service beyond a trusted network.
Your Kubernetes infrastructure must meet the following prerequisites for deploying MinIO Tenants.
MinIO Kubernetes Operator
The procedures on this page require a valid installation of the MinIO Kubernetes Operator and assume the local host has a matching Operator installation. They use v7.1.1, the final upstream release before the repository was archived, as a frozen compatibility baseline.
The Worker Nodes should meet MinIO’s hardware checklist for production environments.
Avoid colocating MinIO tenants on worker nodes that host other high-performance software. Where colocation is necessary, configure appropriate limits and constraints to guarantee MinIO access to the required compute and storage resources.
Persistent Volumes
Note
Exclusive access to drives
MinIO requiresexclusive access to the drives or volumes provided for object storage. No other processes, software, scripts, or persons should perform any actions directly on the drives or volumes provided to MinIO or the objects or files MinIO places on them.
Unless directed by MinIO Engineering, do not use scripts or tools to directly modify, delete, or move any of the data shards, parity shards, or metadata files on the provided drives, including from one drive or node to another. Such operations are very likely to result in widespread corruption and data loss beyond MinIO’s ability to heal.
MinIO can typically use any Kubernetes Persistent Volume (PV) that supports the ReadWriteOnce access mode. MinIO’s consistency guarantees require the exclusive storage access that ReadWriteOnce provides. Additionally, MinIO recommends setting a reclaim policy of Retain for the PVC StorageClass. Where possible, configure the Storage Class, CSI, or other provisioner underlying the PV to format volumes as XFS to ensure best performance.
For Kubernetes clusters where nodes have Direct Attached Storage, MinIO strongly recommends using the DirectPV CSI driver. DirectPV provides a distributed persistent volume manager that can discover, format, mount, schedule, and monitor drives across Kubernetes nodes. DirectPV addresses the limitations of manually provisioning and monitoring local persistent volumes.
For Tenants deploying onto Amazon Elastic, Azure, or Google Kubernetes, select the tabs below for specific guidance on PV configuration:
Amazon EKS
MinIO Tenants on EKS must use the EBS CSI Driver to provision the necessary underlying persistent volumes. MinIO strongly recommends using SSD-backed EBS volumes for best performance. MinIO strongly recommends deploying EBS-based PVs with the XFS filesystem. Create a StorageClass for the MinIO EBS PVs and set the csi.storage.k8s.io/fstypeparameter to xfs .
MinIO recommends the following GKE CSI Driver storage classes:
standard-rwo (Balanced Persistent SSD)
premium-rwo (Performance Persistent SSD)
MinIO strongly recommends SSD-backed disk types for best performance. For more information on GKE disk types, see Persistent Disks.
Azure AKS
MinIO Tenants on AKS should use the Azure Disks CSI driver to provision the necessary underlying persistent volumes.
MinIO recommends the following AKS CSI Driver storage classes:
managed-csi (Standard SSD)
managed-csi-premium (Premium SSD)
MinIO strongly recommends SSD-backed disk types for best performance. For more information on AKS disk types, see Azure disk types.
Tenant Namespace
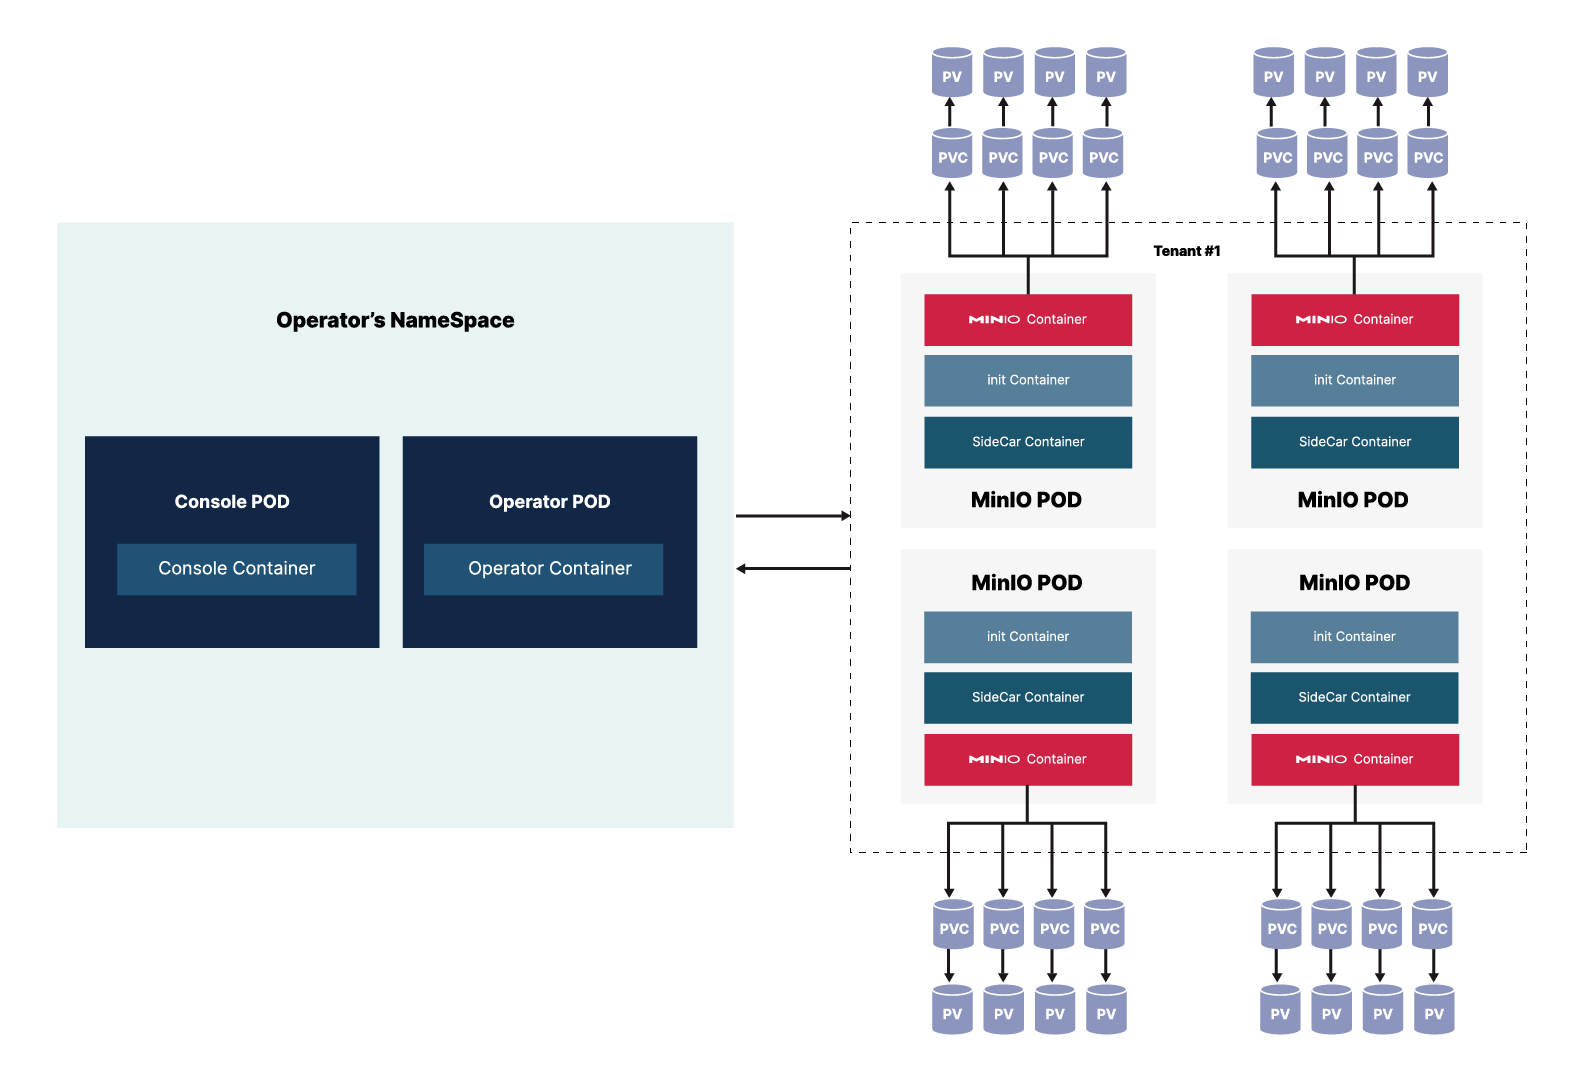
When you use the Operator to create a tenant, the tenant must have its own namespace. Within that namespace, the Operator generates the pods required by the tenant configuration.
Each Tenant pod runs three containers:
MinIO Container that runs all of the standard MinIO functions, equivalent to basic MinIO installation on baremetal. This container stores and retrieves objects in the provided mount points (persistent volumes).
InitContainer that only exists during the launch of the pod to manage configuration secrets during startup. Once startup completes, this container terminates.
SideCar container that monitors configuration secrets for the tenant and updates them as they change. This container also monitors for root credentials and creates an error if it does not find root credentials.
Starting with v5.0.6, the MinIO Operator supports custom init containers for additional pod initialization that may be required for your environment.
The tenant utilizes Persistent Volume Claims to talk to the Persistent Volumes that store the objects.
2.12 - Upgrade a Silo Deployment
Warning
Legacy upstream upgrades
If the deployment still runs an upstream MinIO release older than RELEASE.2024-03-30T09-41-56Z with AD/LDAP enabled, read the upstream notes for RELEASE.2024-04-18T19-09-19Z and complete its migration steps before moving to Silo. These names and links identify upstream release contracts and are intentionally retained.
Upgrade Silo by installing a verified server artifact on every node and then restarting the deployment as one coordinated operation. A full-cluster restart creates a brief availability interruption. Applications should retry failed or interrupted requests; operation atomicity does not remove the need for retry handling.
This page covers systemctl-managed and manually managed bare-metal deployments. When Ansible, Terraform, containers, or another orchestrator owns the service, apply the same release, verification, and restart boundaries through that tool instead of editing its managed files by hand.
Verify the artifact. Check its SHA-256 digest against the checksum published with that exact release. Pin one release across all nodes.
Read every intervening release note. Pay particular attention to format, identity, configuration, and downgrade warnings.
Test the exact upgrade in a lower environment. Exercise representative reads, writes, policies, lifecycle rules, replication, notifications, and recovery procedures before production.
Upgrade through packages or artifacts. SILO permanently disables in-place updates; the compatibility variable MINIO_UPDATE cannot re-enable them.
Check bucket-scoped policies for object-only resources. In the exported IAM configuration, look for statements that grant one of twelve bucket-level write actions — or s3:* — on a resource pattern containing /, with no bare bucket ARN for the same bucket. Those statements no longer authorize those actions. Add the bare ARN alongside the object pattern; see Bucket and Object Resources. Built-in policies and any statement using arn:aws:s3:::* are unaffected.
Caution
Do not use mc admin update ALIAS for Silo
Current SILO rejects in-place updates and does not download an upstream server. MINIO_UPDATE remains only for configuration compatibility. Replace verified packages or binaries as described below; the client command mc update is also disabled.
systemctl-Managed Deployments
Download the same published server release for every node from Download & Install, then verify its checksum.
Install the package or replace the binary on every node without restarting only part of the cluster:
RPM (RHEL family)
sudo dnf install /path/to/silo.rpm
DEB (Debian/Ubuntu)
sudo dpkg -i /path/to/silo.deb
Binary
Verify the downloaded archive against its release checksum before extracting it. The archive checksum does not apply to the extracted executable. Then install it:
sudo install -m 0755 ./silo /usr/local/bin/silo
Replace /usr/local/bin/silo with the path returned by command -v silo when your installation uses a different location.
Run silo --version on every node. Do not proceed until every node reports the same intended release.
Restart all server processes as one coordinated operation. Where the admin API is available, use:
mc admin service restart ALIAS
Native packages use silo.service; otherwise coordinate systemctl restart silo across all nodes through your automation. Custom installations should use their actual unit name. Do not improvise a rolling mixed-version deployment unless the target release explicitly supports it.
Validate the deployment with mc admin info, then test representative S3 reads and writes, console access, identity login, and any configured replication or notifications.
Upgrade the client separately from Download & Install. Standalone artifacts use mcli; source builds and the container retain mc.
Manually Managed Deployments
For a process managed by a user script or another supervisor, download and verify the same Silo binary on every node, replace the executable at the path used by that supervisor, confirm silo --version, and restart all nodes as one coordinated operation. The service account must be able to execute the new binary; the operator performing the replacement must be able to write its installation path.
After restart, run the same validation described above. Preserve the previous verified binary until validation completes so that any rollback decision can follow the target release’s documented downgrade constraints.
2.13 - Upgrade MinIO Operator
You can upgrade the MinIO Operator at any time without impacting your managed MinIO Tenants.
As part of the upgrade process, the Operator may update and restart Tenants to support changes to the MinIO Custom Resource Definition (CRD). These changes require no action on the part of any operator or administrator, and do not impact Tenant operations.
This page describes how to upgrade from Operator 5.0.15 to 7.1.1. See Upgrade MinIO Operator 4.5.8 and Later to 5.0.15 for instructions on upgrading to Operator 5.0.15 before starting this procedure.
Note
Operator 6.0.0 Deprecates the Operator Console
Starting with Operator 6.0.0, the MinIO Operator Console is deprecated and removed.
You can continue to manage and deploy MinIO Tenants using standard Kubernetes approaches such as Kustomize or Helm.
Upgrade MinIO Operator 5.0.15 to 7.1.1
Warning
Important
Operator 6.0.0 deprecates the MinIO Operator Console and removes the related resources from the MinIO Operator CRD. This includes removal of Operator Console resources such as services and pods.
Use either Kustomization or Helm for managing Tenants moving forward.
Upgrade using Kustomize
The following procedure upgrades the MinIO Operator using Kustomize. For deployments using Operator 5.0.0 through 5.0.14, follow the Upgrade MinIO Operator 4.5.8 and Later to 5.0.15 procedure before performing this upgrade.
If you installed the Operator using Helm, use the Upgrade using Helm instructions instead.
(Optional) Update each MinIO Tenant to the latest stable MinIO Version.
Upgrading MinIO regularly ensures your Tenants have the latest features and performance improvements. Test upgrades in a lower environment such as a Dev or QA Tenant, before applying to your production Tenants. See Upgrade a MinIO Tenant for a procedure on upgrading MinIO Tenants.
Verify the existing Operator installation. Use kubectl get all -n minio-operator to verify the health and status of all Operator pods and services.
If you installed the Operator to a custom namespace, specify that namespace as -n <NAMESPACE>.
You can verify the currently installed Operator version by retrieving the object specification for an operator pod in the namespace. The following example uses the jq tool to filter the necessary information from kubectl:
kubectl get pod -l 'name=minio-operator' -n minio-operator -o json | jq '.items[0].spec.containers'
If your local host does not have the jq utility installed, you can run the first part of the command and locate the spec.containers section of the output.
Upgrade Operator with Kustomize
The following command upgrades Operator to version 7.1.1:
kubectl apply -k github.com/minio/operator
In the sample output below, configured indicates where a new change was applied from the updated CRD:
You can check the new Operator version with the same kubectl command used previously:
kubectl get pod -l 'name=minio-operator' -n minio-operator -o json | jq '.items[0].spec.containers'
Upgrade using Helm
The following procedure upgrades an existing MinIO Operator Installation using Helm.
If you installed the Operator using Kustomize, use the Upgrade using Kustomize instructions instead.
(Optional) Update each MinIO Tenant to the latest stable MinIO Version.
Upgrading MinIO regularly ensures your Tenants have the latest features and performance improvements. Test upgrades in a lower environment such as a Dev or QA Tenant, before applying to your production Tenants. See Upgrade a MinIO Tenant for a procedure on upgrading MinIO Tenants.
Verify the existing Operator installation.
Use kubectl get all -n minio-operator to verify the health and status of all Operator pods and services.
If you installed the Operator to a custom namespace, specify that namespace as -n <NAMESPACE>.
Use the helm list command to view the installed charts in the namespace:
helm list -n minio-operator
The result should resemble the following:
NAME            NAMESPACE       REVISION        UPDATED                                 STATUS          CHART           APP VERSION
operator        minio-operator  1               2023-11-01 15:49:54.539724775 -0400 EDT deployed        operator-5.0.x v5.0.x
Update the Operator Repository
Use helm repo update minio-operator to update the MinIO Operator repo. If you set a different alias for the MinIO Operator repository, specify that in the command instead of minio-operator. You can use helm repo list to review your installed repositories.
Use helm search to check the latest available chart version after updating the Operator Repo:
helm search repo minio-operator
The response should resemble the following:
NAME                            CHART VERSION   APP VERSION     DESCRIPTION
minio-operator/minio-operator   4.3.7           v4.3.7          A Helm chart for MinIO Operator
minio-operator/operator         7.1.1          v7.1.1         A Helm chart for MinIO Operator
minio-operator/tenant           7.1.1          v7.1.1         A Helm chart for MinIO Operator
The minio-operator/minio-operator is a legacy chart and should not be installed under normal circumstances.
Run helm upgrade
Helm uses the latest chart to upgrade the MinIO Operator:
If you installed the MinIO Operator to a different namespace, specify that in the -n argument.
If you used a different installation name from operator, replace the value above with the installation name.
The command results should return success with a bump in the REVISION value.
Validate the Operator upgrade
You can check the new Operator version with the same kubectl command used previously:
kubectl get pod -l 'name=minio-operator' -n minio-operator -o json | jq '.items[0].spec.containers'
2.14 - Deploy Silo as a Container
This page documents deploying Silo as a container on an operating system that supports containerized processes.
This documentation assumes installation of Docker, Podman, or a similar runtime which supports the standard container image format. Published docker.io/pgsty/silo release images use Red Hat Universal Base Image 9 Micro.
Functionality and performance of the Silo container may be constrained by the base OS.
The procedure includes guidance for deploying Single-Node Multi-Drive (SNMD) and Single-Node Single-Drive (SNSD) topologies in support of early development and evaluation environments.
Warning
Important
These examples cover Single-Node Single-Drive and Single-Node Multi-Drive development or evaluation deployments. They do not define a production Multi-Node Multi-Drive topology or an upgrade contract for Docker Compose, Docker Swarm, or another container orchestrator. For a production distributed deployment, use a tested Kubernetes tenant workflow and validate persistence, networking, failure domains, and upgrades for your environment.
The examples pin a published Server tag. Validate that version with your workload and record the image digest for rollback.
SILO disables in-place self-update; MINIO_UPDATE=off does not re-enable it. Upgrade containers by replacing the image with a verified SILO tag or digest, not with mc admin update.
Considerations
Review Checklists
Ensure you have reviewed our published Hardware, Software, and Security checklists before attempting this procedure.
Erasure Coding Parity
Silo automatically determines the default erasure coding configuration for the cluster based on the total number of nodes and drives in the topology. You can configure the per-object parity setting when you set up the cluster or let Silo select the default (EC:4 for production-grade clusters).
Parity controls the relationship between object availability and storage on disk. The upstream MinIO Erasure Code Calculator can help compare parity levels; treat it as an upstream planning aid rather than a Silo support contract.
While you can change erasure parity settings at any time, objects written with a given parity do not automatically update to the new parity settings.
Container Storage
This procedure assumes you mount one or more dedicated storage devices to the container to act as persistent storage for Silo.
Data stored on ephemeral container paths is lost when the container restarts or is deleted. Use any such paths at your own risk.
Procedure
Start the Container
This procedure provides instructions for Podman and Docker in rootfull mode. For rootless deployments, defer to documentation by each runtime for configuration and container startup.
For all other container runtimes, follow the documentation for that runtime and specify the equivalent options, parameters, or configurations.
Podman
The following command creates a folder in your home directory, then starts the Silo container using Podman:
The command binds ports 9000 and 9001 to the S3 API and Web Console respectively.
The local drive ~/silo/data is mounted to the /data folder on the container. You can modify the MINIO_ROOT_USER and MINIO_ROOT_PASSWORD variables to change the root login as needed.
For multi-drive deployments, bind each local drive or folder it’s on sequentially-numbered path on the remote. You can then modify the minio server startup to specify those paths:
The command binds ports 9000 and 9001 to the S3 API and Web Console respectively.
The local drive ~/silo/data is mounted to the /data folder on the container. You can modify the MINIO_ROOT_USER and MINIO_ROOT_PASSWORD variables to change the root login as needed.
For multi-drive deployments, bind each local drive or folder it’s on sequentially-numbered path on the remote. You can then modify the minio server startup to specify those paths:
Log in with the MINIO_ROOT_USER and MINIO_ROOT_PASSWORD from the previous step.
You can use the embedded Console for general administration tasks like Identity and Access Management, Metrics and Log Monitoring, or Server Configuration.
CLI
Follow the Silo client installation instructions for mcli on your local host. Run mcli --version to verify the installation. Published standalone archives and Linux packages install mcli; source builds and the client container retain the mc executable name.
Once installed, create an alias for the Silo deployment:
Change the hostname, username, and password to reflect your deployment.
2.15 - Expand a Distributed Silo Deployment
Silo supports expanding an existing distributed deployment by adding a new Server Pool. Each pool expands the total available storage capacity of the cluster.
Expansion does not provide Business Continuity/Disaster Recovery (BC/DR)-grade protections. While each pool is an independent set of servers with distinct erasure sets for availability, the complete loss of one pool results in MinIO stopping I/O for all pools in the deployment. Similarly, an erasure set which loses quorum in one pool represents data loss of objects stored in that set, regardless of the number of other erasure sets or pools.
The new server pool does not need to use the same type or size of hardware and software configuration as any existing server pool, though doing so may allow for simplified cluster management and more predictable performance across pools. All drives in the new pool should be of the same type and size within the new pool. Review MinIO’s hardware recommendations for more complete guidance on selecting an appropriate configuration.
To provide BC-DR grade failover and recovery support for your single or multi-pool MinIO deployments, use site replication.
The procedure on this page expands an existing distributed MinIO deployment with an additional server pool.
Warning
Important
MinIO does not support expanding Single-Node Single-Drive topologies.
Prerequisites
Networking and Firewalls
Each node should have full bidirectional network access to every other node in the deployment. For containerized or orchestrated infrastructures, this may require specific configuration of networking and routing components such as ingress or load balancers. Certain operating systems may also require setting firewall rules. For example, the following command explicitly opens the default MinIO server API port 9000 on servers using firewalld:
All MinIO servers in the deployment must use the same listen port.
If you set a static MinIO Console port (e.g. :9001) you must also grant access to that port to ensure connectivity from external clients.
MinIO strongly recomends using a load balancer to manage connectivity to the cluster. The Load Balancer should use a “Least Connections” algorithm for routing requests to the MinIO deployment, since any MinIO node in the deployment can receive, route, or process client requests.
The following load balancers are known to work well with MinIO:
Configuring firewalls or load balancers to support MinIO is out of scope for this procedure. The Configure NGINX Proxy for MinIO Server reference provides a baseline configuration for using NGINX as a reverse proxy with basic load balancing configured.
Sequential Hostnames
MinIO requires using expansion notation {x...y} to denote a sequential series of MinIO hosts when creating a server pool. MinIO therefore requires using sequentially-numbered hostnames to represent each minio server process in the pool.
Create the necessary DNS hostname mappings prior to starting this procedure. For example, the following hostnames would support a 4-node distributed server pool:
minio5.example.com
minio6.example.com
minio7.example.com
minio8.example.com
You can specify the entire range of hostnames using the expansion notation minio{5...8}.example.com.
Configuring DNS to support MinIO is out of scope for this procedure.
Storage Requirements
The following requirements summarize the Storage section of MinIO’s hardware recommendations:
Use Local Storage
Direct-Attached Storage (DAS) has significant performance and consistency advantages over networked storage (NAS, SAN, NFS). MinIO strongly recommends flash storage (NVMe, SSD) for primary or “hot” data.
Use XFS-Formatting for Drives
MinIO strongly recommends provisioning XFS formatted drives for storage. MinIO uses XFS as part of internal testing and validation suites, providing additional confidence in performance and behavior at all scales.
MinIO does not test nor recommend any other filesystem, such as EXT4, BTRFS, or ZFS.
Use Consistent Type of Drive
MinIO does not distinguish drive types and does not benefit from mixed storage types. Each pool must use the same type (NVMe, SSD)
For example, deploy a pool consisting of only NVMe drives. If you deploy some drives as SSD or HDD, MinIO treats those drives identically to the NVMe drives. This can result in performance issues, as some drives have differing or worse read/write characteristics and cannot respond at the same rate as the NVMe drives.
Use Consistent Size of Drive
MinIO limits the size used per drive to the smallest drive in the pool.
For example, deploy a pool consisting of the same number of NVMe drives with identical capacity of 7.68TiB. If you deploy one drive with 3.84TiB, MinIO treats all drives in the pool as having that smaller capacity.
Configure Sequential Drive Mounting
MinIO uses Go expansion notation {x...y} to denote a sequential series of drives when creating the new server pool, where all nodes in the server pool have an identical set of mounted drives. Configure drive mounting paths as a sequential series to best support this notation. For example, mount your drives using a pattern of /mnt/drive-n, where n starts at 1 and increments by 1 per drive.
Persist Drive Mounting and Mapping Across Reboots
Use /etc/fstab to ensure consistent drive-to-mount mapping across node reboots.
Non-Linux Operating Systems should use the equivalent drive mount management tool.
Note
Exclusive access to drives
MinIO requiresexclusive access to the drives or volumes provided for object storage. No other processes, software, scripts, or persons should perform any actions directly on the drives or volumes provided to MinIO or the objects or files MinIO places on them.
Unless directed by MinIO Engineering, do not use scripts or tools to directly modify, delete, or move any of the data shards, parity shards, or metadata files on the provided drives, including from one drive or node to another. Such operations are very likely to result in widespread corruption and data loss beyond MinIO’s ability to heal.
Minimum Drives for Erasure Code Parity
MinIO requires each pool satisfy the deployment erasure code settings. Specifically the new pool topology must support a minimum of 2 x EC:N drives per erasure set, where EC:N is the Standard parity storage class of the deployment. This requirement ensures the new server pool can satisfy the expected SLA of the deployment.
You can use the MinIO Erasure Code Calculator to check the Erasure Code Stripe Size (K+M) of your new pool. If the highest listed value is at least 2 x EC:N, the pool supports the deployment’s erasure parity settings.
Time Synchronization
Multi-node systems must maintain synchronized time and date to maintain stable internode operations and interactions. Make sure all nodes sync to the same time server regularly. Operating systems vary for methods used to synchronize time and date, such as with ntp, timedatectl, or timesyncd.
Check the documentation for your operating system for how to set up and maintain accurate and identical system clock times across nodes.
Back Up Cluster Settings First
Use the mc admin cluster bucket export and mc admin cluster iam export commands to take a snapshot of the bucket metadata and IAM configurations respectively prior to starting decommissioning. You can use these snapshots to restore bucket and IAM settings to recover from user or process errors as necessary.
Considerations
Writing Files
MinIO does not automatically rebalance objects across the new server pools. Instead, MinIO performs new write operations to the pool with the most free storage weighted by the amount of free space on the pool divided by the free space across all available pools.
The formula to determine the probability of a write operation on a particular pool is
FreeSpaceOnPoolA/FreeSpaceOnAllPools
Consider a situation where a group of three pools has a total of 10 TiB of free space distributed as:
Pool A has 3 TiB of free space
Pool B has 2 TiB of free space
Pool C has 5 TiB of free space
MinIO calculates the probability of a write operation to each of the pools as:
Pool A: 30% chance (3TiB/10TiB)
Pool B: 20% chance (2TiB/10TiB)
Pool C: 50% chance (5TiB/10TiB)
In addition to the free space calculation, if a write option (with parity) would bring a drive usage above 99% or a known free inode count below 1000, MinIO does not write to the pool.
Likewise, MinIO does not write to pools in a decommissioning process.
Expansion is Non-Disruptive
Adding a new server pool requires restarting all MinIO server processes in the deployment at around same time.
MinIO strongly recommends restarting all MinIO Server processes in a deployment simultaneously. MinIO operations are atomic and strictly consistent. As such the restart procedure is non-disruptive to applications and ongoing operations.
Do not perform “rolling” (e.g. one node at a time) restarts.
Capacity-Based Planning
MinIO recommends planning storage capacity sufficient to store at least 2 years of data before reaching 70% usage. Performing server pool expansion more frequently or on a “just-in-time” basis generally indicates an architecture or planning issue.
For example, consider an application suite expected to produce at least 100 TiB of data per year and a 3 year target before expansion. The deployment has ~500TiB of usable storage in the initial server pool, such that the cluster safely met the 70% threshold with some buffer for data growth. The new server pool should ideally meet at minimum 500TiB of additional storage to allow for a similar lifespan before further expansion.
Since MinIO erasure coding requires some storage for parity, the total raw storage must exceed the planned usable capacity. Consider using the MinIO Erasure Code Calculator for guidance in planning capacity around specific erasure code settings.
The following procedure adds a Server Pool to an existing MinIO deployment. Each Pool expands the total available storage capacity of the cluster while maintaining the overall availability of the cluster.
All commands provided below use example values. Replace these values with those appropriate for your deployment.
Review the Prerequisites before starting this procedure.
1) Install the Silo Binary on Each Node in the New Server Pool
Install the same published Silo release used by the existing pool. Download the x86-64 or ARM64 RPM, DEB, or standalone archive from Download & Install, and verify its checksum before installation. The Silo release currently publishes those two Linux architectures; inherited references to unsupported ppc64le and s390x downloads have been removed.
Run minio --version on every new node and compare it with the existing pool. Do not join a node running a different release. For upgrades, follow the systemctl-managed Silo procedure.
2) Add TLS/SSL Certificates
MinIO enables Transport Layer Security (TLS) 1.2+ automatically upon detecting a valid x.509 certificate (.crt) and private key (.key) in the MinIO ${HOME}/.minio/certs directory.
For systemd-managed deployments, use the $HOME directory for the user which runs the MinIO server process. The provided minio.service file runs the process as minio-user. The previous step includes instructions for creating this user with a home directory /home/minio-user.
Place TLS certificates into /home/minio-user/.minio/certs on each host.
If any MinIO server or client uses certificates signed by an unknown Certificate Authority (self-signed or internal CA), you must place the CA certs in the /home/minio-user/.minio/certs/CAs on all MinIO hosts in the deployment. MinIO rejects invalid certificates (untrusted, expired, or malformed).
If the minio.service file specifies a different user account, use the $HOME directory for that account. Alternatively, specify a custom certificate directory using the minio server --certs-dir commandline argument. Modify the MINIO_OPTS variable in /etc/default/minio to set this option. The systemd user which runs the MinIO server process must have read and listing permissions for the specified directory.
For more specific guidance on configuring MinIO for TLS, including multi-domain support via Server Name Indication (SNI), see Network Encryption (TLS). You can optionally skip this step to deploy without TLS enabled. MinIO strongly recommends against non-TLS deployments outside of early development.
3) Create the systemd Service File
The .deb or .rpm packages install the following systemd service file to /usr/lib/systemd/system/minio.service. For binary installations, create this file manually on all MinIO hosts.
Note
Note
systemd checks the /etc/systemd/... path before checking the /usr/lib/systemd/... path and uses the first file it finds. To avoid conflicting or unexpected configuration options, check that the file only exists at the /usr/lib/systemd/system/minio.service path.
[Unit]Description=MinIO
Documentation=https://silo.pgsty.com/docs/
Wants=network-online.target
After=network-online.target
AssertFileIsExecutable=/usr/local/bin/minio
[Service]Type=notify
WorkingDirectory=/usr/local
User=minio-user
Group=minio-user
ProtectProc=invisible
EnvironmentFile=-/etc/default/minio
ExecStart=/usr/local/bin/minio server $MINIO_OPTS$MINIO_VOLUMES# Let systemd restart this service alwaysRestart=always
# Specifies the maximum file descriptor number that can be opened by this processLimitNOFILE=1048576# Turn-off memory accounting by systemd, which is buggy.MemoryAccounting=no
# Specifies the maximum number of threads this process can createTasksMax=infinity
# Disable timeout logic and wait until process is stoppedTimeoutSec=infinity
# Disable killing of MinIO by the kernel's OOM killerOOMScoreAdjust=-1000
SendSIGKILL=no
[Install]WantedBy=multi-user.target
# Built for ${project.name}-${project.version} (${project.name})
The minio.service file runs as the minio-user User and Group by default. You can create the user and group using the groupadd and useradd commands. The following example creates the user, group, and sets permissions to access the folder paths intended for use by MinIO. These commands typically require root (sudo) permissions.
Create an environment file at /etc/default/minio. The MinIO service uses this file as the source of all environment variables used by MinIO and the minio.service file.
The following examples assumes that:
The deployment has a single server pool consisting of four MinIO server hosts with sequential hostnames.
The deployment has a load balancer running at https://minio.example.net that manages connections across all MinIO hosts. The load balancer should not be routing requests to the new hosts at this step, but should have the necessary configuration updates planned.
Modify the example to reflect your deployment topology:
# Set the hosts and volumes MinIO uses at startup# The command uses MinIO expansion notation {x...y} to denote a# sequential series.## The following example starts the MinIO server with two server pools.## The space delimiter indicates a seperate server pool## The second set of hostnames and volumes is the newly added pool.# The pool has sufficient stripe size to meet the existing erasure code# parity of the deployment (2 x EC:4)## The command includes the port on which the MinIO servers listen for each# server pool.MINIO_VOLUMES="https://minio{1...4}.example.net:9000/mnt/disk{1...4}/minio https://minio{5...12}.example.net:9000/mnt/disk{1...8}/minio"# Set all MinIO server options## The following explicitly sets the MinIO Console listen address to# port 9001 on all network interfaces. The default behavior is dynamic# port selection.MINIO_OPTS="--console-address :9001"# Set the root username. This user has unrestricted permissions to# perform S3 and administrative API operations on any resource in the# deployment.## Defer to your organizations requirements for superadmin user name.MINIO_ROOT_USER=minioadmin
# Set the root password## Use a long, random, unique string that meets your organizations# requirements for passwords.MINIO_ROOT_PASSWORD=minio-secret-key-CHANGE-ME
You may specify other environment variables or server commandline options as required by your deployment. All MinIO nodes in the deployment should include the same environment variables with the matching values.
5) Restart the MinIO Deployment with Expanded Configuration
Issue the following commands on each node simultaneously in the deployment to restart the MinIO service:
sudo systemctl restart minio.service
Use the following commands to confirm the service is online and functional:
sudo systemctl status minio.service
journalctl -f -u minio.service
MinIO may log an increased number of non-critical warnings while the server processes connect and synchronize. These warnings are typically transient and should resolve as the deployment comes online.
MinIO strongly recommends restarting all MinIO Server processes in a deployment simultaneously. MinIO operations are atomic and strictly consistent. As such the restart procedure is non-disruptive to applications and ongoing operations.
Do not perform “rolling” (e.g. one node at a time) restarts.
6) Next Steps
Update any load balancers, reverse proxies, or other network control planes to route client requests to the new hosts in the MinIO distributed deployment. While MinIO automatically manages routing internally, having the control planes handle initial connection management may reduce network hops and improve efficiency.
Review the MinIO Console to confirm the updated cluster topology and monitor performance.
2.16 - Modify a Silo Tenant
You can modify tenants after deployment to change mutable configuration settings. See MinIO Custom Resource Definition for a complete description of available settings in the MinIO Custom Resource Definition.
The method for modifying the Tenant depends on how you deployed the tenant:
Kustomize
For Kustomize-deployed Tenants, you can modify the base Kustomization resources and apply them using kubectl apply -k against the directory containing the kustomization.yaml object.
kubectl apply -k ~/kustomization/TENANT-NAME/
Modify the path to the Kustomization directory to match your local configuration.
Helm
For Helm-deployed Tenants, you can modify the base values.yaml and upgrade the Tenant using the chart:
The command above assumes use of the MinIO Operator Chart repository. If you installed the Chart manually or by using a different repository name, specify that chart or name in the command.
Replace TENANT-NAME and TENANT-NAMESPACE with the name and namespace of the Tenant, respectively. You can use helm list -n TENANT-NAMESPACE to validate the Tenant name.
Add Trusted Certificate Authorities
The MinIO Tenant validates the TLS certificate presented by each connecting client against the host system’s trusted root certificate store. The MinIO Operator can attach additional third-party Certificate Authorities (CA) to the Tenant to allow validation of client TLS certificates signed by those CAs.
To customize the trusted CAs mounted to each Tenant MinIO pod, enable the Custom Certificates switch. Select the Add CA Certificate + button to add third party CA certificates.
If the MinIO Tenant cannot match an incoming client’s TLS certificate issuer against either the container OS’s trust store or an explicitly attached CA, MinIO rejects the connection as invalid.
Manage Tenant Pools
Specify Runtime Class
Note
Added: Console
0.23.1
When adding a new pool or modifying an existing pool for a tenant, you can specify the Runtime Class Name for pools to use.
Decommission a Tenant Server Pool
MinIO Operator 4.4.13 and later support decommissioning a server pool in a Tenant. Specifically, you can follow the Decommission a Server pool procedure to remove the pool from the tenant, then edit the tenant YAML to drop the pool from the StatefulSet. When removing the Tenant pool, ensure the spec.pools.[n].name fields have values for all remaining pools.
Note
Maintain pool order when decommissioning and then adding
If you decommission one pool in a multiple pool deployment, you cannot use the same node sequence for a new pool. For example, consider a deployment with the following pools:
MinIO supports decommissioning and removing server pools from a deployment with two or more pools. To decommission, there must be at least one remaining pool with sufficient available space to receive the objects from the decommissioned pools.
Starting with RELEASE.2023-01-18T04-36-38Z, MinIO supports queueing multiple pools in a single decommission command. Each listed pool immediately enters a read-only status, but draining occurs one pool at a time.
Decommissioning is designed for removing an older server pool whose hardware is no longer sufficient or performant compared to the pools in the deployment. MinIO automatically migrates data from the decommissioned pools to the remaining pools in the deployment based on the ratio of free space available in each pool.
During the decommissioning process, MinIO routes read operations (e.g. GET, LIST, HEAD) normally. MinIO routes write operations (e.g. PUT, versioned DELETE) to the remaining “active” pools in the deployment. Versioned objects maintain their ordering throughout the migration process.
The procedures on this page decommission and remove one or more server pools from a distributed MinIO deployment with at least two server pools.
Note
Decommissioning is Permanent
Once MinIO begins decommissioning a pool, it marks that pool as permanently inactive (“draining”). Cancelling or otherwise interrupting the decommissioning procedure does not restore the pool to an active state. Use extra caution when decommissioning multiple pools.
Decommissioning is a major administrative operation that requires care in planning and execution, and is not a trivial or ‘daily’ task.
MinIO SUBNET users can log in and create a new issue related to decommissioning. Coordination with MinIO Engineering via SUBNET can ensure successful decommissioning, including performance testing and health diagnostics.
Community users can seek support on the MinIO Community Slack. Community Support is best-effort only and has no SLAs around responsiveness.
Prerequisites
Back Up Cluster Settings First
Use the mc admin cluster bucket export and mc admin cluster iam export commands to take a snapshot of the bucket metadata and IAM configurations respectively prior to starting decommissioning. You can use these snapshots to restore bucket/IAM settings to recover from user or process errors as necessary.
Networking and Firewalls
Each node should have full bidirectional network access to every other node in the deployment. For containerized or orchestrated infrastructures, this may require specific configuration of networking and routing components such as ingress or load balancers. Certain operating systems may also require setting firewall rules. For example, the following command explicitly opens the default MinIO server API port 9000 on servers using firewalld:
If you set a static MinIO Console port (e.g. :9001) you must also grant access to that port to ensure connectivity from external clients.
MinIO strongly recomends using a load balancer to manage connectivity to the cluster. The Load Balancer should use a “Least Connections” algorithm for routing requests to the MinIO deployment, since any MinIO node in the deployment can receive, route, or process client requests.
The following load balancers are known to work well with MinIO:
Configuring firewalls or load balancers to support MinIO is out of scope for this procedure.
Deployment Must Have Sufficient Storage
The decommissioning process migrates objects from the target pool to other pools in the deployment. The total available storage on the deployment must exceed the total storage of the decommissioned pool.
Use the Erasure Code Calculator to determine the usable storage capacity. Then reduce that by the size of the objects already on the deployment.
For example, consider a deployment with the following distribution of used and free storage:
Pool 1
100TB Used
200TB Total
Pool 2
100TB Used
200TB Total
Pool 3
100TB Used
200TB Total
Decommissioning Pool 1 requires distributing the 100TB of used storage across the remaining pools. Pool 2 and Pool 3 each have 100TB of unused storage space and can safely absorb the data stored on Pool 1.
However, if Pool 1 were full (e.g. 200TB of used space), decommissioning would completely fill the remaining pools and potentially prevent any further write operations.
Considerations
Replacing a Server Pool
For hardware upgrade cycles where you replace old pool hardware with a new pool, you should add the new pool through expansion before starting the decommissioning of the old pool. Adding the new pool first allows the decommission process to transfer objects in a balanced way across all available pools, both existing and new.
Complete any planned hardware expansion prior to decommissioning older hardware pools.
Decommissioning requires that a cluster’s topology remain stable throughout the pool draining process. Do not attempt to perform expansion and decommission changes in a single step.
Decommissioning is Resumable
MinIO resumes decommissioning if interrupted by transient issues such as deployment restarts or network failures.
For manually cancelled or failed decommissioning attempts, MinIO resumes only after you manually re-initiate the decommissioning operation.
The pool remains in the decommissioning state regardless of the interruption. A pool can never return to active status after decommissioning begins.
Decommissioning is Non-Disruptive
Removing a decommissioned server pool requires restarting all MinIO nodes in the deployment at around the same time.
MinIO strongly recommends restarting all MinIO Server processes in a deployment simultaneously. MinIO operations are atomic and strictly consistent. As such the restart procedure is non-disruptive to applications and ongoing operations.
Do not perform “rolling” (e.g. one node at a time) restarts.
Decommissioning Ignores Expired Objects and Trailing DeleteMarker
Starting with RELEASE.2023-05-27T05-56-19Z, decommissioning ignores objects where the only remaining version is a DeleteMarker. This avoids creating empty metadata on the remaining server pool(s) for objects that are effectively fully deleted.
Silo builds that include fced86303 (main after Server 20260903) carry object tags and their revision fields to the destination pool during decommission and rebalance. Earlier builds dropped the tags of migrated objects. If tag-dependent lifecycle or policy rules matter, audit the migrated objects instead of assuming the tags survived; see multi-pool object consistency.
Once the decommissioning process completes, you can safely shut down that pool. Since the only remaining data was scheduled for deletion or was only a DeleteMarker, you can safely clear or destroy those drives as per your internal procedures.
Behavior
Final Listing Check
At the end of the decommission process, MinIO checks for a list of items on the pool. If the list returns empty, MinIO marks the decommission as successfully completed. If any objects return, MinIO returns an error that the decommission process failed.
If the decommission fails, customers should open a MinIO SUBNET issue for further assistance before retrying the decommission. Community users without a SUBNET subscription can retry the decommission process or seek additional support through the MinIO Community Slack. MinIO provides Community Support at best-effort only and provides no SLA around responsiveness.
Decommissioning a Server with Tiering Enabled
Note
Changed: RELEASE.2023-03-20T20-16-18Z
For deployments with tiering enabled and active, decommissioning moves the object references to a new active pool. Applications can continue issuing GET requests against those objects where MinIO handles transparently retrieving them from the remote tier.
In older MinIO versions, tiering configurations prevent decommissioning.
Decommission a Server Pool
1) Review the MinIO Deployment Topology
The mc admin decommission command returns a list of all pools in the MinIO deployment:
mc admin decommission status myminio
The command returns output similar to the following:
The example deployment above has three pools. Each pool has four servers with four drives each.
Identify the target pool for decommissioning and review the current capacity. The remaining pools in the deployment must have sufficient total capacity to migrate all object stored in the decommissioned pool.
In the example above, the deployment has 210TiB total storage with 110TiB used. The first pool (minio-{01...04}) is the decommissioning target, as it was provisioned when the MinIO deployment was created and is completely full. The remaining newer pools can absorb all objects stored on the first pool without significantly impacting total available storage.
2) Start the Decommissioning Process
Note
Decommissioning is Permanent
Once MinIO begins decommissioning a pool, it marks that pool as permanently inactive (“draining”). Cancelling or otherwise interrupting the decommissioning procedure does not restore the pool to an active state.
Review and validate that you are decommissioning the correct pool before running the following command.
Use the mc admin decommission start command to begin decommissioning the target pool. Specify the alias of the deployment and the full description of the pool to decommission, including all hosts, disks, and file paths.
mc admin decommission start myminio/ https://minio-{01...04}.example.net:9000/mnt/disk{1...4}/minio
The example command begins decommissioning the matching server pool on the myminio deployment.
During the decommissioning process, MinIO continues routing read operations (GET, LIST, HEAD) to the pool for those objects not yet migrated. MinIO routes all new write operations (PUT) to the remaining pools in the deployment.
Load balancers, reverse proxy, or other network control components which manage connections to the deployment do not need to modify their configurations at this time.
You can retrieve more detailed information by specifying the description of the server pool to the command:
mc admin decommission status myminio https://minio-{01...04}.example.com:9000/mnt/disk{1...4}/minio
The command returns output similar to the following:
Decommissioning rate at 100MiB/sec [1TiB/10TiB]Started: 30 minutes ago
mc admin decommission status marks the Status as Complete once decommissioning is completed. You can move on to the next step once decommissioning is completed.
If Status reads as failed, you can re-run the mc admin decommission start command to resume the process. For persistent failures, use mc admin logs or review the systemd logs (e.g. journalctl -u minio) to identify more specific errors.
4) Remove the Decommissioned Pool from the Deployment Configuration
As each pool completes decommissioning, you can safely remove it from the deployment configuration. Modify the startup command for each remaining MinIO server in the deployment and remove the decommissioned pool.
The .deb or .rpm packages install a systemd service file to /lib/systemd/system/minio.service. For binary installations, this procedure assumes the file was created manually as per the Installation and Management procedure.
The minio.service file uses an environment file located at /etc/default/minio for sourcing configuration settings, including the startup. Specifically, the MINIO_VOLUMES variable sets the startup command:
cat /etc/default/minio | grep "MINIO_VOLUMES"
The command returns output similar to the following:
Edit the environment file and remove the decommissioned pool from the MINIO_VOLUMES value.
5) Update Network Control Plane
Update any load balancers, reverse proxies, or other network control planes to remove the decommissioned server pool from the connection configuration for the MinIO deployment.
Specific instructions for configuring network control plane components is out of scope for this procedure.
6) Restart the MinIO Deployment
Issue the following commands on each node simultaneously in the deployment to restart the MinIO service:
sudo systemctl restart minio.service
Use the following commands to confirm the service is online and functional:
sudo systemctl status minio.service
journalctl -f -u minio.service
MinIO may log an increased number of non-critical warnings while the server processes connect and synchronize. These warnings are typically transient and should resolve as the deployment comes online.
MinIO strongly recommends restarting all MinIO Server processes in a deployment simultaneously. MinIO operations are atomic and strictly consistent. As such the restart procedure is non-disruptive to applications and ongoing operations.
Do not perform “rolling” (e.g. one node at a time) restarts.
Once the deployment is online, use mc admin info to confirm the uptime of all remaining servers in the deployment.
Decommission Multiple Server Pools
Note
Changed: RELEASE.2023-01-18T04-36-38Z
You can start the decommission process for multiple server pools when issuing a decommission command.
After entering the command:
MinIO immediately stops write access to all pools to be decommissioned.
Decommissioning happens one pool at a time.
Each pool completes the decommission draining process before MinIO begins draining the next pool.
To decommission multiple server pools from one command, add the full description of each server pool to decommission as a comma-separated list.
All other considerations about decommissioning apply when performing the process on multiple servers.
Decommissioning is permanent.
Once you mark the pools as decommissioned, you cannot restore them.
Confirm you select the intended pools.
1) Review the MinIO Deployment Topology
The mc admin decommission command returns a list of all pools in the MinIO deployment:
mc admin decommission status myminio
The command returns output similar to the following:
The example deployment above has three pools. Each pool has four servers with four drives each.
Identify the target pool for decommissioning and review the current capacity. The remaining pools in the deployment must have sufficient total capacity to migrate all object stored in the decommissioned pool.
In the example above, the deployment has 1110TiB total storage with 145TiB used.
The first pool (minio-{01...04}) is the first decommissioning target, as it was provisioned when the MinIO deployment was created and is completely full.
The second pool (minio-{05...08}) is the second decommissioning target, as it was also provisioned when the MinIO deployment was created and is nearly full.
The fourth pool (minio-{13...16}) is a newly added pool with new hardware from a completed server expansion.
The third and fourth pools can absorb all objects stored on the first pool without significantly impacting total available storage.
Warning
Important
Complete any server expansion to add new storage resources before beginning a decommission process.
2) Start the Decommissioning Process
Note
Decommissioning is Permanent
Once MinIO begins decommissioning the pools, it marks those pools as permanently inactive (“draining”). Cancelling or otherwise interrupting the decommissioning procedure does not restore the pools to an active state.
Review and validate that you are decommissioning the correct pools before running the following command.
Use the mc admin decommission start command to begin decommissioning the target pool. Specify the alias of the deployment and a comma-separated list of the full description of each pool to decommission, including all hosts, disks, and file paths.
mc admin decommission start myminio/ https://minio-{01...04}.example.net:9000/mnt/disk{1...4}/minio,https://minio-{05...08}.example.net:9000/mnt/disk{1...4}/minio
The example command begins decommissioning the two listed matching server pools on the myminio deployment.
During the decommissioning process, MinIO continues routing read operations (GET, LIST, HEAD) operations to the pools for those objects not yet migrated. MinIO routes all new write operations (PUT) to the remaining pools in the deployment not scheduled for decommissioning.
Draining of decommissioned pools happens one pool at a time, completing the decommission of each pool in sequence. Draining does not happen concurrently for all decommissioning pools.
Load balancers, reverse proxy, or other network control components which manage connections to the deployment do not need to modify their configurations at this time.
You can retrieve more detailed information by specifying the description of the server pool to the command:
mc admin decommission status myminio https://minio-{01...04}.example.com:9000/mnt/disk{1...4}/minio
The command returns output similar to the following:
Decommissioning rate at 100MiB/sec [1TiB/10TiB]Started: 30 minutes ago
mc admin decommission status marks the Status as Complete once decommissioning is completed. You can move on to the next step once MinIO completes decommissioning for all pools.
If Status reads as failed, you can re-run the mc admin decommission start command to resume the process. For persistent failures, use mc admin logs or review the systemd logs (e.g. journalctl -u minio) to identify more specific errors.
4) Remove the Decommissioned Pools from the Deployment Configuration
Once decommissioning completes, you can safely remove the pools from the deployment configuration. Modify the startup command for each remaining MinIO server in the deployment and remove the decommissioned pool.
The .deb or .rpm packages install a systemd service file to /lib/systemd/system/minio.service. For binary installations, this procedure assumes the file was created manually as per the Installation and Management procedure.
The minio.service file uses an environment file located at /etc/default/minio for sourcing configuration settings, including the startup. Specifically, the MINIO_VOLUMES variable sets the startup command:
cat /etc/default/minio | grep "MINIO_VOLUMES"
The command returns output similar to the following:
Edit the environment file and remove the decommissioned pools from the MINIO_VOLUMES value.
5) Update Network Control Plane
Update any load balancers, reverse proxies, or other network control planes to remove the decommissioned server pools from the connection configuration for the MinIO deployment.
Specific instructions for configuring network control plane components is out of scope for this procedure.
6) Restart the MinIO Deployment
Issue the following commands on each node simultaneously in the deployment to restart the MinIO service:
sudo systemctl restart minio.service
Use the following commands to confirm the service is online and functional:
sudo systemctl status minio.service
journalctl -f -u minio.service
MinIO may log an increased number of non-critical warnings while the server processes connect and synchronize. These warnings are typically transient and should resolve as the deployment comes online.
MinIO strongly recommends restarting all MinIO Server processes in a deployment simultaneously. MinIO operations are atomic and strictly consistent. As such the restart procedure is non-disruptive to applications and ongoing operations.
Do not perform “rolling” (e.g. one node at a time) restarts.
Once the deployment is online, use mc admin info to confirm the uptime of all remaining servers in the deployment.
This page documents deploying Silo onto Apple macOS hosts for development and evaluation.
Silo publishes separate macOS archives for Intel and Apple Silicon. The current project CI runs on Linux and does not establish a macOS support-lifecycle guarantee, so the inherited, dated list of “supported” macOS releases has been removed. Validate the exact operating-system version and workload before production use.
The procedure includes guidance for deploying Single-Node Multi-Drive (SNMD) and Single-Node Single-Drive (SNSD) topologies in support of early development and evaluation environments.
This guide does not validate Multi-Node Multi-Drive (MNMD) distributed configurations on macOS hosts.
Considerations
Review Checklists
Ensure you have reviewed our published Hardware, Software, and Security checklists before attempting this procedure.
Erasure Coding Parity
MinIO automatically determines the default erasure coding configuration for the cluster based on the total number of nodes and drives in the topology. You can configure the per-object parity setting when you set up the cluster or let MinIO select the default (EC:4 for production-grade clusters).
Parity controls the relationship between object availability and storage on disk. Use the MinIO Erasure Code Calculator for guidance in selecting the appropriate erasure code parity level for your cluster.
While you can change erasure parity settings at any time, objects written with a given parity do not automatically update to the new parity settings.
Procedure
1. Download the Silo Binary
Choose the Intel (darwin_amd64) or Apple Silicon (darwin_arm64) archive from Download & Install. Verify the archive against the checksum published with the same release, extract it, and install the silo binary:
The old Homebrew commands on this page installed the upstream MinIO formula, not Silo, and have therefore been removed.
2. Enable TLS Connectivity
You can skip this step to deploy without TLS enabled. MinIO strongly recommends against non-TLS deployments outside of early development.
Create or provide Transport Layer Security (TLS) certificates to MinIO to automatically enable HTTPS-secured connections between the server and clients.
MinIO expects the default certificate names of private.key and public.crt for the private and public keys respectively. Place the certificates in a dedicated directory:
SILO uses the operating system trust store and the configured CAs directory to verify TLS peers when connecting to other services, such as nodes and replication targets. For a private CA, place its CA certificate in /opt/minio/certs/CAs and make it readable by the service account. Enabling server TLS alone does not enable client-certificate authentication.
For more specific guidance on configuring MinIO for TLS, including multi-domain support via Server Name Indication (SNI), see Network Encryption (TLS).
Certificates for Early Development
For local testing or development environments, you can use the MinIO certgen to mint self-signed certificates. For example, the following command generates a self-signed certificate with a set of IP and DNS Subject Alternate Names (SANs) associated to the MinIO Server hosts:
certgen -host "localhost,minio-*.example.net"
Place the generated public.crt and private.key into the /path/to/certs directory to enable TLS for the MinIO deployment. Applications can use the public.crt as a trusted Certificate Authority to allow connections to the MinIO deployment without disabling certificate validation.
3. Create the MinIO Environment File
Create an environment file at /etc/default/silo. The launch command below reads it through MINIO_CONFIG_ENV_FILE; macOS does not use the Linux systemd unit.
Modify the example to reflect your deployment topology.
Single-Node Multi-Drive
Use Single-Node Multi-Drive deployments in development and evaluation environments. You can also use them for smaller storage workloads which can tolerate data loss or unavailability due to node downtime.
# Set the volumes MinIO uses at startup# The command uses MinIO expansion notation {x...y} to denote a# sequential series.## The following specifies a single host with 4 drives at the specified location## The command includes the port that the MinIO server listens on# (default 9000).# If you run without TLS, change https -> httpMINIO_VOLUMES="https://minio1.example.net:9000/mnt/drive{1...4}/minio"# Set all MinIO server command-line options## The following explicitly sets the MinIO Console listen address to# port 9001 on all network interfaces.# The default behavior is dynamic port selection.MINIO_OPTS="--console-address :9001 --certs-dir /opt/minio/certs"# Set the root username.# This user has unrestricted permissions to perform S3 and# administrative API operations on any resource in the deployment.## Defer to your organizations requirements for superadmin user name.MINIO_ROOT_USER=minioadmin
# Set the root password## Use a long, random, unique string that meets your organizations# requirements for passwords.MINIO_ROOT_PASSWORD=minio-secret-key-CHANGE-ME
Single-Node Single-Drive
Use Single-Node Single-Drive (“Standalone”) deployments in early development and evaluation environments. MinIO does not recommend Standalone deployments in production, as the loss of the node or its storage medium results in data loss.
# Set the volume MinIO uses at startup## The following specifies the drive or folder pathMINIO_VOLUMES="/mnt/drive1/minio"# Set all MinIO server command-line options## The following explicitly sets the MinIO Console listen address to# port 9001 on all network interfaces.# The default behavior is dynamic port selection.MINIO_OPTS="--console-address :9001 --certs-dir /opt/minio/certs"# Set the root username.# This user has unrestricted permissions to perform S3 and# administrative API operations on any resource in the deployment.## Defer to your organizations requirements for superadmin user name.MINIO_ROOT_USER=minioadmin
# Set the root password## Use a long, random, unique string that meets your organizations# requirements for passwords.MINIO_ROOT_PASSWORD=minio-secret-key-CHANGE-ME
Specify any other environment variables or server command-line options as required by your deployment.
MINIO_CONFIG_ENV_FILE is parsed by the server; it is not sourced as a shell script. Quote values when leading or trailing spaces are significant. Named configuration targets may contain visible punctuation such as my-hook; malformed keys, NUL, and invisible characters stop startup with a value-redacted file-and-line error. See Config Environment Files Are Not Shell Scripts.
4. Start the MinIO Server
The following command starts the MinIO Server attached to the current terminal/shell window:
exportMINIO_CONFIG_ENV_FILE=/etc/default/silo
silo server --console-address :9001
The API block lists the network interfaces and port on which clients can access the MinIO S3 API. The Console block lists the network interfaces and port on which clients can access the MinIO Web Console.
To run the MinIO server process in the background or as a daemon, defer to the macOS documentation for best practices and procedures.
5. Connect to the Deployment
Console
Open your browser and access any of the MinIO hostnames at port :9001 to open the MinIO Console login page. For example, https://minio1.example.com:9001.
Log in with the MINIO_ROOT_USER and MINIO_ROOT_PASSWORD from the previous step.
You can use the MinIO Console for general administration tasks like Identity and Access Management, Metrics and Log Monitoring, or Server Configuration. Each MinIO server includes its own embedded MinIO Console.
CLI
Follow the installation instructions for mcli on your local host. Run mcli --version to verify the installation. Substitute the installed mcli for the mc examples below; the arguments are unchanged.
If your MinIO deployment uses third-party or self-signed TLS certificates, copy the CA files to ~/.mc/certs/CAs to allow mc
Once installed, create an alias for the MinIO deployment:
mc aliasset myminio https://minio-1.example.net:9000 USERNAME PASSWORD
Change the hostname, username, and password to reflect your deployment. The hostname can be any MinIO node in the deployment. You can also specify the hostname load balancer, reverse proxy, or similar network control plane that handles connections to the deployment.
6. Next Steps
Enable TLS before exposing the service beyond a trusted development network.
The following procedures upgrade a single Silo Tenant using either Kustomize or Helm. Test the exact server image, Operator/chart version, and rollback procedure in a non-production Tenant first.
Caution
Keep the server image on pgsty/silo and use only a tag or digest published on the Silo download page. The upstream Tenant defaults use a MinIO image. Also keep MINIO_UPDATE=off; the inherited in-place updater still targets the upstream MinIO feed and is not a Silo upgrade path.
Warning
Important
For Tenants using a MinIO Image older than RELEASE.2024-03-30T09-41-56Z running with AD/LDAP enabled, you must read through the release notes for RELEASE.2024-04-18T19-09-19Z before starting this procedure. You must take the extra steps documented in the linked release as part of the upgrade procedure.
Upgrade a Tenant using Kustomize
The following procedure upgrades a MinIO Tenant using Kustomize and the kubectl CLI. If you deployed the Tenant using Helm, use the Upgrade the Tenant using the MinIO Helm Chart procedure instead.
To upgrade a Tenant with Kustomize:
If the tenant was deployed with Operator Console, there are additional steps to create a base configuration file before upgrading.
If the tenant was deployed with Kustomize, the base configuration is your existing kustomization files from the original tenant deployment.
Choose a tab below depending on how the tenant was deployed:
Operator Console-Deployed Tenant
Create the base configuration file:
In a convenient directory, save the current Tenant configuration to a file using kubectl get:
kubectl get tenant/my-tenant -n my-tenant-ns -o yaml > my-tenant-base.yaml
Replace my-tenant and my-tenant-ns with the name and namespace of the Tenant to upgrade.
If you used a different filename for the kubectl get output in the previous step, replace my-tenant-base.yaml with the name of that file.
Existing Kustomized-deployed Tenant
You can upgrade the tenant using the kustomization files from the original deployment as the base configuration. If you no longer have these files, follow the instructions in the Operator Console-Deployed Tenant tab.
Create a upgrade-minio-tenant.yaml file with contents resembling the following:
This file instructs Kustomize to upgrade the tenant using the specified image. The name of this file, upgrade-minio-tenant.yaml, must match the patches.path filename specified in the kustomization.yaml file created in the previous step.
Replace my-tenant and my-tenant-ns with the name and namespace of the Tenant to upgrade. Replace the sample image tag only with a newer published Silo release that you have validated.
Alternatively, you can update the base configuration directly, according to your local procedures. Refer to the Kustomize Documentation for more information.
From the same directory as the above files, apply the updated configuration to the Tenant with kubectl apply:
kubectl apply -k ./
The output resembles the following:
tenant.minio.min.io/my-tenant configured
Upgrade the Tenant using the MinIO Helm Chart
This procedure upgrades an existing MinIO Tenant using Helm Charts.
Use kubectl get all -n TENANT_NAMESPACE to verify the health and status of all Tenant pods and services.
Use the helm list command to view the installed charts in the namespace:
helm list -n TENANT_NAMESPACE
The result should resemble the following:
NAME            NAMESPACE         REVISION        UPDATED                                 STATUS          CHART           APP VERSION
CHART_NAME      TENANT_NAMESPACE  1               2023-11-01 15:49:58.810412732 -0400 EDT deployed        tenant-5.0.x   v5.0.x
Update the Operator Repository
Use helm repo update minio-operator to update the MinIO Operator repo. If you set a different alias for the MinIO Operator repository, specify that to the command. You can use helm repo list to review your installed repositories.
Use helm search to check the latest available chart version after updating the Operator Repo:
helm search repo minio-operator
The response should resemble the following:
NAME                            CHART VERSION   APP VERSION     DESCRIPTION
minio-operator/minio-operator   4.3.7           v4.3.7          A Helm chart for MinIO Operator
minio-operator/operator         7.1.1          v7.1.1         A Helm chart for MinIO Operator
minio-operator/tenant           7.1.1          v7.1.1         A Helm chart for MinIO Operator
The minio-operator/minio-operator is a legacy chart and should not be installed under normal circumstances.
Preserve and review the Tenant values
Export the release’s current user-supplied values, then verify that the file retains all topology, storage, TLS, credentials, and scheduling settings:
helm get values CHART_NAME -n TENANT_NAMESPACE -o yaml > values.yaml
Set tenant.image.repository to pgsty/silo, pin tenant.image.tag to a tested published Silo release, and ensure tenant.env includes MINIO_UPDATE=off. Never allow a chart upgrade to silently restore the upstream image default.
Run the pinned helm upgrade
Pin the chart version separately from the Silo server image and pass the reviewed values file:
The command results should return success with a bump in the REVISION value.
Validate the Tenant Upgrade
Check that all services and pods are online, confirm the running image digest, and perform an authenticated S3 read/write smoke test before completing the rollout.
This page documents deploying Silo onto Microsoft Windows hosts for development and evaluation.
Silo publishes Windows archives for x86-64 and ARM64. The current project CI runs on Linux and does not provide Windows runtime coverage, so the old upstream list of “officially supported” Windows releases has been removed. Validate the exact Windows edition, filesystem, service wrapper, and workload before relying on it in production.
The procedure includes guidance for deploying Single-Node Multi-Drive (SNMD) and Single-Node Single-Drive (SNSD) topologies in support of early development and evaluation environments.
This guide does not validate Multi-Node Multi-Drive (MNMD) distributed configurations on Windows hosts.
Considerations
Review Checklists
Ensure you have reviewed our published Hardware, Software, and Security checklists before attempting this procedure.
Erasure Coding Parity
MinIO automatically determines the default erasure coding configuration for the cluster based on the total number of nodes and drives in the topology. You can configure the per-object parity setting when you set up the cluster or let MinIO select the default (EC:4 for production-grade clusters).
Parity controls the relationship between object availability and storage on disk. Use the MinIO Erasure Code Calculator for guidance in selecting the appropriate erasure code parity level for your cluster.
While you can change erasure parity settings at any time, objects written with a given parity do not automatically update to the new parity settings.
Procedure
1. Download the Silo Binary
Download the Windows archive for your architecture from Download & Install, verify it against the checksum published with the same release, and extract silo.exe.
The next step includes instructions for running the executable. Launch the server from PowerShell or the Command Prompt rather than by double-clicking it in Explorer.
2. Launch the MinIO Server
In PowerShell or the Command Prompt, navigate to the location of the executable or add the path of the silo.exe file to the system $PATH. computer.
Multi-Drive
For Windows hosts with multiple drives, you can specify a sequential set of drives to use for configuring MinIO in the Single-Node Multi-Drive (SNMD) topology:
.\silo.exe server {D...G}:\minio --console-address :9001
The silo server process prints its output to the system console, similar to the following:
API: http://192.0.2.10:9000 http://127.0.0.1:9000
RootUser: minioadmin
RootPass: minioadmin
Console: http://192.0.2.10:9001 http://127.0.0.1:9001
RootUser: minioadmin
RootPass: minioadmin
Command-line: https://silo.pgsty.com/reference/minio-mc/
$ mc aliasset myminio http://192.0.2.10:9000 minioadmin minioadmin
Documentation: https://silo.pgsty.com/docs/
WARNING: Detected default credentials 'minioadmin:minioadmin', we recommend that you change these values with 'MINIO_ROOT_USER' and 'MINIO_ROOT_PASSWORD' environment variables.
The process is tied to the current PowerShell or Command Prompt window. Closing the window stops the server and ends the process.
Single-Drive
Use this command to start a local MinIO instance in the C:\minio folder. You can replace C:\minio with another drive or folder path on the local
.\silo.exe server C:\minio --console-address :9001
The silo server process prints its output to the system console, similar to the following:
API: http://192.0.2.10:9000 http://127.0.0.1:9000
RootUser: minioadmin
RootPass: minioadmin
Console: http://192.0.2.10:9001 http://127.0.0.1:9001
RootUser: minioadmin
RootPass: minioadmin
Command-line: https://silo.pgsty.com/reference/minio-mc/
$ mc aliasset myminio http://192.0.2.10:9000 minioadmin minioadmin
Documentation: https://silo.pgsty.com/docs/
WARNING: Detected default credentials 'minioadmin:minioadmin', we recommend that you change these values with 'MINIO_ROOT_USER' and 'MINIO_ROOT_PASSWORD' environment variables.
The process is tied to the current PowerShell or Command Prompt window. Closing the window stops the server and ends the process.
3. Connect your Browser to the MinIO Server
Access the MinIO Console by going to a browser (such as Microsoft Edge) and going to http://127.0.0.1:9001 or one of the Console addresses specified in the silo server command’s output. For example, Console: http://192.0.2.10:9001 http://127.0.0.1:9001 in the example output indicates two possible addresses to use for connecting to the Console.
While port 9000 is used for connecting to the API, MinIO automatically redirects browser access to the MinIO Console.
Log in to the Console with the RootUser and RootPass user credentials displayed in the output. These default to minioadmin | minioadmin.
You can use the MinIO Console for general administration tasks like Identity and Access Management, Metrics and Log Monitoring, or Server Configuration. Each MinIO server includes its own embedded MinIO Console.
For more information, see the MinIO Console documentation.
4. (Optional) Install the Silo Client
The Silo client allows you to work with the deployment from PowerShell.
Download the Windows client archive from Download & Install, verify its checksum, and extract mcli.exe.
Run it from the Command Prompt or PowerShell:
\path\to\mcli.exe --help
Use mc alias set through the installed mcli.exe command to authenticate and connect to the deployment.
mcli.exe aliassetlocal http://127.0.0.1:9000 minioadmin minioadmin
mcli.exe admin info local
This procedure documents expanding the available storage capacity of an existing MinIO tenant by deploying an additional pool of MinIO pods in the Kubernetes infrastructure.
Warning
Important
The MinIO Operator Console is deprecated and removed in Operator 6.0.0.
See Modify a MinIO Tenant for instructions on migrating Tenants installed via the Operator Console to Kustomization.
Prerequisites
MinIO Kubernetes Operator
This procedure requires a valid installation of the MinIO Kubernetes Operator and assumes the local host has a matching Operator installation. It uses v7.1.1, the final upstream release before the repository was archived, as a frozen compatibility baseline.
MinIO deploys additional minio server pods as part of the new Tenant pool. The Kubernetes cluster must have sufficient available worker nodes on which to schedule the new pods.
The MinIO Operator provides configurations for controlling pod affinity and anti-affinity to direct scheduling to specific workers.
Persistent Volumes
Note
Exclusive access to drives
MinIO requiresexclusive access to the drives or volumes provided for object storage. No other processes, software, scripts, or persons should perform any actions directly on the drives or volumes provided to MinIO or the objects or files MinIO places on them.
Unless directed by MinIO Engineering, do not use scripts or tools to directly modify, delete, or move any of the data shards, parity shards, or metadata files on the provided drives, including from one drive or node to another. Such operations are very likely to result in widespread corruption and data loss beyond MinIO’s ability to heal.
MinIO can use any Kubernetes Persistent Volume (PV) that supports the ReadWriteOnce access mode. MinIO’s consistency guarantees require the exclusive storage access that ReadWriteOnce provides.
For Kubernetes clusters where nodes have Direct Attached Storage, MinIO strongly recommends using the DirectPV CSI driver. DirectPV provides a distributed persistent volume manager that can discover, format, mount, schedule, and monitor drives across Kubernetes nodes. DirectPV addresses the limitations of manually provisioning and monitoring local persistent volumes.
Note
Note
MinIO Tenants on EKS must use the EBS CSI Driver to provision the necessary underlying persistent volumes. MinIO strongly recommends using SSD-backed EBS volumes for best performance. For more information on EBS resources, see EBS Volume Types.
Procedure
The MinIO Operator supports expanding a MinIO Tenant by adding additional pools.
Kustomization
Review the Kustomization object which describes the Tenant object (tenant.yaml).
The spec.pools array describes the current pool topology.
Add a new entry to the spec.pools array.
The new pool must reflect your intended combination of Worker nodes, volumes per server, storage class, and affinity/scheduler settings. See MinIO Custom Resource Definition for more complete documentation on Pool-related configuration settings.
Apply the updated Tenant configuration
Use the kubectl apply command to update the Tenant:
kubectl apply -k ~/kustomization/TENANT-NAME
Modify the path to the Kustomization directory to match your local configuration.
Helm
Review the Helm values.yaml file.
The tenant.pools array describes the current pool topology.
Add a new entry to the tenant.pools array.
The new pool must reflect your intended combination of Worker nodes, volumes per server, storage class, and affinity/scheduler settings. See Tenant Helm Charts for more complete documentation on Pool-related configuration settings.
Apply the updated Tenant configuration
Use the helm upgrade command to update the Tenant:
The command above assumes use of the MinIO Operator Chart repository. If you installed the Chart manually or by using a different repository name, specify that chart or name in the command.
Replace TENANT-NAME and TENANT-NAMESPACE with the name and namespace of the Tenant respectively. You can use helm list -n TENANT-NAMESPACE to validate the Tenant name.
You can use the kubectl get events -n TENANT-NAMESPACE --watch to monitor the progress of expansion. The MinIO Operator updates services to route connections appropriately across the new nodes. If you use customized services, routes, ingress, or similar Kubernetes network components, you may need to update those components for the new pod hostname ranges.
2.22 - Migrate from Gateway or Filesystem Mode
Background
The MinIO Gateway and the related filesystem mode entered a feature freeze in July 2020. In February 2022, MinIO announced the deprecation of the MinIO Gateway. Along with the deprecation announcement, MinIO also announced that the feature would be removed in six months time.
As of RELEASE.2022-10-29T06-21-33Z, the MinIO Gateway and the related filesystem mode code have been removed. Deployments still using the standalone or filesystem MinIO modes that upgrade to MinIO Server RELEASE.2022-10-29T06-21-33Z or later receive an error when attempting to start MinIO.
Overview
To upgrade to the RELEASE.2022-10-29T06-21-33Z or later release, those who were using the standalone or filesystem deployment modes must create a new Single-Node Single-Drive deployment and migrate settings and content to the new deployment.
This document outlines the steps required to successfully launch and migrate to a new deployment.
Warning
Important
Standalone/file system mode continues to work on any release up to and including MinIO Server RELEASE.2022-10-24T18-35-07Z. To continue using a standalone deployment, install that MinIO Server release with MinIO Client RELEASE.2022-10-29T10-09-23Z or any earlier release with its corresponding MinIO Client. Note that the version of the MinIO Client should be newer and as close as possible to the version of the MinIO server.
Filesystem mode deployments must be on at least RELEASE.2022-06-25T15-50-16Z to use the MinIO Client import and export commands. Filesystem mode deployments up to and including RELEASE.2022-06-20T23-13-45Z can be migrated by manually recreating users, policies, buckets, and other resources on the new deployment.
Procedure
Note
Note
You can set MinIO configuration settings in environment variables and using mc admin config set. Depending on your current deployment setup, you may need to retrieve the values for both.
You can examine any runtime settings using env | grep MINIO_ or, for deployments using MinIO’s systemd service, check the contents of /etc/default/minio.
Create a new Single-Node Single-Drive MinIO deployment.
Follow our installation instructions for your OS of choice and configure the installation as a Single-Node Single-Drive (SNSD) topology.
The location of the deployment can be any empty folder on the storage medium of your choice. A new folder on the same drive can work for the new deployment as long as the existing deployment is not on the root of a drive. If the existing standalone system points to the root of the drive, you must use a separate drive for the new deployment.
If both old and new deployments are on the same host:
Install the new deployment to a different path from the existing deployment.
Set the new deployment’s Console and API ports to different ports than the existing deployment.
The following commandline options set the ports at startup:
Duplicate the existing /etc/default/minio environment file with a unique name.
In the new deployment’s service file, update EnvironmentFile to reference the new environment file.
The steps below use the mc command line tool from both deployments. Existing MinIO Client is mc from the old deployment. New MinIO Client is mc from the new deployment.
Add an alias for the deployment created in the previous step using mc alias set and the new MinIO Client.
mc aliasset NEWALIAS PATH ACCESSKEY SECRETKEY
Use the new MinIO Client.
Replace NEWALIAS with the alias to create for the deployment.
Replace PATH with the IP address or hostname and port for the new deployment.
Replace ACCESSKEY and SECRETKEY with the credentials you used when creating the new deployment.
Migrate settings according to the type of deployment:
The MinIO Gateway is a stateless proxy service that provides S3 API compatibility for an array of backend storage systems.
Filesystem mode deployments provide an S3 access layer for a single MinIO server process and single storage volume.
Gateway
Migrate configuration settings:
If your deployment uses environment variables for configuration settings, copy the environment variables from the existing deployment’s /etc/default/minio file to the same file in the new deployment. You may omit any MINIO_CACHE_* and MINIO_GATEWAY_SSE environment variables, as these are no longer used.
If you use mc admin config set for configuration settings, duplicate the existing settings for the new deployment using the new MinIO Client.
Filesystem mode
Note
Note
The following Filesystem mode steps presume the existing MinIO Client supports the needed export commands. If it does not, recreate users, policies, lifecycle rules, and buckets manually on the new deployment using the new MinIO Client.
Export the existing deployment’s configurations.
Use the mc admin config export command with the existing MinIO Client to retrieve the configurations defined for the existing standalone MinIO deployment.
mc admin config export ALIAS > config.txt
Use the existing MinIO Client.
Replace ALIAS with the alias used for the existing standalone deployment you are retrieving values from.
Import configurations from the existing standalone deployment to the new deployment with the new MinIO Client.
mc admin config import ALIAS < config.txt
Use the new MinIO Client.
Replace ALIAS with the alias for the new deployment.
If import reports an error for a configuration key, comment it out with # at the beginning of the relevant line and try again. When you are finished migrating the deployment, verify the current syntax for the target MinIO Server version and set any needed keys manually using mc admin config set.
Restart the server for the new deployment with the new MinIO Client.
mc admin service restart ALIAS
Use the new MinIO Client.
Replace ALIAS with the alias for the new deployment.
Export bucket metadata from the existing standalone deployment with the existing MinIO Client.
The following command exports bucket metadata from the existing deployment to a .zip file.
The data includes:
bucket targets
lifecycle rules
notifications
quotas
locks
versioning
The export includes the bucket metadata only. This command does not export objects from the existing deployment.
mc admin cluster bucket export ALIAS
Use the existing MinIO Client.
Replace ALIAS with the alias for your existing deployment.
This command creates a cluster-metadata.zip file with metadata for each bucket.
Import bucket metadata to the new deployment with the new MinIO Client.
The following command reads the contents of the exported bucket .zip file and creates buckets on the new deployment with the same configurations.
mc admin cluster bucket import ALIAS cluster-metadata.zip
Use the new MinIO Client.
Replace ALIAS with the alias for the new deployment.
The command creates buckets on the new deployment with the same configurations as provided by the metadata in the .zip file from the existing deployment.
Export IAM settings from the existing standalone deployment to new deployment with the existing MinIO Client.
If you are using an external identity and access management provider, recreate those settings in the new deployment along with all associated policies.
Use the following command to export IAM settings from the existing deployment. This command exports:
Groups and group mappings
STS users and STS user mappings
Policies
Users and user mappings
mc admin cluster iam export ALIAS
Use the existing MinIO Client.
Replace ALIAS with the alias for your existing deployment.
This command creates a ALIAS-iam-info.zip file with IAM data.
Import the IAM settings to the new deployment with the new MinIO Client.
Use the exported file to create the IAM setting on the new deployment.
mc admin cluster iam import ALIAS alias-iam-info.zip
Use the new MinIO Client.
Replace ALIAS with the alias for the new deployment.
Replace the name of the zip file with the name for the existing deployment’s file.
Use mc mirror with the --preserve and --watch flags on the standalone deployment to move objects to the new SNSD deployment with the existing MinIO Client
mc mirror --preserve --watch SOURCE/BUCKET TARGET/BUCKET
Use the existing MinIO Client.
Replace SOURCE/BUCKET with the alias and a bucket for the existing standalone deployment.
Replace TARGET/BUCKET with the alias and corresponding bucket for the new deployment.
Stop writes to the standalone deployment from any S3 or POSIX client.
Wait for mc mirror to complete for all buckets for any remaining operations.
Stop the server for both deployments.
Restart the new MinIO deployment with the ports used for the previous standalone deployment.
Ensure you apply all environment variables and runtime configuration settings and validate the behavior of the new deployment.
2.23 - Delete a Silo Tenant
Prerequisites
MinIO Kubernetes Operator
The procedures on this page require a valid installation of the MinIO Kubernetes Operator and assume the local host has a matching Operator installation. They use v7.1.1, the final upstream release before the repository was archived, as a frozen compatibility baseline.
The delete behavior of each Persistent Volume Claims (PVC) generated by the Tenant depends on the Reclaim Policy of its bound Persistent Volume (PV):
For recycle or delete policies, the command deletes the PVC.
For retain, the command retains the PVC.
Caution
Warning
Deletion of the underlying PV, whether automatic or manual, results in the loss of any objects stored on the MinIO Tenant.
Perform all due diligence in ensuring the safety of stored data prior to deleting the Tenant.
Procedure
Kustomization
You can delete a Kustomization-installed Tenant by deleting the namespace:
kubectl delete namespace TENANT-NAMESPACE
Replace TENANT-NAMESPACE with the name of the namespace to remove.
Warning
Important
Ensure you have specified the correct namespace for removal before running the command. Namespace removal occurs at the Kubernetes layer, such that the MinIO Operator cannot interfere with nor undo the operation.
Helm
You can delete a Helm-installed namespace by using the helm uninstall command:
The command above assumes use of the MinIO Operator Chart repository. If you installed the Chart manually or by using a different repository name, specify that chart or name in the command.
Replace TENANT-NAME and TENANT-NAMESPACE with the name and namespace of the Tenant respectively. You can use helm list -n TENANT-NAMESPACE to validate the Tenant name.
2.24 - Upgrade Legacy MinIO Operators
MinIO supports the following upgrade paths for older versions of the MinIO Operator:
Current Version
Supported Upgrade Target
5.0.15 or later
7.1.1
5.0.0 to 5.0.14
5.0.15
4.2.3 to 4.5.7
4.5.8
4.0.0 through 4.2.2
4.2.3
3.X.X
4.2.2
To upgrade from Operator to 7.1.1 from version 4.5.7 or earlier, you must first upgrade to version 4.5.8, then upgrade to 5.0.15. Depending on your current version, you may need to do one or more intermediate upgrades to reach v4.5.8.
You have an existing MinIO Operator deployment running 4.5.8 or later
Your Kubernetes cluster runs 1.21.0 or later
Your local host has kubectl installed and configured with access to the Kubernetes cluster
This procedure upgrades the MinIO Operator from any 4.5.8 or later release to 5.0.15
Tenant Custom Resource Definition Changes
The following changes apply for Operator v5.0.0 or later:
The .spec.s3 field is replaced by the .spec.features field.
The .spec.credsSecret field is replaced by the .spec.configuration field.
The .spec.credsSecret should hold all the environment variables for the MinIO deployment that contain sensitive information and should not show in .spec.env. This change impacts the Tenant CRD and only impacts users editing a tenant YAML directly, such as through Helm or Kustomize.
Both the Log Search API (.spec.log) and Prometheus (.spec.prometheus) deployments have been removed. However, existing deployments are left running as standalone deployments / statefulsets with no connection to the Tenant CR. Deleting the Tenant CRD does not cascade to the log or Prometheus deployments.
Warning
Important
MinIO recommends that you create a yaml file to manage these deployments going forward.
Log Search and Prometheus
The latest releases of Operator remove Log Search and Prometheus from included Operator tools. The following steps back up the existing yaml files, perform some clean up, and provide steps to continue using either or both of these functions.
Back up Prometheus and Log Search yaml files.
exportTENANT_NAME=myminio
exportNAMESPACE=mynamespace
kubectl -n $NAMESPACE get secret $TENANT_NAME-log-secret -o yaml > $TENANT_NAME-log-secret.yaml
kubectl -n $NAMESPACE get cm $TENANT_NAME-prometheus-config-map -o yaml > $TENANT_NAME-prometheus-config-map.yaml
kubectl -n $NAMESPACE get sts $TENANT_NAME-prometheus -o yaml > $TENANT_NAME-prometheus.yaml
kubectl -n $NAMESPACE get sts $TENANT_NAME-log -o yaml > $TENANT_NAME-log.yaml
kubectl -n $NAMESPACE get deployment $TENANT_NAME-log-search-api -o yaml > $TENANT_NAME-log-search-api.yaml
kubectl -n $NAMESPACE get svc $TENANT_NAME-log-hl-svc -o yaml > $TENANT_NAME-log-hl-svc.yaml
kubectl -n $NAMESPACE get svc $TENANT_NAME-log-search-api -o yaml > $TENANT_NAME-log-search-api-svc.yaml
kubectl -n $NAMESPACE get svc $TENANT_NAME-prometheus-hl-svc -o yaml > $TENANT_NAME-prometheus-hl-svc.yaml
Replace myminio with the name of the tenant on the operator deployment you are upgrading.
Replace mynamespace with the namespace for the tenant on the operator deployment you are upgrading.
Repeat for each tenant.
Remove .metadata.ownerReferences for all backed up files for all tenants.
(Optional) To continue using Log Search API and Prometheus, add the following variables to the tenant’s yaml specification file under .spec.env
Replace <TENANT_NAME> in the name or value lines with the name of your tenant.
Procedure
Upgrade using Kustomize
The following procedure upgrades the MinIO Operator using Kustomize.
For Operator versions 5.0.1 to 5.0.14 installed with the MinIO Kubernetes Plugin, follow the Kustomize instructions below to upgrade to 5.0.15 or later. If you installed the Operator using Helm, use the Upgrade using Helm instructions instead.
(Optional) Update each MinIO Tenant to the latest stable MinIO Version.
Upgrading MinIO regularly ensures your Tenants have the latest features and performance improvements. Test upgrades in a lower environment such as a Dev or QA Tenant, before applying to your production Tenants. See Upgrade a MinIO Tenant for a procedure on upgrading MinIO Tenants.
Verify the existing Operator installation. Use kubectl get all -n minio-operator to verify the health and status of all Operator pods and services.
If you installed the Operator to a custom namespace, specify that namespace as -n <NAMESPACE>.
You can verify the currently installed Operator version by retrieving the object specification for an operator pod in the namespace. The following example uses the jq tool to filter the necessary information from kubectl:
kubectl get pod -l 'name=minio-operator' -n minio-operator -o json | jq '.items[0].spec.containers'
If your local host does not have the jq utility installed, you can run the first part of the command and locate the spec.containers section of the output.
Upgrade Operator with Kustomize
The following command upgrades Operator to version 5.0.15:
You can check the new Operator version with the same kubectl command used previously:
kubectl get pod -l 'name=minio-operator' -n minio-operator -o json | jq '.items[0].spec.containers'
Upgrade using Helm
The following procedure upgrades an existing MinIO Operator Installation using Helm.
If you installed the Operator using Kustomize, use the Upgrade using Kustomize instructions instead.
(Optional) Update each MinIO Tenant to the latest stable MinIO Version.
Upgrading MinIO regularly ensures your Tenants have the latest features and performance improvements. Test upgrades in a lower environment such as a Dev or QA Tenant, before applying to your production Tenants. See Upgrade a MinIO Tenant for a procedure on upgrading MinIO Tenants.
Verify the existing Operator installation.
Use kubectl get all -n minio-operator to verify the health and status of all Operator pods and services.
If you installed the Operator to a custom namespace, specify that namespace as -n <NAMESPACE>.
Use the helm list command to view the installed charts in the namespace:
helm list -n minio-operator
The result should resemble the following:
NAME            NAMESPACE       REVISION        UPDATED                                 STATUS          CHART           APP VERSION
operator        minio-operator  1               2023-11-01 15:49:54.539724775 -0400 EDT deployed        operator-5.0.x v5.0.x
You can also introspect the operator pods directly to determine the installed version. The following example uses the jq tool to filter the necessary information from kubectl:
kubectl get pod -l 'name=minio-operator' -n minio-operator -o json | jq '.items[0].spec.containers'
If your local host does not have the jq utility installed, you can run the first part of the command and locate the spec.containers section of the output.
Update the Operator Repository
Use helm repo update minio-operator to update the MinIO Operator repo. If you set a different alias for the MinIO Operator repository, specify that in the command instead of minio-operator. You can use helm repo list to review your installed repositories.
Use helm search to check the latest available chart version after updating the Operator Repo:
helm search repo minio-operator
The response should resemble the following:
NAME                            CHART VERSION   APP VERSION     DESCRIPTION
minio-operator/minio-operator   4.3.7           v4.3.7          A Helm chart for MinIO Operator
minio-operator/operator         7.1.1          v7.1.1         A Helm chart for MinIO Operator
minio-operator/tenant           7.1.1          v7.1.1         A Helm chart for MinIO Operator
The minio-operator/minio-operator is a legacy chart and should not be installed under normal circumstances.
Run helm upgrade
Helm uses the latest chart to upgrade the MinIO Operator:
Use kubectl get all -n minio-operator to verify the health and status of all Operator pods and services.
If you installed the Operator to a custom namespace, specify that namespace as -n <NAMESPACE>.
You can verify the currently installed Operator version by retrieving the object specification for an operator pod in the namespace. The following example uses the jq tool to filter the necessary information from kubectl:
kubectl get pod -l 'name=minio-operator' -n minio-operator -o json | jq '.items[0].spec.containers'
Download the Latest Stable Version of the MinIO Kubernetes Plugin
You can install the MinIO plugin using either the Kubernetes Krew plugin manager or manually by downloading and installing the plugin binary to your local host:
Krew Plugin Manager
Krew is a kubectl plugin manager developed by the Kubernetes SIG CLI group. See the krewinstallation documentation for specific instructions. You can use the Krew plugin for Linux, macOS, and Windows operating systems.
You can use Krew to install the MinIO kubectl plugin using the following commands:
kubectl krew update
kubectl krew install minio
If you want to update the MinIO plugin with Krew, use the following command:
kubectl krew upgrade minio
Manual (Linux, macOS)
You can download the MinIO kubectl plugin to your local system path. The kubectl CLI automatically discovers and runs compatible plugins.
The following code downloads the most recent version of the MinIO Kubernetes plugin and installs it to the system path:
Ensure the path to the plugin folder is included in the Windows PATH.
Run the following command to verify installation of the plugin:
kubectl minio version
The output should display the Operator version as 5.0.14.
Run the initialization command to upgrade the Operator
Use the kubectl minio init command to upgrade the existing MinIO Operator installation
kubectl minio init
Validate the Operator upgrade
You can check the Operator version by reviewing the object specification for an Operator Pod using a previous step.
Upgrade MinIO Operator 4.0.0 through 4.2.2 to 4.2.3
Prerequisites
This procedure assumes that:
You have an existing MinIO Operator deployment running any release from 4.0.0 through 4.2.2
Your Kubernetes cluster runs 1.19.0 or later
Your local host has kubectl installed and configured with access to the Kubernetes cluster
Procedure
This procedure covers the necessary steps to upgrade a MinIO Operator deployment running any release from 4.0.0 through 4.2.2 to 4.2.3. You can then perform Upgrade MinIO Operator 5.0.15 to 7.1.1 to complete the upgrade to 7.1.1.
There is no direct upgrade path for 4.0.0 - 4.2.2 installations to 7.1.1.
(Optional) Update each MinIO Tenant to the latest stable MinIO Version.
Upgrading MinIO regularly ensures your Tenants have the latest features and performance improvements. Test upgrades in a lower environment such as a Dev or QA Tenant, before applying to your production Tenants.
Use the following command to validate the specification for each managed MinIO Tenant:
kubectl get tenants <TENANT-NAME> -n <TENANT-NAMESPACE> -o yaml
If the spec.pools.securityContext field does not exist for a Tenant, the tenant pods likely run as root.
As part of the 4.2.3 and later series, pods run with a limited permission set enforced as part of the Operator upgrade. However, Tenants running pods as root may fail to start due to the security context mismatch. You can set an explicit Security Context that allows pods to run as root for those Tenants:
Download the MinIO Kubernetes Plugin 4.2.3 and use it to upgrade the Operator. Open https://github.com/minio/operator/releases/tag/v4.2.3 in a browser and download the binary that corresponds to your local host OS.
For example, Linux hosts running an Intel or AMD processor can run the following commands:
Use the following command to validate the specification for each managed MinIO Tenant:
kubectl get tenants <TENANT-NAME> -n <TENANT-NAMESPACE> -o yaml
Ensure each tenant.spec.zones element has a name field set to the name for that zone. Each zone must have a unique name for that Tenant, such as zone-0 and zone-1 for the first and second zones respectively.
Ensure each tenant.spec.zones has an explicit securityContext describing the permission set with which pods run in the cluster.
The following example tenant YAML fragment sets the specified fields:
Download the MinIO Kubernetes Plugin 4.2.2 and use it to upgrade the Operator. Open https://github.com/minio/operator/releases/tag/v4.2.2 in a browser and download the binary that corresponds to your local host OS. For example, Linux hosts running an Intel or AMD processor can run the following commands:
SILO upgrade requirements: the September IAM repairs require a coordinated upgrade of all participating nodes and a backup containing deletion history. Read IAM Upgrade and Recovery and Audit Historical Replica State, and use the component matrix to distinguish main from published artifacts.
Site replication configures multiple independent MinIO deployments as a cluster of replicas called peer sites.
A site replication deployment with two peer sites.
A load balancer manages routing operations to either of the two sites.
Data written to one site automatically replicates to the other peer site.
Site replication assumes the use of either the included MinIO identity provider (IDP) or an external IDP. All configured deployments must use the same IDP. Deployments using an external IDP must use the same configuration across sites.
MinIO does not recommend using macOS, Windows, or non-orchestrated container deployments for site replication outside of early development, evaluation, or general experimentation. For production, use a supported Linux or Kubernetes deployment and follow the site-replication procedure on this page.
Overview
What Replicates Across All Sites
Each MinIO deployment (“peer site”) synchronizes the following changes across the other peer sites:
Creation, modification, and deletion of buckets and objects, including
After the initial synchronization of data across peer sites, MinIO continually replicates and synchronizes replicable data among all sites as they occur on any site.
Site Healing
Any MinIO deployment in the site replication configuration can resynchronize damaged replica-eligible data from the peer with the most updated (“latest”) version of that data.
Note
Changed: RELEASE.2023-07-18T17-49-40Z
Site replication operations retry up to three (3) times.
MinIO dequeues replication operations that fail to replicate after three attempts. The scanner picks up those affected objects at a later time and requeues them for replication.
Note
Changed: RELEASE.2022-08-11T04-37-28Z
Failed or pending replications requeue automatically when performing any GET or HEAD API method. For example, using mc stat, mc cat, or mc ls commands after a site comes back online prompts healing to requeue.
Note
Changed: RELEASE.2022-12-02T23-48-47Z
If one site loses data for any reason, resynchronize the data from another healthy site with mc admin replicate resync. This launches an active process that resynchronizes the data without waiting for the passive MinIO scanner to recognize the missing data.
You can adjust how MinIO balances the scanner performance with read/write operations using either the MINIO_SCANNER_SPEED environment variable or the scanner speed configuration setting.
Synchronous vs Asynchronous Replication
MinIO supports specifying either asynchronous (default) or synchronous replication for a given remote target.
With asynchronous replication, MinIO completes the originating PUT operation before placing the object into a replication queue. The originating client may therefore see a successful PUT operation before the object is replicated. While this may result in stale or missing objects on the remote, it mitigates the risk of slow write operations due to replication load.
With synchronous replication, MinIO attempts to replicate the object prior to completing the originating PUT operation. MinIO returns a successful PUT operation whether or not the replication attempt succeeds. This reduces the risk of slow write operations at a possible cost of stale or missing objects on the remote location.
MinIO strongly recommends using the default asynchronous site replication. Synchronous site replication performance depends strongly on latency between sites, where higher latency can result in lower PUT performance and replication lag. To configure synchronous site replication use mc admin replicate update with the --mode option.
Proxy to Other Sites
MinIO peer sites can proxy GET/HEAD requests for an object to other peers to check if it exists. This allows a site that is healing or lagging behind other peers to still return an object persisted to other sites.
For example:
A client issues GET("data/invoices/january.xls") to Site1
Site1 cannot locate the object
Site1 proxies the request to Site2
Site2 returns the latest version of the requested object
Site1 returns the proxied object to the client
For GET/HEAD requests that do not include a unique version ID, the proxy request returns the latest version of that object on the peer site. This may result in retrieval of a non-current version of an object, such as if the responding peer site is also experiencing replication lag.
MinIO does not proxy LIST, DELETE, and PUT operations.
Prerequisites
Back Up Cluster Settings First
Use the mc admin cluster bucket export and mc admin cluster iam export commands to take a snapshot of the bucket metadata and IAM configurations respectively prior to configuring Site Replication. You can use these snapshots to restore bucket/IAM settings in the event of misconfiguration during site replication configuration.
One Site with Data at Setup
Only one site can have data at the time of setup. The other sites must be empty of buckets and objects.
After configuring site replication, any data on the first deployment replicates to the other sites.
All Sites Must Use the Same IDP
All sites must use the same Identity Provider. Site replication supports the included MinIO IDP, OIDC, or LDAP.
All Sites Must use the Same MinIO Server Version
All sites must have a matching and consistent MinIO Server version. Configuring replication between sites with mismatched MinIO Server versions may result in unexpected or undesired replication behavior.
You should also ensure the mc version used to configure replication closely matches the server version.
Access to the Same Encryption Service
For SSE-S3 or SSE-KMS encryption via Key Management Service (KMS), all sites must have access to a central KMS deployment.
You can achieve this with a central KES server or multiple KES servers (say one per site) connected via a central supported key vault server.
Replication Requires Versioning
Site replication requiresBucket Versioning and enables it for all created buckets automatically. You cannot disable versioning in site replication deployments.
MinIO cannot replicate objects in prefixes in the bucket that you excluded from versioning.
Load Balancers Installed on Each Site
Specify the URL or IP address of the site’s load balancer, reverse proxy, or similar network control plane component. Requests are automatically routed to nodes in the deployment.
MinIO recommends against using a single node hostname for a peer site. This creates a single point of failure: if that node goes offline, replication fails.
Switch to Site Replication from Bucket Replication
Bucket replication and multi-site replication are mutually exclusive. You cannot use both replication methods on the same deployments.
If you previously set up bucket replication and wish to now use site replication, you must first delete all of the bucket replication rules on the deployment that has data when initializing site replication. Use mc replicate rm on the command line to remove bucket replication rules.
Only one site can have data when setting up site replication. All other sites must be empty.
The three sites use aliases, minio1, minio2, and minio3, and only minio1 contains any data.
Deploy three or more separate MinIO sites, using the same IDP
Start with empty sites or have no more than one site with any replicable data.
Configure an alias for each site
Specify the URL or IP address of the site’s load balancer, reverse proxy, or similar network control plane component. Requests are automatically routed to nodes in the deployment.
MinIO recommends against using a single node hostname for a peer site. This creates a single point of failure: if that node goes offline, replication fails.
For example, for three MinIO sites, you might create aliases minio1, minio2, and minio3.
Use mc alias set to define the hostname or IP of the load balancer managing connections to the site.
mc aliasset minio1 https://minio1.example.com:9000 adminuser adminpassword
mc aliasset minio2 https://minio2.example.com:9000 adminuser adminpassword
mc aliasset minio3 https://minio3.example.com:9000 adminuser adminpassword
If all sites are empty, the order of the aliases does not matter. If one of the sites contains any replicable data, you must list it first.
No more than one site can contain any replicable data.
Query the site replication configuration to verify
mc admin replicate info minio1
You can use the alias for any peer site in the site replication configuration.
Query the site replication status to confirm any initial data has replicated to all peer sites.
mc admin replicate status minio1
You can use the alias for any of the peer sites in the site replication configuration. The output should say that all replicable data is in sync.
The output could resemble the following:
Bucket replication status:
●  1/1 Buckets in sync

Policy replication status:
●  5/5 Policies in sync

User replication status:
No Users present

Group replication status:
No Groups present
You can add more sites to an existing site replication configuration.
The new site must meet the following requirements:
Site is fully deployed and accessible by hostname or IP
Shares the IDP configuration as all other sites in the configuration
Uses the same root user credentials as other configured sites
Contains no bucket or object data
Deploy the new MinIO peer site(s) following the stated requirements
Configure an alias for the new site
Specify the URL or IP address of the site’s load balancer, reverse proxy, or similar network control plane component. Requests are automatically routed to nodes in the deployment.
MinIO recommends against using a single node hostname for a peer site. This creates a single point of failure: if that node goes offline, replication fails.
Use the mc admin replicate add command to expand the site replication configuration with the new peer site. Specify the alias of all existing peer sites, then the alias of the new site to add.
For example, the following command adds the new peer site minio4 to an existing site replication configuration that includes the existing sites minio1, minio2, and minio3.
mc admin replicate add minio1 minio2 minio3 minio4
Note
Note
If any of the sites are unreachable or permanently lost, you must first remove the unreachable site(s) with mc admin replicate rm before expanding with the new site.
Query the site replication configuration to verify
mc admin replicate info minio1
Modify a Site’s Endpoint
If a peer site changes its hostname, you can modify the replication configuration to reflect the new hostname.
mc admin replicate update ALIAS --deployment-id [DEPLOYMENT-ID] --endpoint [NEW-ENDPOINT]
Replace [DEPLOYMENT-ID] with the deployment ID of the site to update.
Replace [NEW-ENDPOINT] with the new endpoint for the site.
Specify the URL or IP address of the site’s load balancer, reverse proxy, or similar network control plane component. Requests are automatically routed to nodes in the deployment.
MinIO recommends against using a single node hostname for a peer site. This creates a single point of failure: if that node goes offline, replication fails.
Remove a Site from Replication
You can remove a site from replication at any time. You can re-add the site at a later date, but you must first completely wipe bucket and object data from the site.
Displays the replication status summary for all replication sites of which minio3 is part.
The output resembles the following:
Bucket replication status:
●  1/1 Buckets in sync

Policy replication status:
●  5/5 Policies in sync

User replication status:
●  1/1 Users in sync

Group replication status:
●  0/2 Groups in sync

Group           | MINIO2          | MINIO3          | MINIO4
ittechs         | ✗  in-sync      |                 | ✗  in-sync
managers        | ✗  in-sync      |                 | ✗  in-sync
3.2 - IAM Upgrade and Recovery
Coordinate the IAM revocation upgrade, preserve complete deletion history, and rehearse recovery.
The IAM repairs in Server #191 and
#192 persist deletion revisions and
parent revocation boundaries. They prevent delayed site events from restoring
revoked identities and older grants. They require a coordinated upgrade of all
participating servers, including nodes without site replication that share an
IAM backend. Mixed old/new nodes on that backend and rolling downgrade are unsupported.
Release status: these repairs shipped in Server 20260916
and are absent from Server 20260903. This procedure covers coordinated upgrades
and recovery for the repaired version. Isolated upgrade/restore observations and remaining recovery checks are
tracked in #200; see the
validation scope. Publication of this page does not establish
production upgrade acceptance.
Prepare the maintenance window
Inventory every node, site, shared IAM backend, offline peer and backup. Record
the old and candidate Server SHA, binary checksum or image digest, deployment
configuration, root-credential source, external identity-provider settings and
KMS dependencies. Select the matching maintained components from the
component matrix; a standalone Console update does
not replace the Console embedded in a Server binary.
Use protected, preconfigured mcli aliases. These commands read state; run them
for each site and retain the outputs privately. Replace site-a with the actual
alias. Do not collect credentials or enable HTTP debug logging in shared evidence.
The replication command applies to sites with site replication configured.
Readiness alone does not verify IAM correctness. Check clock synchronization on
every node (for example, chronyc tracking on a chrony-managed Linux host), IAM
load errors and replication failures. Repair clock drift before the upgrade:
ordering uses timestamps, and a trusted peer’s future-dated deletion can reject
subsequent older updates until a newer revision is used.
Pause IAM administration and credential issuance, including automation. Isolate
unknown offline peers and prevent automatic restarts of old binaries. Drain
application traffic for the coordinated stop. Establish a list of revoked
identities, recreated parents and credentials requiring reissuance. Missing
deletion history cannot be reconstructed from a missing user record.
Stop here if any participating node, backend, backup, required key, unknown
peer or rollback procedure is unaccounted for. Do not admit an old snapshot to a
live replication group merely to inspect its contents.
Before upgrading, follow the password-policy migration.
Where an existing Deny admin:CreateUser also meant to prohibit changing one’s own
password, add admin:ChangeMyPassword to the same Deny with its existing scope and
conditions; retain both through rollback. Server 20260916 keeps multipart listing in
legacy by default. An ordinary upgrade does not require strict mode; only an
explicit opt-in needs the multipart preflight and drain procedure.
Preserve a complete recovery point
Stop all SILO processes sharing each backend before taking the final recovery
point. For systemd, use the deployment’s actual unit, then verify it is inactive
on every node. For an operator-managed deployment, use its tested maintenance
procedure and prevent reconciliation from restarting old Pods.
SILO_UNIT='silo.service'# replace with the installed unit namesudo systemctl stop "$SILO_UNIT"systemctl is-active "$SILO_UNIT"# expected: inactive; nonzero exit is normal
Backend
Required recovery material
Verification before proceeding
Object storage
A consistent, restorable backup of the complete IAM store, including revisions, deletion records and retained parent boundaries. Use the deployment’s tested full-storage snapshot/backup procedure with all required pool/set/drive mappings.
Restore to an isolated clone with the matching topology and confirm IAM loads. Copying a visible user directory or one erasure-coded drive is insufficient.
etcd
A complete etcd snapshot, member/topology configuration, certificates and authentication material, plus SILO’s endpoint/prefix and encryption configuration.
Check the snapshot, then restore to an isolated etcd cluster using the documented procedure for that etcd version. Do not restore a shared etcd cluster over unrelated workloads.
Both
Exact binaries/images, deployment configuration, root-secret references, KMS/key recovery material and the revocation/change ledger since the backup.
Verify access to the required keys independently of the cluster being replaced. Store secret material separately from review logs.
For etcd, use the deployment’s authenticated TLS configuration and a supported
etcdctl/etcdutl version; see the etcd recovery guide.
The following are backup/check commands; they do not
restore a running cluster:
etcdctl --endpoints="$ETCD_ENDPOINT" snapshot save iam-upgrade-evidence/etcd.db
etcdutl snapshot status iam-upgrade-evidence/etcd.db --write-out=json
A live mcli admin cluster iam export contains useful live records but omits
deletion history. It is not the recovery point for this upgrade. A snapshot
checksum proves file identity; it does not prove that restore and revocation
checks work. Record the backup’s time, scope, checksum and successful clone
restore separately.
Upgrade and verify
Replace binaries/images on all stopped nodes of each shared backend.
Start only upgraded nodes. Keep unknown/old peers isolated and complete the
coordinated upgrade across sites before relying on the new guarantees.
Repeat mcli --json admin info site-a, mcli ready site-a and
mcli --json admin replicate status site-a. Verify the actual identity of
every process, clean IAM loading and working cross-site communication.
Run the write-readiness check against each process endpoint, not just a load
balancer. On distributed nodes, confirm IAM load(startup) finished. in each process’s
current startup log and, when site replication is configured, also
Cluster replication initialized. /minio/health/ready and successful root requests
can precede these background initializers. Wait for both before issuing STS
credentials; the startup messages still do not replace the credential checks
below.
Check IAM metrics for revision counts, healing failures and last successful
healing. A quiet error counter alone does not prove credential revocation.
The background pass runs periodically; its interval is not a convergence SLA.
On every site, use designated canary aliases to read the same pre-existing
object. An old revoked credential must fail authorization; a deliberately
reissued credential with the required policy must succeed. A timeout, 5xx or
missing object is inconclusive. Preserve the error code, site and credential
label, never its secret.
mcli --json stat --no-list revoked-canary/upgrade-canary/probe
mcli --json stat --no-list reissued-canary/upgrade-canary/probe
Reissue service-account/STS credentials belonging to a recreated parent.
Older credentials lack the retained parent boundary required after
revocation. Parents with no retained revocation history keep their existing
credential behavior. Attach only the intended current grants.
Explicitly reconcile known pre-upgrade deletions on sites still holding old
records. Rebuild stale offline peers from approved state before reconnecting
them. Repeat the credential checks after restart and peer catch-up.
Deleting an explicit override of a built-in policy now leaves a durable deletion;
reload does not recreate that policy. Restore an intended policy through an
explicit policy-create operation. Ordinary legacy group-member removal during
an outage remains outside the durable parent-deletion guarantee.
Reopen access only after version identity, backend recovery, IAM loading,
replication and both credential checks pass. If a stale credential succeeds,
keep affected sites isolated and investigate; restarting until health is green
does not resolve the authorization failure.
Errors and observability
A revocation can persist and then return HTTP 500 with
IAM revocation committed; cleanup failed when dependent cleanup fails. This does
not roll back the revocation. Keep IAM writes paused, inspect the identity and
logs, and retry cleanup; do not blindly repeat deletion after a same-name identity
has been recreated. This path publishes to local sibling caches but may skip the
immediate cross-site hook, so verify later site reconciliation. STS fails closed
with STSInternalError if it cannot read the parent revocation boundary; that is
neither successful issuance nor proof of a revoked credential.
Collect these from every process at /minio/metrics/v3/cluster/iam:
Metric
Meaning
minio_cluster_iam_revocation_records
Persistent revocation records observed by this process
These are process metrics, not additive unique-record counts. The three heal_*
metrics advance only with site replication enabled and on the node holding the
leader lease. A shared-backend deployment without site replication performs no
such pass; zero healing metrics are expected. Tombstones have no TTL or automatic
compaction: budget for durable capacity and startup reads. Initial reconciliation
may backfill missing revisions and produce a write burst. Neither its interval
nor these metrics establish a convergence SLA.
A deleted access-key canary normally returns 403 InvalidAccessKeyId; other
revocation mechanisms require their appropriate authorization failure, not a
universal error-code assertion. A 5xx, timeout or missing object is inconclusive.
Live-record export/import omits deletion history and cannot preserve the guarantee
of earlier revocations by itself. See the IAM design
for ordering and remaining limitations.
Rollback and restore
Stop and isolate the affected sites first. Record all IAM changes and revocations
since the chosen recovery point. Restore the complete, compatible backend into
an isolated environment with its matching configuration, keys and binary; do
not start old software against a backend already changed by newer software.
An older backup can restore a credential revoked after that backup. Reapply the
revocation ledger or rekey affected identities before exposing the restored
system. If that ledger is incomplete, keep access isolated until the affected
scope is reconciled. Never remove tombstones, truncate revision history or
import only live records to make an old binary start.
After a restore, repeat the IAM/site-replication startup checks on every process
before issuing credentials. Verify temporary sessions separately from ordinary
users and service accounts. Reissue the required STS credentials after startup
and check them against every intended site; an old session failing on one site
does not prove that its parent identity is safely revoked everywhere.
Reconcile a known recovery group
One bounded recovery policy is to keep retired parent identities disabled,
remove their recorded service-account keys, detach revoked grants, and issue
replacement credentials under distinct identity names. Use the reviewed ledger
to select the actual users, keys and policies; all known sites must be online
inside the isolated recovery group, with stale or unknown peers excluded.
The isolated object-store and etcd rehearsals passed this policy with the
credential checks below. Apply the same checks to the actual recovery group
before approving access.
Check and apply reconciliation at every restored site. A successful command
at one site does not prove that the others applied it. After restoring an old
object-store snapshot with its old binaries, do not rely on site replication
alone to propagate revocations. Confirm already-removed service keys are absent,
keep replacement identities and credentials consistent across the recovery
group, and require the per-process credential checks below before opening access.
The following shows the operations against one protected recovery alias. Replace
the uppercase names with reviewed entries. User creation prompts for a secret;
service-account creation prints credentials, which belong in the approved
secret store rather than the rehearsal log.
Issue designated STS canaries through the application’s usual authenticated
flow after startup completes, and verify each new session on every intended
process. If issuance or cross-site reads fail, keep the recovery group isolated,
retain the failure evidence and investigate. A fresh canary may be issued again
within the planned maintenance window; an elapsed timer alone cannot approve
access. Check the retired user, recorded service keys, revoked
mapping and both pre-restore and newly issued sessions of the retired parent.
They must all be denied on every process that will serve clients. The replacement
user, service account and freshly issued STS credentials must work. Repeat these
checks after a complete restore of the reconciled backup. Keep access isolated
if any check fails; this policy does not permit reconnecting a stale old peer or
re-enabling a retired parent on old software.
Required rehearsal record
For each supported backend, use isolated old/new multi-process sites and
record exact binary identities and backup/restore commands. Exercise deletion
during peer disconnection, delayed old-event replay, deliberate same-name
recreation and credential reissue. Repeat after restart and full restore; also
test rollback to a recovery point predating a deletion. Old credentials must
remain denied after reconciliation while intended new credentials work.
Source regression evidence in #192
supports the protocol implementation. The rehearsal adds deployment topology,
backup completeness, restart and operator recovery evidence. Link the resulting
redacted observations in #200; keep
release-artifact validation and a real production rollout separate.
Validation scope
On 2026-09-16, isolated rehearsals upgraded Server 20260903 (9b11dc9469e6)
to build 70c7ec4a9fbf, whose runtime source matches baseline 40220bd836cb
(only the changelog differs). Both the object-store and etcd 3.6.13 backends
passed. Each run used three sites with two Server processes and four drives per
site; the etcd run used one independent etcd process per site.
Existing, non-revoked user, service-account and STS credentials survived the
coordinated upgrade. Revocations made while one site was stopped converged after
it returned. Cold restart and full restore from a post-revocation backup kept
old credentials and detached grants denied, while explicitly recreated and
reissued credentials worked. Same-key service-account replacement also retained
the new secret and rejected the old secret. Denial checks used signed reads of
a known object with a successful root control, rather than treating any request
failure as proof of revocation.
Restoring a pre-upgrade backup with its old binary made a subsequently revoked
credential work again, confirming the rollback hazard above. A subsequent
rehearsal applied the bounded reconciliation policy, then restored
the reconciled backup using the matching old binary:
Backend
Observed result after reconciliation and full restore
etcd 3.6.13
All six processes rejected the retired user, service key, revoked mapping and retired parent’s sessions; replacement users, service accounts and newly issued STS credentials worked. The isolated client-access checks passed.
Object store
The completed continuation from the same pre-upgrade backup rejected retired users, service keys, revoked grants and the retired parent’s STS. Replacement users, service accounts and fresh STS worked on all six processes after reconciliation and full restore.
The object-store laboratory also observed temporary STS write and cross-site
authentication failures after startup checks passed. A control using only
Server 20260903 also encountered an STS write failure after cold restart; this
does not establish a regression in the new build. The exact cause was not
isolated. Fresh STS probes later passed without changing the binaries or
configuration, and the completed recovery run required those end-to-end checks
before proceeding. Startup messages and a fixed waiting period are insufficient;
preservation of pre-restore STS sessions is outside the accepted recovery scope.
The laboratory used one isolated Linux ARM64 container with a shared clock and
no external peers; the etcd instances were single-member backends. Production
storage snapshots, HA etcd, external identity providers/KMS and clock skew were
not tested. Those deployment-specific checks, the startup observations and
exact artifact identities remain tracked in #200.
3.3 - Audit Historical Replica State
Inventory stored Content-Encoding by exact version and prepare a bounded historical-state repair.
Upgrading to the September replication repairs
prevents new errors. It does not rewrite old Content-Encoding, reconstruct lost
tags or establish that historical delete-marker purge work has converged.
#201 tracks inventory and recovery
readiness. No affected production installation has been identified by this review.
Read-only version inventory
Start with stored aws-chunked Content-Encoding, the transport token addressed
by #194. Inventory all versions on
the authoritative site and replicas. Checking only current objects misses
historical versions; a normal COPY can preserve polluted source metadata.
Download and inspect the read-only inventory script.
It uses Python 3 and boto3, calls only ListObjectVersions and exact-version
HeadObject, and emits JSON Lines. It does not read bodies, write objects, edit
storage files or collect credentials. Use an existing protected AWS profile
with s3:ListBucketVersions and s3:GetObjectVersion permissions on the chosen
scope. This profile is separate from an mcli alias. Allow any additional
read-only Object Lock permissions needed to inspect that deployment.
Download the script and its SHA-256 file, then verify it before execution. This revision is ccc9d035809b2b41157b4a3f1d35a21108ae4b3af2836e99416a1d2eec1efef2.
Keep the script revision/checksum, client dependency versions, Server identity,
bucket configuration, chosen prefix and start/end time with the inventory.
Use an empty prefix to cover the entire bucket and repeat for every relevant
bucket/site. Each data version requires one HEAD, so begin with a bounded
prefix and size the scan to the deployment. Listings are not atomic snapshots;
pause relevant changes or compare repeated inventories before any later repair.
The final summary row must have listing_complete: true. Exit code 0 means
the scan completed without ambiguous rows, not that it found no affected
headers; 2 means ambiguous rows remain, and 1 means listing failed. An
interruption or any unexpected failure without a complete summary is incomplete.
Classification
Meaning and next action
confirmed-header
HEAD returned a well-formed encoding list containing the exact aws-chunked token. The proposed header only removes that token. Raw bytes and a supported repair operation still need verification.
ambiguous
HEAD failed, LIST/HEAD identity or state changed, or encoding tokens are malformed, duplicated or noncanonical. Investigate; never turn a failed HEAD into an empty-header success.
unaffected-header
This successful exact-version HEAD did not contain the transport token. This says nothing about historical tags, purges, body integrity or another version.
delete-marker
A listed marker identity, retained for separate purge analysis. It has no object body to normalize.
Matching is token-based: gzip, aws-chunked is a candidate; my-aws-chunked
is not the transport token. Mixed encoding retains the other tokens in order.
Case variants and duplicates require manual review. SSE-C versions without
the required key can fail HEAD and remain ambiguous; this tool accepts no
SSE-C keys. Use an approved key-aware read procedure for those records without
placing keys in reports or command history.
Manifest and private evidence
The script records exact bucket/key/version, listing time/ETag/size, raw and
proposed Content-Encoding, metadata fingerprint and available replication,
encryption and Object Lock fields. User metadata values and KMS key identifiers
are omitted. Object names and version IDs may still be sensitive: retain the
full manifest privately and use stable replacements in shared reports.
This is an example, not an observed production object. Before approving any
write, enrich the private record with the trusted source/version relationship,
full ordinary/user metadata, exact-version tags, retention/legal hold, SSE mode
and key availability, independent raw-byte checksum and replication state.
Absent fields are unknown until the relevant authorized read confirms them.
The fingerprint detects differences; it cannot restore omitted metadata.
Retrieve raw object bytes without automatic Content-Encoding decompression and
compare them with the trusted source version or an independent known checksum.
Preserve genuine gzip bytes; do not recompress. An ETag alone is not a universal
content checksum, especially for multipart or encrypted objects. If the source
is missing, polluted or otherwise untrustworthy, keep the object unresolved.
Choose and rehearse a repair
Establish the authoritative exact version first, then its replicas. In
multi-way replication, compare every participating source. A still-polluted
source can make later heal/resync select metadata replication again; this
does not establish an uninterrupted retry loop.
Produce a per-version before/after change list. Remove only the verified
transport token. Preserve raw bytes, genuine encodings, user metadata, tags,
Object Lock and encryption requirements.
Rehearse the chosen supported operation on an isolated clone with the same
versioning, Object Lock, SSE and replication configuration. Ordinary self-COPY
may create a new version and change modification time or replication ordering;
it is not a generic in-place metadata repair API. If a replacement version is
required, explicitly document changed version identity and caller impact.
If no supported safe operation exists, leave the record unresolved. Do not
edit xl.meta or internal drive files.
Verify the encryption configuration and key availability at each destination;
an encrypted source alone does not establish encrypted replica storage.
After any restart, use a designated write/read canary on every serving
process, including replication targets, before COPY or rollback. Health
checks and successful reads can precede usable write quorum.
Immediately before a write, recheck exact version, ETag, size, metadata
fingerprint, timestamps, tags and lock state under the chosen write-coordination
procedure. A read-then-write check alone does not eliminate races; metadata
changes can leave ETag unchanged. Skip conflicts and re-inventory them.
On the clone, verify exact-version HEAD, unchanged raw-byte checksum, all
retained metadata/locks and eventual replica convergence. Exercise restart,
delayed old events and the specific rollback operation. A successful local
COPY response alone is insufficient.
Check exact version listings at every site and the source replication status
as well as current-object reads. After rollback, the replacement version must
be absent from every intended replica; a correct current object can coexist
with a version still awaiting purge elsewhere.
Keep the immutable manifest, full private metadata backup and a tested rollback
for the selected operation. If it created a new version, rollback must account
for that version and which version is current. Another COPY is not proof of
rollback. Reverting the binary can reopen the original error path and does not
undo prior metadata writes.
If a write fails or its outcome is uncertain, stop and re-inventory the exact
versions before retrying. An automatic COPY retry can create another version;
repeating the request is not a substitute for reconciling its outcome.
Tags and marker purge
Tag loss or resurrection: compare exact-version tags and available
revision/audit evidence across sites. An empty tag set can be intentional;
absence cannot reconstruct a lost tag history. Use an authoritative manifest
before planning a new tagging operation, which itself advances the revision.
Delete-marker purge: record the expected version, bucket, key and
modification time alongside purge/MRF status and replication errors. A
retained marker may be intentional or awaiting outbound replication. A 405
response alone does not prove that the expected marker was found or purged.
On 2026-09-16 the tool was exercised with a read-only account against actual
Server 20260903 storage, a stopped-storage clone upgraded to build 70c7ec4a9fbf
(runtime source baseline 40220bd836cb), and that clone after restart. All three inventories agreed on
21 version/marker records: six confirmed headers, two ambiguous encodings,
twelve unaffected headers and one marker. Fixtures included a non-current
version, null version, unusual object keys, gzip bytes, and SSE-S3 with retention
and legal hold. Original bytes, tags and the verified lock state survived the
upgrade; the old encoding headers also remained, as expected.
A separate clone rehearsal corrected one unlocked current object’s encoding
through an explicit replacement COPY. Raw gzip bytes and tags were preserved,
but COPY created a new version and left the original version’s header unchanged.
Deleting only that new, unlocked version restored the original current version.
This demonstrates the version/rollback distinction, not a general in-place
repair. That initial setup used one Linux ARM64 process/drive and a static test
KMS key.
An additional rehearsal used three sites, each with two Server processes and
four drives. A stopped Server 20260903 backup was restored into the same
candidate build above, with explicit SSE-S3 bucket defaults and a static lab
KMS key. Two unlocked gzip objects received replacement versions while one
site was offline. After it returned, all six processes served the same new
version IDs, raw gzip bytes, metadata and tags; the source reported replication
COMPLETED. Later tag updates to the historical versions remained separate
from the replacement versions. An untouched control retained SSE-S3,
GOVERNANCE retention and legal hold throughout.
Phase
Observed exact-version inventory at each site
Old storage and upgraded clone
Three affected original versions.
Replacement, offline-site catch-up and cold restart
Two corrected current versions plus the three affected original versions.
Delete only the two new unlocked versions, then cold restart
The three original versions remain; both replacement version IDs are absent.
The completed run checked signed write/read canaries on every process before
both COPY and rollback. Earlier attempts are retained: health/read checks
passed while writes returned SlowDownWrite, and a rollback begun immediately
after restart still had replacement versions in peer listings after 180
seconds. That observation does not establish a permanent replication failure;
the longer recovery path for that attempt was not tested. The completed
procedure requires actual write readiness and exact-version convergence.
The multi-site lab ran in one isolated Linux ARM64 container with a shared
clock. It did not validate SSE-C, external KMS, rewriting locked versions,
every delayed-event ordering or a general in-place historical-version repair.
Detailed results and remaining limits are tracked in
#201.
The inventory tool is preparation, not a repair engine. Configuration-specific
Object Lock/SSE/replication checks remain tracked in
#201. Record any production inventory
and writes separately against a selected deployment and reviewed change list.
For a confirmed-header row, proposed_content_encoding: null means remove the Content-Encoding field entirely, not set an empty string. A null value in other classifications is not a repair recommendation. See replica metadata normalization for the design.
4 - Core Operational Concepts
What are the components of a MinIO Deployment?
A MinIO deployment consists of a set of storage and compute resources running one or more minio server nodes that together act as a single object storage repository.
A standalone instance of MinIO consists of a single Server Pool with a single minio server node. Standalone instances are best suited for initial development and evaluation.
A MinIO deployment can run directly on a physical device in a bare metal or non-virtualized infrastructure. Or, MinIO might run within a virtual machine on a cloud service, such as using Docker, Podman, or Kubernetes. MinIO can run locally, on a private cloud, or in any of the many public clouds available on the market.
The specific way you design, architect, and build your system is called the system’s topology.
For example, a single container with two or more mounted volumes.
Multi Node Multi Drive, multiple MinIO servers with multiple mounted drives or volumes for data
For Baremetal infrastructure, you can install and manage distributed MinIO deployments using Ansible, Terraform, or manual processes
For Kubernetes infrastructure, use the MinIO Operator to manage and deploy distributed MinIO Tenants.
How does a distributed MinIO deployment work?
A distributed deployment makes use of the resources of more than one physical or virtual machine’s compute and storage resources. In modern situations, this often means running MinIO in a private or public cloud environment, such as with Amazon Web Services, the Google Cloud Platform, Microsoft’s Azure platform, or many others.
How does MinIO manage multiple virtual or physical servers?
While testing MinIO may only involve a single drive on a single computer, most production MinIO deployments use multiple compute and storage devices to create a high availability environment. A server pool is a set of minio server nodes that pool their drives and resources to support object storage write and retrieval requests.
MinIO supports adding one or more server pools to existing MinIO deployments for horizontal expansion. When MinIO has multiple server pools available, an individual object always writes to the same erasure set in the same server pool.
If one server pool goes down, MinIO halts I/O to all pools until the cluster resumes normal operations. You must restore the pool to working operation to resume I/O to the deployment. Objects written to other pools remain safe on disk while you perform repair operations.
The HOSTNAME argument passed to the minio server command represents a Server Pool:
Consider the following example startup command, which creates a single Server Pool with 4 minio server nodes of 4 drives each for a total of 16 drives.
minio server https://minio{1...4}.example.net/mnt/disk{1...4}| Server Pool |
Starting server pools in the same minio server startup command enables awareness of all server pool peers.
How does MinIO link multiple server pools into a single MinIO cluster?
A cluster refers to an entire MinIO deployment consisting of one or more Server Pools.
Consider the command below that creates a cluster consisting of two Server Pools, each with 4 minio server nodes and 4 drives per node for a total of 32 drives.
minio server https://minio{1...4}.example.net/mnt/disk{1...4}\
https://minio{5...8}.example.net/mnt/disk{1...4}| Server Pool |
Each server pool has one or more erasure sets depending on the number of drives and nodes in the pool.
MinIO strongly recommends production clusters consist of a minimum of 4 minio server nodes in a Server Pool for proper high availability and durability guarantees.
Can I change the size of an existing MinIO deployment?
MinIO distributed deployments support expansion and decommissioning as functions to increase or decrease the available storage.
Expansion consists of adding one or more server pools to an existing deployment. Each server pool consists of dedicated nodes and storage that contribute to the overall capacity of the deployment. Once you create a server pool you cannot change its size, but you can add or remove capacity at any time by adding or decommissioning pools.
For deployments which have multiple server pools, you can decommission the older pools and migrate that data to the newer pools in the deployment. Once started, decommissioning cannot be stopped. MinIO intends decommissioning for use with removing older pools with aged hardware, and not as an operation performed regularly within any deployment.
Note
Maintain pool order when decommissioning and then adding
If you decommission one pool in a multiple pool deployment, you cannot use the same node sequence for a new pool. For example, consider a deployment with the following pools:
The MinIO Console graphical user interface for individual instances
How do I manage object distribution across a MinIO deployment?
MinIO optimizes storage of objects across available pools by writing new objects (that is, objects with no existing versions) to the server pool with the most free space compared total amount of free space on all available server pools. MinIO does not perform the costly action of rebalancing objects from older pools to newer pools. Instead, new objects typically route to the new pool as it has the most free space. As that pool fills, new write operations eventually balance out across all pools in the deployment. For more information on write preference calculation logic, see Writing Files below.
Rebalancing data across all pools after an expansion is an expensive operation that requires scanning the entire deployment and moving objects between pools. This may take a long time to complete depending on the amount of data to move.
Starting with MinIO Client version RELEASE.2022-11-07T23-47-39Z, you can manually initiate a rebalancing operation across all server pools using mc admin rebalance.
Rebalancing does not block ongoing operations and runs in parallel to all other I/O. This can result in reduced performance of regular operations. Consider scheduling rebalancing operations during non-peak periods to avoid impacting production workloads. You can start and stop rebalancing at any time
How do I upload objects to MinIO?
You can use any S3-compatible SDK to upload objects to a MinIO deployment. Each SDK performs the equivalent of a PUT operation which transmits the object to MinIO for storage.
MinIO also implements support for multipart uploads, where clients can split an object into multiple parts for better throughput and reliability of transmission. MinIO reassembles these parts until it has a completed object, then stores that object at the specified path.
How does MinIO provide availability, redundancy, and reliability?
MinIO Uses Erasure Coding for Data Redundancy and Reliability
MinIO Erasure Coding is a data redundancy and availability feature that allows MinIO deployments with multiple drives to automatically reconstruct objects on-the-fly despite the loss of multiple drives or nodes in the cluster. Erasure Coding provides object-level healing with significantly less overhead than adjacent technologies such as RAID or replication.
MinIO Implements Bit Rot Healing to Protect Data At Rest
Bit rot is the random, silent corruption to data that can happen on any storage device. Bit rot corruption is not prompted by any activity from a user, nor does the system’s operating system alone have awareness of the corruption to notify a user or administrator about a change to the data.
Some common reasons for bit rot include:
ageing drives
current spikes
bugs in drive firmware
phantom writes
misdirected reads/writes
driver errors
accidental overwrites
MinIO uses a hashing algorithm to confirm the integrity of an object. This algorithm automatically applies at the time of any GET and HEAD operations for an object. For objects in a versioned bucket, a PUT operation can also trigger healing if MinIO identifies version inconsistencies. If an object becomes corrupted by bit rot, MinIO can automatically heal the object depending on the availability of parity shards for the object.
MinIO can also perform bit rot checks and healing using the MinIO Scanner. However, scanner bit rot checking is off by default. Active bit rot healing during scanner has a high performance impact in comparison to the low probability of bit rot affecting multiple object shards distributed across multiple drives and nodes. The automatic checks during normal operations is generally sufficient for bit rot, and MinIO does not recommend using the scanner for this type of health check.
MinIO Distributes Data Across Erasure Sets for High Availability and Resiliency
An erasure set is a group of multiple drives that supports MinIO Erasure Coding. Erasure Coding provides high availability, reliability, and redundancy of data stored on a MinIO deployment.
SILO divides objects into shards and distributes them across the drives in an erasure set. Continued read and write access depends on the object’s parity and the available drives in that set meeting the corresponding quorum. A two-drive EC:1 set has a read quorum of 1 and a write quorum of 2: losing one drive can preserve access to existing intact objects, but prevents writes. At maximum parity, an object can be reconstructed from ceil(N/2) healthy shards in its N-drive erasure set; for an even-sized set this is exactly half the drives. Object access also requires the applicable metadata quorum. These limits apply to each erasure set, not to the deployment’s aggregate drive count.
MinIO calculates the size and number of Erasure Sets in a Server Pool based on the total number of drives in the set and the number of minio servers in the set. See Erasure Coding Basics for more information.
MinIO Automatically Heals Corrupt or Missing Data On-the-fly
Healing is MinIO’s ability to restore data after some event causes data loss. Data loss can come from bit rot, drive loss, or node loss.
Erasure coding provides continued read and write access if an object has been partially lost.
Note
Exclusive access to drives
MinIO requiresexclusive access to the drives or volumes provided for object storage. No other processes, software, scripts, or persons should perform any actions directly on the drives or volumes provided to MinIO or the objects or files MinIO places on them.
Unless directed by MinIO Engineering, do not use scripts or tools to directly modify, delete, or move any of the data shards, parity shards, or metadata files on the provided drives, including from one drive or node to another. Such operations are very likely to result in widespread corruption and data loss beyond MinIO’s ability to heal.
MinIO Writes Data Protection at the Object Level with Parity
A MinIO deployment with multiple drives divides the available drives into data drives and parity drives. MinIO Erasure Coding adds additional hashing information about the contents of an object to the parity drives when writing an object. MinIO uses the parity information to confirm the integrity of an object and, if necessary, to restore a lost, missing, or corrupted object shard on a given drive or set of drives.
MinIO can tolerate losing up to the total number of drives equal to the number of parity devices available in the erasure set while still providing full access to an object.
Deliver Read and Write Functions with Quorum
A minimum number of drives that must be available to perform a task. MinIO has one quorum for reading data and a separate quorum for writing data.
Typically, MinIO requires a higher number of available drives to maintain the ability to write objects than what is required to read objects.
4.1 - Deployment Architecture
Silo production deployment architecture and topology
This page provides an overview of MinIO deployment architectures from a production perspective. For information on specific hardware or software configurations, see:
For production deployments that need availability during node failures, SILO recommends planning around at least 4 hosts with homogeneous storage and compute resources. This is a topology recommendation, not the minimum required to run SILO or enable erasure coding.
Validate the planned node failures against read and write quorum in every erasure set. A single-node, two-drive EC:1 deployment is supported, but it loses write availability when either drive is unavailable and loses service availability when its host is down.
MinIO aggregates these resources together as a pool and presents itself as a single object storage service.
Each MinIO host in this pool has matching compute, storage, and network configurations
MinIO provides best performance when using locally-attached storage, such as NVMe or SSD drives attached to a PCI-E controller board on the host machine.
Storage controllers should present XFS-formatted drives in “Just a Bunch of Drives” (JBOD) configurations with no RAID, pooling, or other hardware/software resiliency layers. MinIO recommends against caching, either at the drive or the controller layer. Either type of caching can cause I/O spikes as the cache fills and clears, resulting in unpredictable performance.
Each SSD connects by SAS to a PCI-E-attached storage controller operating in HBA mode
MinIO automatically groups drives in the pool into erasure sets.
Erasure sets are the foundational component of MinIO availability and resiliency. MinIO stripes erasure sets symmetrically across the nodes in the pool to maintain even distribution of erasure set drives. MinIO then partitions objects into data and parity shards based on the deployment parity and distributes them across an erasure set.
With the maximum parity of EC:8, MinIO shards the object into 8 data and 8 parity blocks, distributing them across the drives in the erasure set.
All erasure sets in this pool have the same stripe size and shard distribution.
MinIO uses a deterministic hashing algorithm based on object name and path to select the erasure set for a given object.
For each unique object namespace BUCKET/PREFIX/[PREFIX/...]/OBJECT.EXTENSION, MinIO always selects the same erasure set for read/write operations. MinIO handles all routing within pools and erasure sets, making the select/read/write process entirely transparent to applications.
MinIO reconstructs objects from data or parity shards transparently before returning the object to the requesting client.
Each MinIO server has a complete picture of the distributed topology, such that an application can connect and direct operations against any node in the deployment.
The MinIO responding node automatically handles routing internal requests to other nodes in the deployment and returning the final response to the client.
Applications typically should not manage those connections, as any changes to the deployment topology would require application updates. Production environments should instead deploy a load balancer or similar network control plane component to manage connections to the MinIO deployment. For example, you can deploy an NGINX load balancer to perform “least connections” or “round robin” load balancing against the available nodes in the deployment.
The load balancer routes the request to any node in the deployment.
The receiving node handles any internode requests thereafter.
You can expand a MinIO deployment’s available storage through pool expansion.
Each pool consists of an independent group of nodes with their own erasure sets. MinIO must query each pool to determine the correct erasure set to which it directs read and write operations, such that each additional pool adds increased internode traffic per call. The pool which contains the correct erasure set then responds to the operation, remaining entirely transparent to the application.
If you modify the MinIO topology through pool expansion, you can update your applications by modifying the load balancer to include the new pool’s nodes. Applications can continue using the load balancer address for the MinIO deployment without any updates or modifications. This ensures even distribution of requests across all pools, while applications continue using the single load balancer URL for MinIO operations.
The PUT request requires checking each pool for the correct erasure set.
Once identified, MinIO partitions the object and distributes the data and parity shards across the appropriate set.
Client applications can use any S3-compatible SDK or library to interact with the MinIO deployment.
MinIO publishes its own SDK specifically intended for use with S3-compatible deployments.
Clients using a variety of S3-compatible SDKs can perform operations against the same MinIO deployment.
MinIO uses a strict implementation of the S3 API, including requiring clients to sign all operations using AWS Signature V4 or the legacy Signature V2. AWS signature calculation uses the client-provided headers, such that any modification to those headers by load balancers, proxies, security programs, or other components will result in signature mismatch errors and request failure. Ensure any such intermediate components support pass-through of unaltered headers from client to server.
While the S3 API uses HTTP methods like GET and POST for all operations, applications typically use an SDK for S3 operations. In particular, the complexity of signature calculation typically makes interfacing via curl or similar REST clients impractical. MinIO recommends using S3-compatible SDKs or libraries which perform the signature calculation automatically as part of operations.
Replicated MinIO Deployments
MinIO site replication provides support for synchronizing distinct independent deployments.
You can deploy peer sites in different racks, datacenters, or geographic regions to support functions like BC/DR or geo-local read/write performance in a globally distributed MinIO object store.
A MinIO multi-site deployment with three peers.
Write operations on one peer replicate to all other peers in the configuration automatically.
Replication performance primarily depends on the network latency between each peer site.
With geographically distributed peer sites, high latency between sites can result in significant replication lag. This can compound with workloads that are near or at the deployment’s overall performance capacity, as the replication process itself requires sufficient free I/O to synchronize objects.
In this peer configuration, the latency between Site A and its peer sites is 100ms.
The soonest the object fully synchronizes to all sites is at least 110ms.
Deploying a global load balancer or similar network appliance with support for site-to-site failover protocols is critical to the functionality of multi-site deployments.
The load balancer should support a health probe/check setting to detect the failure of one site and automatically redirect applications to any remaining healthy peer.
The Load Balancer automatically routes client requests using configured logic (geo-local, latency, etc.).
Data written to one site automatically replicates to the other peer site.
The load balancer should meet the same requirements as single-site deployments regarding connection balancing and header preservation. MinIO replication handles transient failures by queuing objects for replication.
4.2 - Availability and Resiliency
Silo availability and resiliency in production environments
This page provides an overview of MinIO’s availability and resiliency design and features from a production perspective.
Note
Note
The contents of this page are intended as a best-effort guide to understanding MinIO’s intended design and philosophy behind availability and resiliency. It cannot replace the functionality of MinIO SUBNET, which allows for coordinating with MinIO Engineering when planning your MinIO deployments.
Community users can seek support on the MinIO Community Slack. Community Support is best-effort only and has no SLAs around responsiveness.
Distributed MinIO Deployments
MinIO implements erasure coding as the core component in providing availability and resiliency during drive or node-level failure events.
MinIO partitions each object into data and parity shards and distributes those shards across a single erasure set.
This small one-node deployment has 16 drives in one erasure set.
Assuming default parity of EC:4, MinIO partitions the object into 4 (four) parity shards and 12 (twelve) data shards.
MinIO distributes these shards evenly across each drive in the erasure set.
MinIO uses a deterministic algorithm to select the erasure set for a given object.
For each unique object namespace BUCKET/PREFIX/[PREFIX/...]/OBJECT.EXTENSION, MinIO always selects the same erasure set for read/write operations. This includes all versions of that same object.
MinIO calculates the destination erasure set using the full object namespace.
MinIO requires read and write quorum to perform read and write operations against an erasure set.
For an ordinary, non-empty object stored locally, let N be the number of drives in its erasure set, M its parity shard count, and K=N-M its data shard count. The normal read quorum is K, not M: its data can be reconstructed from K healthy shards, tolerating up to M unavailable shards. Object access must also satisfy the applicable metadata quorum. Use the parity recorded for that object: changing the configured default does not change its existing shards. These shard counts do not cover all metadata or initialization requirements; for example, tiered objects and delete markers follow different metadata quorum rules, and disabling default parity can require all drives for metadata reads.
This node has two failed drives.
MinIO uses parity shards to replace the lost data shards automatically and serves the reconstructed object to the requesting client.
An object stored with EC:4 can tolerate 4 (four) unavailable shards in its erasure set and remain readable if the remaining shards are intact and metadata quorum is met.
Write quorum depends on the configured parity and the size of the erasure set.
If M < N/2, write quorum is K=N-M. If M=N/2, write quorum is K+1. For a new write, calculate these values from the shard layout selected for that write.
With MINIO_STORAGE_CLASS_OPTIMIZE=availability, SILO can increase parity for new objects written to a degraded erasure set, up to floor(N/2) parity shards. This can improve redundancy for those new objects, but does not guarantee unchanged availability or bypass write quorum. Repair or replace failed drives to restore the set to full health.
This node has two failed drives.
In this example, SILO increases the parity of the new object to EC:6.
For a fixed EC:4 layout in the 16-drive example above, K=12 and write quorum is 12, leaving room for 4 unavailable drives. Parity upgrades for new writes can change that layout and its write quorum; this example is not a universal failure limit for all deployments that use EC:4.
If parity equals 1/2 (half) the number of erasure set drives, write quorum equals parity + 1 (one) to avoid data inconsistency due to “split brain” scenarios.
For example, if a network fault isolates exactly half the drives and M=N/2, neither half can meet the required write quorum of K+1=N/2+1.
This node has 50% drive failure.
If parity is EC:8, this erasure set cannot meet write quorum and MinIO rejects write operations to that set.
Since the erasure set still maintains read quorum, read operations to existing objects can still succeed.
An object’s data cannot be reconstructed from its erasure set if more than its own M shards are permanently lost.
In an even-sized set with maximum parity (K=M=N/2), losing half the drives can leave enough intact shards to read an object, but not enough drives to write to the set. For example, a 16-drive object written with EC:8 has a read quorum of 8 and a write quorum of 9. Permanently losing 9 of its shards prevents reconstruction of that object. Objects written with lower parity have lower failure tolerance.
This erasure set has permanently lost more than 4 drives.
Objects stored with EC:4 cannot be reconstructed from their remaining shards.
Transient or temporary drive failures, such as due to a failed storage controller or connecting hardware, may recover back to normal operational status within the erasure set.
MinIO further mitigates the risk of erasure set failure by “striping” erasure set drives symmetrically across each node in the pool.
MinIO automatically calculates the optimal erasure set size based on the number of nodes and drives, where the maximum set size is 16 (sixteen). It then selects one drive per node going across the pool for each erasure set, circling around if the erasure set stripe size is greater than the number of nodes. Spreading a set across nodes limits the shards lost with one node, but continued reads and writes still depend on each affected set meeting the corresponding quorum.
In this 16 x 8 deployment, MinIO would calculate 8 erasure sets of 16 drives each.
It allocates one drive per node across the available nodes to fill each erasure set.
If there were 8 nodes, MinIO would need to select 2 drives per node for each erasure set.
In the above topology, the pool has 8 erasure sets of 16 drives each striped across 16 nodes. Each node would have one drive allocated per erasure set. While losing one node would technically result in the loss of 8 drives, each erasure set would only lose one drive each. This maintains quorum despite the node downtime.
Each erasure set is independent of all others in the same pool.
If one erasure set becomes completely degraded, MinIO can still perform read/write operations on other erasure sets.
One pool has a degraded erasure set.
While MinIO can no longer serve read/write operations to that erasure set, it can continue to serve operations on healthy erasure sets in that pool.
However, the lost data may still impact workloads which rely on the assumption of 100% data availability. Furthermore, each erasure set is fully independent of the other such that you cannot restore data to a completely degraded erasure set using other erasure sets. You must use Site or Bucket replication to create a BC/DR-ready remote deployment for restoring lost data.
For multi-pool MinIO deployments, each pool requires at least one erasure set maintaining read/write quorum to continue performing operations.
If one pool loses all erasure sets, MinIO can no longer determine whether a given read/write operation would have routed to that pool. MinIO therefore stops all I/O to the deployment, even if other pools remain operational.
One pool in this deployment has completely failed.
MinIO can no longer determine which pool or erasure set to route I/O to.
Continued operations could produce an inconsistent state where an object and/or it’s versions reside in different erasure sets.
MinIO therefore halts all I/O in the deployment until the pool recovers.
To restore access to the deployment, administrators must restore the pool to normal operations. This may require formatting disks, replacing hardware, or replacing nodes depending on the severity of the failure. See Recover after Hardware Failure for more complete documentation.
Use replicated remotes to restore the lost data to the deployment. All data stored on the healthy pools remain safe on disk.
Note
Exclusive access to drives
MinIO requiresexclusive access to the drives or volumes provided for object storage. No other processes, software, scripts, or persons should perform any actions directly on the drives or volumes provided to MinIO or the objects or files MinIO places on them.
Unless directed by MinIO Engineering, do not use scripts or tools to directly modify, delete, or move any of the data shards, parity shards, or metadata files on the provided drives, including from one drive or node to another. Such operations are very likely to result in widespread corruption and data loss beyond MinIO’s ability to heal.
Replicated MinIO Deployments
MinIO implements site replication as the primary measure for ensuring Business Continuity and Disaster Recovery (BC/DR) in the case of both small and large scale data loss in a MinIO deployment.
Each peer site is deployed to an independent datacenter to provide protection from large-scale failure or disaster.
If one datacenter goes completely offline, clients can fail over to the other site.
MinIO replication can automatically heal a site that has partial or total data loss due to transient or sustained downtime.
Datacenter 2 was down and Site B requires resynchronization.
The Load Balancer handles routing operations to Site A in Datacenter 1.
Site A continuously replicates data to Site B.
Once all data synchronizes, you can restore normal connectivity to that site. Depending on the amount of replication lag, latency between sites and overall workload I/O, you may need to temporarily stop write operations to allow the sites to completely catch up.
If a peer site completely fails, you can remove that site from the configuration entirely. The load balancer configuration should also remove that site to avoid routing client requests to the offline site.
You can then restore the peer site, either after repairing the original hardware or replacing it entirely, by adding it back to the site replication configuration. MinIO automatically begins resynchronizing existing data while continuously replicating new data.
Sites can continue processing operations during resynchronization by proxying GET/HEAD requests to healthy peer sites
Site B does not have the requested object, possibly due to replication lag.
It proxies the GET request to Site A.
Site A returns the object, which Site B then returns to the requesting client.
The client receives the results from first peer site to return any version of the requested object.
PUT and DELETE operations synchronize using the regular replication process. LIST operations do not proxy and require clients to issue them exclusively against healthy peers.
MinIO implements Erasure Coding as a core component in providing data redundancy and availability. This page provides an introduction to MinIO Erasure Coding.
The diagrams and content in this section present a simplified view of MinIO erasure coding operations and are not intended to represent the complexities of MinIO’s full erasure coding implementation.
MinIO groups drives in each server pool into one or more Erasure Sets of the same size.
The above example deployment consists of 4 nodes with 4 drives each.
MinIO initializes with a single erasure set consisting of all 16 drives across all four nodes.
MinIO determines the optimal number and size of erasure sets when initializing a server pool. You cannot modify these settings after this initial setup.
For each write operation, MinIO partitions the object into data and parity shards.
Erasure set stripe size dictates the maximum possible parity of the deployment. The formula for determining the number of data and parity shards to generate is:
N (ERASURE SET SIZE)= K (DATA) + M (PARITY)
The above example deployment has an erasure set of 16 drives.
This can support parity between EC:0 and 1/2 the erasure set drives, or EC:8.
Parity is an integer from 0 to floor(N/2), where N is the erasure set size.
MinIO uses a Reed-Solomon erasure coding implementation and partitions the object for distribution across an erasure set.
The example deployment above has an erasure set size of 16 and a parity of EC:4
Objects written with a given parity settings do not automatically update if you change the parity values later.
Reconstructing an object’s data requires at least K healthy data or parity shards.
For an ordinary, non-empty object stored locally, K is its normal read quorum, calculated from its recorded shard layout. Reads also require the applicable metadata quorum; K is not a universal quorum for all operations or the entire deployment.
This deployment has one offline node, resulting in only 12 remaining healthy drives.
The object was written with EC:4 with a read quorum of K=12.
This object therefore maintains read quorum and MinIO can reconstruct it for read operations.
MinIO cannot reconstruct an object that has lost read quorum. Such objects may be recovered through other means such as replication resynchronization.
Object writes require K available drives when K>M, or K+1 when K=M.
Write quorum is calculated from the data and parity shard counts selected for the object. The erasure set must have at least that many available drives for the write. New objects written to a degraded set may use increased parity, subject to the parity limit and write quorum.
This deployment has one offline node, resulting in only 12 remaining healthy drives.
A client writes an object with EC:4 parity settings where the erasure set has a write quorum of K=12.
This erasure set maintains write quorum and MinIO can use it for write operations.
If Parity EC:M is exactly 1/2 the erasure set size, write quorum is K+1
This prevents a split-brain type scenario, such as one where a network issue isolates exactly half the erasure set drives from the other.
This deployment has two nodes offline due to a transient network failure.
A client writes an object with EC:8 in this 16-drive set: K=8, so write quorum is K+1=9.
This erasure set has lost write quorum and MinIO cannot use it for write operations.
The K+1 logic ensures that a client could not potentially write the same object twice - once to each “half” of the erasure set.
Note
Two-drive EC:1
SILO supports a two-drive erasure set, which defaults to EC:1. Here K=M=1, so read quorum is 1 and write quorum is 2. This layout has the capacity cost of two copies. If one drive becomes unavailable while the service is running, existing objects can remain readable from intact data and metadata on the other drive, but writes cannot continue. Separate physical drives are needed for physical-drive redundancy, and a single node does not provide availability during a host failure.
For an object maintaining read quorum, MinIO can use any data or parity shard to heal damaged shards.
An object with EC:4 lost four data shards out of 12 due to drive failures.
Since the object has maintained read quorum, MinIO can heal those lost data shards using the available parity shards.
Use the MinIO Erasure Coding Calculator to explore the possible erasure set size and distributions for your planned topology. Where possible, use an even number of nodes and drives per node to simplify topology planning and conceptualization of drive/erasure-set distribution.
Note
Exclusive access to drives
MinIO requiresexclusive access to the drives or volumes provided for object storage. No other processes, software, scripts, or persons should perform any actions directly on the drives or volumes provided to MinIO or the objects or files MinIO places on them.
Unless directed by MinIO Engineering, do not use scripts or tools to directly modify, delete, or move any of the data shards, parity shards, or metadata files on the provided drives, including from one drive or node to another. Such operations are very likely to result in widespread corruption and data loss beyond MinIO’s ability to heal.
Erasure Parity and Storage Efficiency
Setting the parity for a deployment is a balance between availability and total usable storage. Higher parity values increase resiliency to drive or node failure at the cost of usable storage, while lower parity provides maximum storage with reduced tolerance for drive/node failures. Use the MinIO Erasure Code Calculator to explore the effect of parity on your planned cluster deployment.
The following table lists the outcome of varying erasure code parity levels on a MinIO deployment consisting of 1 node and 16 1TB drives:
Parity
Total Storage
Storage Ratio
Minimum Drives for Read Operations
Minimum Drives for Write Operations
EC: 4 (Default)
12 Tebibytes
0.750
12
12
EC: 6
10 Tebibytes
0.625
10
10
EC: 8
8 Tebibytes
0.500
8
9
Bit Rot Protection
Bit rot is silent data corruption from random changes at the storage media level. For data drives, it is typically the result of decay of the electrical charge or magnetic orientation that represents the data. These sources can range from the small current spike during a power outage to a random cosmic ray resulting in flipped bits. The resulting “bit rot” can cause subtle errors or corruption on the data medium without triggering monitoring tools or hardware.
MinIO’s optimized implementation of the HighwayHash algorithm ensures that it captures and heals corrupted objects on the fly. Integrity is ensured from end to end by computing a hash on READ and verifying it on WRITE from the application, across the network, and to the memory or drive. The implementation is designed for speed and can achieve hashing speeds over 10 GB/sec on a single core on Intel CPUs.
4.4 - Object Healing
What is healing?
Healing is MinIO’s ability to restore an object that has been damaged, corrupted, or partially lost. The loss can come from multiple types of corruptions or loss, such as but not limited to:
Parity refers to the number of dedicated recovery shards MinIO creates when writing the object. For example, an erasure set may have eight total drives and use three drives during a write for parity. In this scenario, MinIO splits an object into 5 data shards and create 3 parity shards. MinIO distributes these eight shards across the drives in the erasure set. No one drive contains only parity shards or only data shards. Instead, MinIO writes shards for each object in a randomized way to distribute reads evenly across drives.
When MinIO needs to provide the object, it looks for the data shards for the object. If any of the data shards are missing or damaged, MinIO uses one or more of the parity shards to restore the object. When looking for the parity shards, if any of the parity shards are missing or damaged, MinIO restores those as well, provided there are sufficient other shards to serve the object. For this scenario, up to three of data shard parts can be lost or damaged and MinIO can still successfully restore and serve the object.
The number of drives available with intact data or parity shards of the object must meet or exceed the number of drives used for data shards in the erasure set. In the scenario above, five drives with intact shards must be online and available for MinIO to successfully serve the object.
When does MinIO heal an object?
MinIO has a robust system for healing objects.
Healing during GET requests
MinIO automatically checks the consistency of an object’s data shards each time you request an object with a GET or HEAD operation. For versioned buckets, MinIO also checks for consistency during PUT operation.
If all of the data shards are found intact, MinIO serves the object from the data shards without inspecting the corresponding parity shards.
If the object has missing or damaged data shards, MinIO uses the available parity shards to heal the object before serving it as part of the operation. There must be an intact parity shard available for each lost or damaged data shard, otherwise the object cannot be recovered. If any parity shards are lost or damaged, MinIO restores the parity shard, provided there are sufficient other parity shards to serve the object.
Healing with the object scanner
MinIO uses an object scanner to perform a number of tasks related to objects. One of these tasks checks the integrity of objects and, if found damaged or corrupted, heals them.
On each scanning pass, MinIO uses a hash of the object name to select one out of every 1,024 objects to check.
If any object is found to have lost shards, MinIO heals the object from available shards. By default, MinIO does not check for bit rot corruption using the scanner. This can be an expensive operation to perform and the risk of bit rot across multiple disks is low.
Healing by manual request
Administrators can use mc admin heal to initiate a full system healing. The procedure is very resource intensive and not typically needed.
Consult with MinIO Engineers before manually starting a healing process on a deployment.
Healing metrics
MinIO provides several healing metrics to monitor the status of healing processes on a deployment.
Refer to the Metrics and alerts for more information on available endpoints and configuration.
4.5 - Object Scanner
Overview
MinIO uses the built-in scanner to check objects for healing and to take any scheduled object actions. Such actions may include:
check objects for missing or corrupted data or parity shards and perform healing
The scanner performs these functions at two levels: cluster and bucket. At the cluster level, the scanner splits all buckets into groups and scans one group of buckets at a time. The scanner starts with any new buckets added since the last scan, then randomizes the scanning of other buckets. The scanner completes checks on all bucket groups before starting over with a new set of scans.
At the bucket level, the scanner groups items in buckets and scans selected items from that bucket. The scanner selects objects for a scan based on a hash of the object name. Over a span of 16 scans, MinIO checks every object in the namespace. MinIO fully scans any prefixes known to be new since the last scan.
Scan Length
Multiple factors impact the time it takes for a scan to complete.
Some of these factors include:
Type of drives provided to MinIO
Throughput and iops available
Number and size of objects
Other activity on the MinIO Server
For example, by default, MinIO pauses the scanner to make I/O operations available for read and write requests. This can lengthen the time it takes for a scan to complete.
MinIO waits between each scan by a factor multiplication of the time it takes each scan operation to complete. By default, the value of this factor is 10.0, meaning MinIO waits 10x the length of an operation after one scan completes before starting the next scan. The value of this factor changes depending on the configured scanner speed setting.
Scanner Performance
Many factors impact the scanner performance. Some of these factors include:
available node resources
size of the cluster
number of erasure sets compared to the number of drives
complexity of bucket hierarchy (objects and prefixes).
For example, a cluster that starts with 100TB of data and then grows to 200TB of data may require more time to scan the entire namespace of buckets and objects given the same hardware and workload. Likewise, a single erasure set of 16 drives takes longer to scan than the same number of drives split into two erasure sets of 8 drives each.
MinIO treats the scanner as a background task and pauses it in favor of completing read and write requests on the cluster. As the cluster or workload increases, scanner performance decreases as it yields more frequently to ensure priority of normal S3 operations.
You can adjust how MinIO balances the scanner performance with read/write operations using either the MINIO_SCANNER_SPEED environment variable or the scanner speed configuration setting.
Use mc admin scanner info to see the current status of the scanner and the time since the last full scan. This can help in understanding the metrics provided by the scanner operation.
Scanner metrics, including usage metrics, reflect the last completed scan. PUT or DELETE operations since the last scan do not update in the usage until the next scan of the affected bucket(s).
This page reflects limits and thresholds that apply to MinIO.
Refer to the hardware and software for related recommendations and requirements.
S3 API Limits
Item
Specification
Maximum object size
50 TiB
Minimum object size
0 B
Maximum object size per PUT operation
5 TiB for non-multipart upload 50 TiB for multipart upload
Maximum number of parts per upload
10,000
Part size range
5 MiB to 5 GiB. Last part can be 0 B to 5 GiB
Maximum number of parts returned per list parts request
10,000
Maximum number of objects returned per list objects request
1,000
Maximum number of multipart uploads returned per list multipart uploads request
1,000
Maximum length for bucket names
63
Maximum length for object names
1024
Maximum length for each / separated segment of an object name
255
Maximum number of object versions for a unique object
10000 (Configurable)
Erasure Code Limits
Item
Specification
Maximum number of servers per cluster
no limit
Minimum number of servers
1
Minimum number of drives per server when server count is 1
1 (for SNSD deployments, which do not provide additional reliability or availability)
Minimum number of drives per server when server count is 2 or more
1
Maximum number of drives per server
no limit
Minimum number of drives per multi-drive erasure set
2
Maximum number of drives per erasure set
16
Object read quorum
K=N-M
Object write quorum
K when K>M; K+1 when K=M
Here N is the number of drives in one erasure set, M is the object’s parity shard count, and K is its data shard count. These formulas describe ordinary, non-empty objects stored locally; reads also require intact shards and the applicable metadata quorum. New writes may use increased parity in a degraded set. The formulas N/2 and N/2+1 apply only when K=M=N/2. A single-drive EC:0 deployment has no erasure-code redundancy; a two-drive EC:1 set requires 1 drive to read and 2 to write.
Object Name Limitations
Filesystem and Operating System Restrictions
Object Names in MinIO are restricted primarily by the local operating system and filesystem. Windows and some other operating systems restrict file systems with certain special characters, such as ^, *, |, \, /, &, ", or ;.
This list is not exhaustive and may not apply to your operating system and filesystem combination.
On Unix-like operating systems, objects with a path name of ., .., or / return an error of file access denied.
Consult your operating system vendor or filesystem documentation for a comprehensive list for your situation.
MinIO recommends using a Linux operating system with an XFS based filesystem for production workloads.
Conflicting Objects
Applications must assign non-conflicting, unique keys for all objects. This includes avoiding creating objects where the name can collide with that of a parent or sibling object. MinIO returns an empty set for LIST operations at the location of the collision.
For example, the following operations create a namespace conflicts
PUT data/invoices/2024/january/vendors.csv
PUT data/invoices/2024/january <- collides with existing object prefix
PUT data/invoices/2024/january
PUT data/invoices/2024/january/vendors.csv <- collides with existing object
While you can perform GET or HEAD operations against these objects, the name collision causes LIST operations to return an empty result set at the /invoices/2024/january path.
MinIO publishes point-in-time metrics using the Prometheus Data Model. You can use any scraping tool which supports that data model to pull those metrics into a database for populating historical views, performing query/analysis of metrics data, or creating alerts on preferred data points.
The following table lists tutorials for integrating MinIO metrics with select third-party monitoring software.
Configure InfluxDB to Monitor and Alert for a MinIO deployment.
Other metrics and analytics software suites which support the Prometheus data model may work regardless of their inclusion on the above list.
Logging
MinIO publishes all minio server operations to the system console. MinIO also supports publishing server logs and audit logs to an HTTP webhook.
Server logs contain the same minio server operations logged to the system console. Server logs support general monitoring and troubleshooting of operations.
Audit logs are more granular descriptions of each operation on the MinIO deployment. Audit logging supports security standards and regulations which require detailed tracking of operations.
MinIO publishes logs as a JSON document as a PUT request to each configured endpoint. The endpoint server is responsible for processing each JSON document. MinIO requires explicit configuration of each webhook endpoint and does not publish logs to a webhook by default.
MinIO exposes unauthenticated endpoints for probing node uptime and cluster high availability for simple healthchecks. These endpoints return only an HTTP status code. See Healthcheck API for more information.
5.1 - Metrics and alerts
MinIO publishes metrics using the Prometheus Data Model. You can use any scraping tool to pull metrics data from MinIO for further analysis and alerting.
For metrics version 3, all metrics are available under the base /minio/metrics/v3 endpoint. You can scrape the base endpoint to collect all metrics in a single operation, or append an optional path to return a specific category.
Warning
Important
The V3 metrics on this page may have gaps, inaccuracies, or incorrect information. Reference the minio/minio repository and review the source code for the most accurate representation of metrics as available.
For example, the following endpoint returns audit metrics:
http://HOSTNAME:PORT/minio/metrics/v3/audit
Replace HOSTNAME:PORT with the FQDN and port of the MinIO deployment. For deployments with a load balancer managing connections between MinIO nodes, specify the address of the load balancer.
By default, MinIO requires authentication to scrape the metrics endpoints. To generate the needed bearer tokens, use mc admin prometheus generate. You can also disable metrics endpoint authentication by setting MINIO_PROMETHEUS_AUTH_TYPE to public.
MinIO provides the following scraping endpoints, relative to the base URL:
Set an appropriate scrape_interval value to ensure each scraping operation completes before the next one begins. The recommended value is 60 seconds.
Some deployments require a longer scrape interval due to the number of metrics being scraped. To reduce the load on your MinIO and Prometheus servers, choose the longest interval that meets your monitoring requirements.
Set the job_name to a value associated to the MinIO deployment.
Use a unique value to ensure isolation of the deployment metrics from any others collected by that Prometheus service.
MinIO deployments started with MINIO_PROMETHEUS_AUTH_TYPE set to "public" can omit the bearer_token field.
Set the scheme to http for MinIO deployments not using TLS.
Set the targets array with a hostname that resolves to the MinIO deployment.
This can be any single node, or a load balancer/proxy which handles connections to the MinIO nodes.
For MinIO Tenants on Kubernetes infrastructure, when using a Prometheus cluster in that same cluster you can specify the service DNS name for the minio service. You can otherwise specify the ingress or load balancer endpoint configured to route connections to and from the MinIO Tenant.
2) Restart Prometheus with the Updated Configuration
Append the desired scrape_configs job generated in the previous step to the configuration file:
Cluster
Cluster metrics aggregate node-level metrics and, where appropriate, attach labels to metrics for the originating node.
Average last minute latency in µs for drive API storage operations.
minio_node_drive_offline_total
Total drives offline in this node.
minio_node_drive_online_total
Total drives online in this node.
minio_node_drive_total
Total drives in this node.
minio_node_drive_total_bytes
Total storage on a drive.
minio_node_drive_used_bytes
Total storage used on a drive.
minio_node_drive_errors_timeout
Total number of drive timeout errors since server start.
minio_node_drive_errors_availability
Total number of drive I/O errors, permission denied and timeouts since server start.
minio_node_drive_io_waiting
Total number of I/O operations waiting on drive.
4) Configure an Alert Rule using MinIO Metrics
You must configure Alert Rules on the Prometheus deployment to trigger alerts based on collected MinIO metrics.
The following example alert rule files provide a baseline of alerts for a MinIO deployment. You can modify or otherwise use these examples as guidance in building your own alerts.
groups:- name:minio-alertsrules:- alert:NodesOfflineexpr:avg_over_time(minio_cluster_nodes_offline_total{job="minio-job"}[5m]) > 0for:10mlabels:severity:warnannotations:summary:"Node down in MinIO deployment"description:"Node(s) in cluster {{ $labels.instance }} offline for more than 5 minutes"- alert:DisksOfflineexpr:avg_over_time(minio_cluster_drive_offline_total{job="minio-job"}[5m]) > 0for:10mlabels:severity:warnannotations:summary:"Disks down in MinIO deployment"description:"Disks(s) in cluster {{ $labels.instance }} offline for more than 5 minutes"
In the Prometheus configuration, specify the path to the alert file in the rule_files key:
rule_files:- minio-alerting.yml
Once triggered, Prometheus sends the alert to the configured AlertManager service.
For MinIO Deployments on Kubernetes, this procedure assumes all necessary network control components, such as Ingress or Load Balancers, to facilitate access between the MinIO Tenant and the InfluxDB service.
Configure InfluxDB to Collect and Alert using MinIO Metrics
Warning
Important
This procedure specifically uses the InfluxDB UI to create a scraping endpoint.
The InfluxDB UI does not provide the same level of configuration as using Telegraf and the corresponding Prometheus plugin. Specifically:
You cannot enable authenticated access to the MinIO metrics endpoint via the InfluxDB UI
You cannot set a tag for collected metrics (e.g. url_tag) for uniquely identifying the metrics for a given MinIO deployment
The Telegraf Prometheus plugin also supports Kubernetes-specific features, such as scraping the minio service for a given MinIO Tenant.
Configuring Telegraf is out of scope for this procedure. You can use this procedure as general guidance for configuring Telegraf to scrape MinIO metrics.
Configure Public Access to MinIO Metrics
Set the MINIO_PROMETHEUS_AUTH_TYPE environment variable to "public" for all nodes in the MinIO deployment. You can then restart the deployment to allow public access to MinIO metrics.
You can validate the change by attempting to curl the metrics endpoint:
curl https://HOSTNAME/minio/v2/metrics/cluster
Replace HOSTNAME with the URL of the load balancer or reverse proxy through which you access the MinIO deployment. You can alternatively specify any single node as HOSTNAME:PORT, specifying the MinIO server API port in addition to the node hostname.
The response body should include a list of collected MinIO metrics.
Log into the InfluxDB UI and Create a Bucket
Select the Organization under which you want to store MinIO metrics.
Create a New Bucket in which to store metrics for the MinIO deployment.
Specify the full URL to the MinIO deployment, including the metrics endpoint:
https://HOSTNAME/minio/v2/metrics/cluster
Replace HOSTNAME with the URL of the load balancer or reverse proxy through which you access the MinIO deployment. You can alternatively specify any single node as HOSTNAME:PORT, specifying the MinIO server API port in addition to the node hostname.
Validate the Data
Use the DataExplorer to visualize the collected MinIO data.
For example, you can set a filter on minio_cluster_capacity_usable_total_bytes and minio_cluster_capacity_usable_free_bytes to compare the total usable against total free space on the MinIO deployment.
The following example check rules provide a baseline of alerts for a MinIO deployment. You can modify or otherwise use these examples for guidance in building your own checks.
Create a Threshold Check named MINIO_NODE_DOWN.
Set the filter for the minio_cluster_nodes_offline_total key.
Set the Thresholds to WARN when the value is greater than 1
Create a Threshold Check named MINIO_QUORUM_WARNING.
Set the filter for the minio_cluster_drive_offline_total key.
Set the Thresholds to CRITICAL when the value is one less than your configured Erasure Code Parity setting.
For example, a deployment using EC:4 should set this value to 3.
5.4 - Publish Server or Audit Logs to an External Service
MinIO publishes all minio server operations to the system console. Reading these logs depends on how the server process is managed. For example, if the server is managed through a systemd script, you can read the logs using journalctl -u SERVICENAME.service. Replace SERVICENAME with the name of the MinIO service.
MinIO also supports publishing server logs and audit logs to an HTTP webhook.
Server logs contain the same minio server operations logged to the system console. Server logs support general monitoring and troubleshooting of operations.
Audit logs are more granular descriptions of each operation on the MinIO deployment. Audit logging supports security standards and regulations which require detailed tracking of operations.
MinIO publishes logs as a JSON document as a PUT request to each configured endpoint. The endpoint server is responsible for processing each JSON document. MinIO requires explicit configuration of each webhook endpoint and does not publish logs to a webhook by default.
Publish Server Logs to HTTP Webhook
You can configure a new HTTP webhook endpoint to which MinIO publishes minio server logs using either environment variables or by setting runtime configuration settings.
Environment Variables
MinIO supports specifying the minio server log HTTP webhook endpoint and associated configuration settings using environment variables.
The following example code sets all environment variables related to configuring a log HTTP webhook endpoint. The minimum required variables are:
set MINIO_LOGGER_WEBHOOK_ENABLE_<IDENTIFIER>="on"set MINIO_LOGGER_WEBHOOK_ENDPOINT_<IDENTIFIER>="https://webhook-1.example.net"set MINIO_LOGGER_WEBHOOK_AUTH_TOKEN_<IDENTIFIER>="TOKEN"
Replace <IDENTIFIER> with a unique descriptive string for the HTTP webhook endpoint. Use the same <IDENTIFIER> for all environment variables related to the new log HTTP webhook.
If the specified <IDENTIFIER> matches an existing log endpoint, the new settings override any existing settings for that endpoint. Use mc admin config get logger_webhook to review the currently configured log HTTP webhook endpoints.
Replace https://webhook-1.example.net with the URL of the HTTP webhook endpoint.
Replace TOKEN with an authentication token of the appropriate type for the endpoint. Omit for endpoints which do not require authentication.
To allow for a variety of token types, MinIO creates the request authentication header using the value exactly as specified. Depending on the endpoint, you may need to include additional information.
Consult the documenation for the desired service for more details.
Restart the MinIO server to apply the new configuration settings. You must specify the same environment variables and settings on all MinIO servers in the deployment.
Configuration Settings
MinIO supports adding or updating log HTTP webhook endpoints on a MinIO deployment using the mc admin config set command and the logger_webhook configuration key. You must restart the MinIO deployment to apply any new or updated configuration settings.
The following example code sets all settings related to configuring a log HTTP webhook endpoint. The minimum required setting is logger_webhook endpoint:
mc admin config set ALIAS/ logger_webhook:IDENTIFIER \
endpoint="https://webhook-1.example.net"\
auth_token="TOKEN"
Replace <IDENTIFIER> with a unique descriptive string for the HTTP webhook endpoint. Use the same <IDENTIFIER> for all environment variables related to the new log HTTP webhook.
If the specified <IDENTIFIER> matches an existing log endpoint, the new settings override any existing settings for that endpoint. Use mc admin config get logger_webhook to review the currently configured log HTTP webhook endpoints.
Replace https://webhook-1.example.net with the URL of the HTTP webhook endpoint.
Replace TOKEN with an authentication token of the appropriate type for the endpoint. Omit for endpoints which do not require authentication.
To allow for a variety of token types, MinIO creates the request authentication header using the value exactly as specified. Depending on the endpoint, you may need to include additional information.
For example: for a Bearer token, prepend Bearer:
mc admin config set ALIAS/ logger_webhook \
endpoint="https://webhook-1.example.net"\
auth_token="Bearer 1a2b3c4f5e"
Modify the value according to the endpoint requirements. A custom authentication format could resemble the following:
mc admin config set ALIAS/ logger_webhook \
endpoint="https://webhook-1.example.net"\
auth_token="ServiceXYZ 1a2b3c4f5e"
Consult the documenation for the desired service for more details.
Publish Audit Logs to HTTP Webhook
You can configure a new HTTP webhook endpoint to which MinIO publishes audit logs using either environment variables or by setting runtime configuration settings:
Environment Variables
MinIO supports specifying the audit log HTTP webhook endpoint and associated configuration settings using environment variables.
The following example code sets all environment variables related to configuring a audit log HTTP webhook endpoint. The minimum required variables are:
Replace <IDENTIFIER> with a unique descriptive string for the HTTP webhook endpoint. Use the same <IDENTIFIER> for all environment variables related to the new audit log HTTP webhook.
If the specified <IDENTIFIER> matches an existing log endpoint, the new settings override any existing settings for that endpoint. Use mc admin config get audit_webhook to review the currently configured audit log HTTP webhook endpoints.
Replace https://webhook-1.example.net with the URL of the HTTP webhook endpoint.
Replace TOKEN with an authentication token of the appropriate type for the endpoint. Omit for endpoints which do not require authentication.
To allow for a variety of token types, MinIO creates the request authentication header using the value exactly as specified. Depending on the endpoint, you may need to include additional information.
Consult the documenation for the desired service for more details.
Replace cert.pem and cert.key with the public and private key of the x.509 TLS certificates to present to the HTTP webhook server. Omit for endpoints which do not require clients to present TLS certificates.
Restart the MinIO server to apply the new configuration settings. You must specify the same environment variables and settings on all MinIO servers in the deployment.
Configuration Settings
MinIO supports adding or updating audit log HTTP webhook endpoints on a MinIO deployment using the mc admin config set command and the audit_webhook configuration key. You must restart the MinIO deployment to apply any new or updated configuration settings.
The following example code sets all settings related to configuring a audit log HTTP webhook endpoint. The minimum required setting is audit_webhook endpoint:
mc admin config set ALIAS/ audit_webhook:IDENTIFIER \
endpoint="https://webhook-1.example.net"\
auth_token="TOKEN"\
client_cert="cert.pem"\
client_key="cert.key"
Replace <IDENTIFIER> with a unique descriptive string for the HTTP webhook endpoint. Use the same <IDENTIFIER> for all environment variables related to the new audit log HTTP webhook.
If the specified <IDENTIFIER> matches an existing log endpoint, the new settings override any existing settings for that endpoint. Use mc admin config get audit_webhook to review the currently configured audit log HTTP webhook endpoints.
Replace https://webhook-1.example.net with the URL of the HTTP webhook endpoint.
Replace TOKEN with an authentication token of the appropriate type for the endpoint. Omit for endpoints which do not require authentication.
To allow for a variety of token types, MinIO creates the request authentication header using the value exactly as specified. Depending on the endpoint, you may need to include additional information.
For example: for a Bearer token, prepend Bearer:
mc admin config set ALIAS/ audit_webhook \
endpoint="https://webhook-1.example.net"\
auth_token="Bearer 1a2b3c4f5e"
Modify the value according to the endpoint requirements. A custom authentication format could resemble the following:
mc admin config set ALIAS/ audit_webhook \
endpoint="https://webhook-1.example.net"\
auth_token="ServiceXYZ 1a2b3c4f5e"
Consult the documenation for the desired service for more details.
Replace cert.pem and cert.key with the public and private key of the x.509 TLS certificates to present to the HTTP webhook server. Omit for endpoints which do not require clients to present TLS certificates.
Audit Log Structure
MinIO audit logs resemble the following JSON document:
The api.timeToFirstByte and api.timeToResponse fields are expressed in nanoseconds.
For erasure coded setupstags.objectErasureMap provides per-object details on the following:
The Server Pool on which the object operation was performed.
The erasure set on which the object operation was performed.
The list of drives in the erasure set which participated in the object operation.
MinIO exposes unauthenticated endpoints for probing node uptime and cluster high availability for simple healthchecks. These endpoints return an HTTP status code indicating whether the underlying resource is healthy or satisfies read/write quorum. MinIO exposes no other data through these endpoints.
Node Liveness
Use the following endpoint to test if a MinIO server is online:
Replace https://minio.example.net:9000 with the DNS hostname of the MinIO server to check.
A response code of 200 OK indicates the MinIO server is online and functional. Any other HTTP codes indicate an issue with reaching the server, such as a transient network issue or potential downtime.
The healthcheck probe alone cannot determine if a MinIO server is offline. Instead, the probe determines whether the current host machine can reach the server. Consider configuring a Prometheus alert using minio_cluster_health_nodes_offline_count for metrics v3 or minio_cluster_nodes_offline_total for metrics v2 to detect whether one or more MinIO nodes are offline.
Cluster Write Quorum
Use the following endpoint to test if a MinIO cluster has write quorum:
Replace https://minio.example.net:9000 with the DNS hostname of a node in the MinIO cluster to check. For clusters using a load balancer to manage incoming connections, specify the hostname for the load balancer.
A response code of 200 OK indicates that the MinIO cluster has sufficient MinIO servers online to meet write quorum. A response code of 503 Service Unavailable indicates the cluster does not currently have write quorum.
The healthcheck probe alone cannot determine if a MinIO server is offline or processing write operations normally - only whether enough MinIO servers are online to meet write quorum requirements based on the configured erasure code parity. Consider configuring a Prometheus alert using one of the following metrics to detect potential issues or errors on the MinIO cluster:
minio_cluster_nodes_offline_total to alert if one or more MinIO nodes are offline.
minio_node_drive_free_bytes to alert if the cluster is running low on free drive space.
Cluster Read Quorum
Use the following endpoint to test if a MinIO cluster has read quorum:
Replace https://minio.example.net:9000 with the DNS hostname of a node in the MinIO cluster to check. For clusters using a load balancer to manage incoming connections, specify the hostname for the load balancer.
A response code of 200 OK indicates that the MinIO cluster has sufficient MinIO servers online to meet read quorum. A response code of 503 Service Unavailable indicates the cluster does not currently have read quorum.
The healthcheck probe alone cannot determine if a MinIO server is offline or processing read operations normally - only whether enough MinIO servers are online to meet read quorum requirements based on the configured erasure code parity. Consider configuring a Prometheus alert using the minio_cluster_nodes_offline_total metric to detect whether one or more MinIO nodes are offline.
Cluster Maintenance Check
Use the following endpoint to test if the MinIO cluster can maintain both read and write if the specified MinIO server is taken down for maintenance:
Replace https://minio.example.net:9000 with the DNS hostname of a node in the MinIO cluster to check. For clusters using a load balancer to manage incoming connections, specify the hostname for the load balancer.
A response code of 200 OK indicates that the MinIO cluster has sufficient MinIO servers online to meet write quorum. A response code of 412 Precondition Failed indicates the cluster will lose quorum if the MinIO server goes offline.
The healthcheck probe alone cannot determine if a MinIO server is offline - only whether enough MinIO servers will be online after taking the node down for maintenance to meet read and write quorum requirements based on the configured erasure code parity. Consider configuring a Prometheus alert using the minio_cluster_nodes_offline_total metric to detect whether one or more MinIO nodes are offline.
Startup Readiness Window
None of the endpoints above proves that the node which received the request can already serve the data path after a restart. Each node connects its erasure drives to its peers in a monitor loop: a remote drive that could not be connected during startup stays uninstalled on that node until a later pass, and the monitor waits 15 seconds after each completed pass, so that interval is a floor between attempts, not a bound on recovery. While a drive is uninstalled, the node’s liveness endpoint answers 200 OK, both cluster endpoints, mc admin info and mcli ready can report healthy as well, because the cluster endpoints aggregate every peer’s report of its own local drives rather than the drives this node has installed. Yet a PUT through that node can fail with 503 SlowDownWrite for lack of write quorum, and a GET through it of an object another node just wrote can answer 404 NoSuchKey. In the review runs that established this, sampled I/O began succeeding roughly 13 to 15 seconds after the administrative views became healthy on a four-node loopback cluster, consistent with the reconnect interval, and every object acknowledged by other nodes during the window was readable afterwards; these are observations, not guarantees, since reconnection can keep failing.
Automation that restarts a cluster and then immediately writes to it, such as an upgrade or failover runbook, should gate on a bounded data-path check rather than on these endpoints: one small PUT through each node followed by a read of each object through every node, repeated until every request returns the correct bytes and the acknowledged version within one fixed deadline, with each request budgeted from the remaining deadline and SDK retries disabled, and with the acknowledged objects re-read afterwards. Record the time to first usable I/O separately from the endpoint result. Such a check proves sampled I/O at that moment for the erasure sets those keys hash to; it proves neither that every set is complete nor that there is headroom for a further node loss, since a set can admit writes with fewer than all of its drives installed. The endpoints remain the right signal for their stated purpose, process liveness and quorum membership.
5.6 - Metrics version 2
MinIO publishes cluster and node metrics using the Prometheus Data Model. You can use any scraping tool to pull metrics data from MinIO for further analysis and alerting.
Version 2 Endpoints
Metrics version 2 provides metrics organized into three categories:
Replace HOSTNAME:PORT with the FQDN and port of the MinIO deployment. For deployments with a load balancer managing connections between MinIO nodes, specify the address of the load balancer.
Bucket Metrics
Note
Changed: MinIO
RELEASE.2023-07-21T21-12-44Z
Bucket metrics have moved to use their own, separate endpoint.
v2 metrics have a limit of 100 buckets for performance reasons. For metrics across a higher number of buckets, use v3 metrics instead.
http://HOSTNAME:PORT/minio/v2/metrics/bucket
Replace HOSTNAME:PORT with the FQDN and port of the MinIO deployment. For deployments with a load balancer managing connections between MinIO nodes, specify the address of the load balancer.
Resource Metrics
Note
Added: RELEASE.2023-10-07T15-07-38Z
You can scrape resource metrics using the following URL endpoint:
http://HOSTNAME:PORT/minio/v2/metrics/resource
Replace HOSTNAME:PORT with the FQDN and port of the MinIO deployment. For deployments with a load balancer managing connections between MinIO nodes, specify the address of the load balancer.
MinIO collects the following metrics at the cluster level. Metrics may include one or more labels, such as the server that calculated that metric.
These metrics can be obtained from any MinIO server once per collection by using the following URL:
https://HOSTNAME:PORT/minio/v2/metrics/cluster
Replace HOSTNAME:PORT with the hostname of your MinIO deployment. For deployments behind a load balancer, use the load balancer hostname instead of a single node hostname.
Audit Metrics
Name
Description
minio_audit_failed_messages
Total number of messages that failed to send since start.
minio_audit_target_queue_length
Number of unsent messages in queue for target.
minio_audit_total_messages
Total number of messages sent since start.
Cluster Capacity Metrics
Name
Description
minio_cluster_capacity_raw_free_bytes
Total free capacity online in the cluster.
minio_cluster_capacity_raw_total_bytes
Total capacity online in the cluster.
minio_cluster_capacity_usable_free_bytes
Total free usable capacity online in the cluster.
minio_cluster_capacity_usable_total_bytes
Total usable capacity online in the cluster.
minio_cluster_objects_size_distribution
Distribution of object sizes across a cluster
minio_cluster_objects_version_distribution
Distribution of object versions across a cluster
minio_cluster_usage_object_total
Total number of objects in a cluster
minio_cluster_usage_total_bytes
Total cluster usage in bytes
minio_cluster_usage_version_total
Total number of versions (includes delete marker) in a cluster
minio_cluster_usage_deletemarker_total
Total number of delete markers in a cluster
minio_cluster_bucket_total
Total number of buckets in the cluster
Cluster Drive Metrics
Name
Description
minio_cluster_drive_offline_total
Total drives offline in this cluster.
minio_cluster_drive_online_total
Total drives online in this cluster.
minio_cluster_drive_total
Total drives in this cluster.
Cluster ILM Metrics
Name
Description
minio_cluster_ilm_transitioned_bytes
Total bytes transitioned to a tier.
minio_cluster_ilm_transitioned_objects
Total number of objects transitioned to a tier.
minio_cluster_ilm_transitioned_versions
Total number of versions transitioned to a tier.
Cluster KMS Metrics
Name
Description
minio_cluster_kms_online
Reports whether the KMS is online (1) or offline (0).
minio_cluster_kms_request_error
Number of KMS requests that failed due to some error. (HTTP 4xx status code).
minio_cluster_kms_request_failure
Number of KMS requests that failed due to some internal failure. (HTTP 5xx status code).
minio_cluster_kms_request_success
Number of KMS requests that succeeded.
minio_cluster_kms_uptime
The time the KMS has been up and running in seconds.
Cluster Health Metrics
Name
Description
minio_cluster_nodes_offline_total
Total number of MinIO nodes offline.
minio_cluster_nodes_online_total
Total number of MinIO nodes online.
minio_cluster_write_quorum
Maximum write quorum across all pools and sets
minio_cluster_health_status
Get current cluster health status
minio_cluster_health_erasure_set_healing_drives
Count of healing drives in the erasure set
minio_cluster_health_erasure_set_online_drives
Count of online drives in the erasure set
minio_cluster_health_erasure_set_read_quorum
Get read quorum of the erasure set
minio_cluster_health_erasure_set_write_quorum
Get write quorum of the erasure set
minio_cluster_health_erasure_set_status
Get current health status of the erasure set
Cluster Replication Metrics
Metrics marked as Site Replication Only only populate on deployments with Site Replication configurations. For deployments with bucket or batch replication configurations, these metrics populate instead under the Bucket Metrics endpoint.
Name
Description
minio_cluster_replication_last_hour_failed_bytes
(Site Replication Only) Total number of bytes failed at least once to replicate in the last full hour.
minio_cluster_replication_last_hour_failed_count
(Site Replication Only) Total number of objects which failed replication in the last full hour.
(Site Replication Only)Number of failures proxying PUT tagging requests to replication target
Node Replication Metrics
Metrics marked as Site Replication Only only populate on deployments with Site Replication configurations. For deployments with bucket or batch replication configurations, these metrics populate instead under the Bucket Metrics endpoint.
Name
Description
minio_node_replication_current_active_workers
Total number of active replication workers
minio_node_replication_average_active_workers
Average number of active replication workers
minio_node_replication_max_active_workers
Maximum number of active replication workers seen since server start
minio_node_replication_link_online
Reports whether the replication link is online (1) or offline (0).
Total action outcome of lifecycle checks since server start for deletion of all versions
Tier Metrics
Name
Description
minio_node_tier_tier_ttlb_seconds_distribution
Distribution of time to last byte for objects downloaded from warm tier
minio_node_tier_requests_success
Number of requests to download object from warm tier that were successful
minio_node_tier_requests_failure
Number of requests to download object from warm tier that were failure
System Metrics
Name
Description
minio_node_file_descriptor_limit_total
Limit on total number of open file descriptors for the MinIO Server process.
minio_node_file_descriptor_open_total
Total number of open file descriptors by the MinIO Server process.
minio_node_go_routine_total
Total number of go routines running.
minio_node_io_rchar_bytes
Total bytes read by the process from the underlying storage system including cache, /proc/[pid]/io rchar.
minio_node_io_read_bytes
Total bytes read by the process from the underlying storage system, /proc/[pid]/io read_bytes.
minio_node_io_wchar_bytes
Total bytes written by the process to the underlying storage system including page cache, /proc/[pid]/io wchar.
minio_node_io_write_bytes
Total bytes written by the process to the underlying storage system, /proc/[pid]/io write_bytes.
minio_node_process_cpu_total_seconds
Total user and system CPU time spent in seconds by the process.
minio_node_process_resident_memory_bytes
Resident memory size in bytes.
minio_node_process_virtual_memory_bytes
Virtual memory size in bytes.
minio_node_process_starttime_seconds
Start time for MinIO process per node, time in seconds since Unix epoc.
minio_node_process_uptime_seconds
Uptime for MinIO process per node in seconds.
Scanner Metrics
Name
Description
minio_node_scanner_bucket_scans_finished
Total number of bucket scans finished since server start.
minio_node_scanner_bucket_scans_started
Total number of bucket scans started since server start.
minio_node_scanner_directories_scanned
Total number of directories scanned since server start.
minio_node_scanner_objects_scanned
Total number of unique objects scanned since server start.
minio_node_scanner_versions_scanned
Total number of object versions scanned since server start.
minio_node_syscall_read_total
Total read SysCalls to the kernel. /proc/[pid]/io syscr.
minio_node_syscall_write_total
Total write SysCalls to the kernel. /proc/[pid]/io syscw.
minio_usage_last_activity_nano_seconds
Time elapsed (in nano seconds) since last scan activity.
Note
Changed: RELEASE.2025-03-12T17-29-24Z
v2 metrics have a limit of 100 buckets for performance reasons. For metrics across a higher number of buckets, use v3 metrics instead.
Bucket Metrics
MinIO collects the following metrics at the bucket level. Each metric includes the bucket label to identify the corresponding bucket. Metrics may include one or more additional labels, such as the server that calculated that metric.
These metrics can be obtained from any MinIO server once per collection by using the following URL:
https://HOSTNAME:PORT/minio/v2/metrics/bucket
Replace HOSTNAME:PORT with the hostname of your MinIO deployment. For deployments behind a load balancer, use the load balancer hostname instead of a single node hostname.
Distribution Metrics
Name
Description
minio_bucket_objects_size_distribution
Distribution of object sizes in the bucket, includes label for the bucket name.
minio_bucket_objects_version_distribution
Distribution of object sizes in a bucket, by number of versions
Number of failures in PUT tagging proxy requests to replication target
Traffic Metrics
Name
Description
minio_bucket_traffic_received_bytes
Total number of S3 bytes received for this bucket.
minio_bucket_traffic_sent_bytes
Total number of S3 bytes sent for this bucket.
Usage Metrics
Name
Description
minio_bucket_usage_object_total
Total number of objects.
minio_bucket_usage_version_total
Total number of versions (includes delete marker)
minio_bucket_usage_deletemarker_total
Total number of delete markers.
minio_bucket_usage_total_bytes
Total bucket size in bytes.
minio_bucket_quota_total_bytes
Total bucket quota size in bytes.
Requests Metrics
Name
Description
minio_bucket_requests_4xx_errors_total
Total number of S3 requests with (4xx) errors on a bucket.
minio_bucket_requests_5xx_errors_total
Total number of S3 requests with (5xx) errors on a bucket.
minio_bucket_requests_inflight_total
Total number of S3 requests currently in flight on a bucket.
minio_bucket_requests_total
Total number of S3 requests on a bucket.
minio_bucket_requests_canceled_total
Total number S3 requests canceled by the client.
minio_bucket_requests_ttfb_seconds_distribution
Distribution of time to first byte across API calls per bucket.
Resource Metrics
MinIO collects the following resource metrics at the node level. Each metric includes the server label to identify the corresponding node. Metrics may include one or more additional labels, such as the drive path, interface name, etc.
These metrics can be obtained from any MinIO server once per collection by using the following URL:
https://HOSTNAME:PORT/minio/v2/metrics/resource
Replace HOSTNAME:PORT with the hostname of your MinIO deployment. For deployments behind a load balancer, use the load balancer hostname instead of a single node hostname.
Drive Resource Metrics
Name
Description
minio_node_drive_total_bytes
Total bytes on a drive.
minio_node_drive_used_bytes
Used bytes on a drive.
minio_node_drive_total_inodes
Total inodes on a drive.
minio_node_drive_used_inodes
Total inodes used on a drive.
minio_node_drive_reads_per_sec
Reads per second on a drive.
minio_node_drive_reads_kb_per_sec
Kilobytes read per second on a drive.
minio_node_drive_reads_await
Average time for read requests to be served on a drive.
minio_node_drive_writes_per_sec
Writes per second on a drive.
minio_node_drive_writes_kb_per_sec
Kilobytes written per second on a drive.
minio_node_drive_writes_await
Average time for write requests to be served on a drive.
minio_node_drive_perc_util
Percentage of time the disk was busy since uptime.
Network Interface Metrics
Name
Description
minio_node_if_rx_bytes
Bytes received on the interface in 60s.
minio_node_if_rx_bytes_avg
Bytes received on the interface in 60s (avg) since uptime.
minio_node_if_rx_bytes_max
Bytes received on the interface in 60s (max) since uptime.
minio_node_if_rx_errors
Receive errors in 60s.
minio_node_if_rx_errors_avg
Receive errors in 60s (avg).
minio_node_if_rx_errors_max
Receive errors in 60s (max).
minio_node_if_tx_bytes
Bytes transmitted in 60s.
minio_node_if_tx_bytes_avg
Bytes transmitted in 60s (avg).
minio_node_if_tx_bytes_max
Bytes transmitted in 60s (max).
minio_node_if_tx_errors
Transmit errors in 60s.
minio_node_if_tx_errors_avg
Transmit errors in 60s (avg).
minio_node_if_tx_errors_max
Transmit errors in 60s (max).
CPU Metrics
Name
Description
minio_node_cpu_avg_user
CPU user time.
minio_node_cpu_avg_user_avg
CPU user time (avg).
minio_node_cpu_avg_user_max
CPU user time (max).
minio_node_cpu_avg_system
CPU system time.
minio_node_cpu_avg_system_avg
CPU system time (avg).
minio_node_cpu_avg_system_max
CPU system time (max).
minio_node_cpu_avg_idle
CPU idle time.
minio_node_cpu_avg_idle_avg
CPU idle time (avg).
minio_node_cpu_avg_idle_max
CPU idle time (max).
minio_node_cpu_avg_iowait
CPU ioWait time.
minio_node_cpu_avg_iowait_avg
CPU ioWait time (avg).
minio_node_cpu_avg_iowait_max
CPU ioWait time (max).
minio_node_cpu_avg_nice
CPU nice time.
minio_node_cpu_avg_nice_avg
CPU nice time (avg).
minio_node_cpu_avg_nice_max
CPU nice time (max).
minio_node_cpu_avg_steal
CPU steam time.
minio_node_cpu_avg_steal_avg
CPU steam time (avg).
minio_node_cpu_avg_steal_max
CPU steam time (max).
minio_node_cpu_avg_load1
CPU load average 1min.
minio_node_cpu_avg_load1_avg
CPU load average 1min (avg).
minio_node_cpu_avg_load1_max
CPU load average 1min (max).
minio_node_cpu_avg_load1_perc
CPU load average 1min (percentage).
minio_node_cpu_avg_load1_perc_avg
CPU load average 1min (percentage) (avg).
minio_node_cpu_avg_load1_perc_max
CPU load average 1min (percentage) (max).
minio_node_cpu_avg_load5
CPU load average 5min.
minio_node_cpu_avg_load5_avg
CPU load average 5min (avg).
minio_node_cpu_avg_load5_max
CPU load average 5min (max).
minio_node_cpu_avg_load5_perc
CPU load average 5min (percentage).
minio_node_cpu_avg_load5_perc_avg
CPU load average 5min (percentage) (avg).
minio_node_cpu_avg_load5_perc_max
CPU load average 5min (percentage) (max).
minio_node_cpu_avg_load15
CPU load average 15min.
minio_node_cpu_avg_load15_avg
CPU load average 15min (avg).
minio_node_cpu_avg_load15_max
CPU load average 15min (max).
minio_node_cpu_avg_load15_perc
CPU load average 15min (percentage).
minio_node_cpu_avg_load15_perc_avg
CPU load average 15min (percentage) (avg).
minio_node_cpu_avg_load15_perc_max
CPU load average 15min (percentage) (max).
Memory Metrics
Name
Description
minio_node_mem_available
Available memory on the node.
minio_node_mem_available_avg
Available memory on the node (avg).
minio_node_mem_available_max
Available memory on the node (max).
minio_node_mem_buffers
Buffers memory on the node.
minio_node_mem_buffers_avg
Buffers memory on the node (avg).
minio_node_mem_buffers_max
Buffers memory on the node (max).
minio_node_mem_cache
Cache memory on the node.
minio_node_mem_cache_avg
Cache memory on the node (avg).
minio_node_mem_cache_max
Cache memory on the node (max).
minio_node_mem_free
Free memory on the node.
minio_node_mem_free_avg
Free memory on the node (avg).
minio_node_mem_free_max
Free memory on the node (max).
minio_node_mem_shared
Shared memory on the node.
minio_node_mem_shared_avg
Shared memory on the node (avg).
minio_node_mem_shared_max
Shared memory on the node (max).
minio_node_mem_total
Total memory on the node.
minio_node_mem_total_avg
Total memory on the node (avg).
minio_node_mem_total_max
Total memory on the node (max).
minio_node_mem_used
Used memory on the node.
minio_node_mem_used_avg
Used memory on the node (avg).
minio_node_mem_used_max
Used memory on the node (max).
minio_node_mem_used_perc
Used memory percentage on the node.
minio_node_mem_used_perc_avg
Used memory percentage on the node (avg).
minio_node_mem_used_perc_max
Used memory percentage on the node (max).
5.7 - Monitor a Silo Server with Grafana
Grafana allows you to query, visualize, alert on and understand your metrics no matter where they are stored.
To track changes to the Grafana dashboard, inspect the JSON files for the server or bucket dashboards in the MinIO Server GitHub repository.
MinIO Server Metrics Dashboard
Browse the maintained MinIO dashboards in the MinIO organization catalog on Grafana, then select a server dashboard compatible with the metrics version exposed by your deployment.
MinIO provides a Grafana Dashboard for MinIO Server metrics. For specifics on the dashboard’s configuration, see the JSON file on GitHub.
For MinIO Deployments running with Server-Side Encryption (SSE-KMS or SSE-S3), the dashboard includes metrics for the KMS. These metrics include status, request error rates, and request success rates.
Users can authenticate against MinIO using their externally managed credentials and the related Security Token Service (STS) API. Once authenticated, MinIO attempts to associate the user with one or more configured policies. A user with no associated policies has no permissions on the MinIO deployment.
OpenID Connect (OIDC)
MinIO supports using an OpenID Connect (OIDC) compatible IDentity Provider (IDP) such as Okta, KeyCloak, Dex, Google, or Facebook for external management of user identities. Configuring an external IDP enables Single-Sign On workflows, where applications authenticate against the external IDP before accessing MinIO.
MinIO uses Policy Based Access Control (PBAC) to define the actions and resources to which an authenticated user has access. MinIO supports creating and managing policies which an externally managed user can claim.
For identities managed by the external OpenID Connect (OIDC) compatible provider, MinIO uses a JSON Web Token claim to identify the policy to assign to the authenticated user.
MinIO by default looks for a policy claim and reads a list of one or more policies to assign. MinIO attempts to match existing policies to those specified in the JWT claim. If none of the specified policies exist on the MinIO deployment, MinIO denies authorization for any and all operations issued by that user. For example, consider a claim with the following key-value assignment:
policy="readwrite_data,read_analytics,read_logs"
The specified policy claim directs MinIO to attach the policies with names matching readwrite_data, read_analytics, and read_logs to the authenticated user.
You can use a JWT Debugging tool to decode the returned JWT token and validate that the user attributes include the specified claim. See RFC 7519: JWT Claim for more information on JWT claims. Defer to the documentation for your preferred OIDC provider for instructions on configuring user claims.
Active Directory / LDAP
MinIO supports using an Active Directory or LDAP (AD/LDAP) service for external management of user identities. Configuring an external IDentity Provider (IDP) enables Single-Sign On (SSO) workflows, where applications authenticate against the external IDP before accessing MinIO.
Querying the Active Directory / LDAP Service
MinIO queries the configured Active Directory / LDAP server to verify the credentials specified by the application and optionally return a list of groups in which the user has membership. This process, called Lookup-Bind mode, uses an AD/LDAP user with minimal permissions, only sufficient to authenticate with the AD/LDAP server for user and group lookups.
The following tabs provide a reference of the environment variables and configuration settings required for enabling Lookup-Bind mode.
MinIO uses Policy Based Access Control (PBAC) to define the actions and resources to which an authenticated user has access. When using an Active Directory/LDAP server for identity management (authentication), MinIO maintains control over access (authorization) through PBAC.
When a user successfully authenticates to MinIO using their AD/LDAP credentials, MinIO searches for all policies which are explicitly associated to that user’s Distinguished Name (DN). Specifically, the policy must be assigned to a user with a matching DN using the mc idp ldap policy attach command.
MinIO also supports querying for the user’s AD/LDAP group membership. MinIO attempts to match existing policies to the DN for each of the user’s groups. The authenticated users complete set of permissions consists of its explicitly assigned and group-inherited policies. See Group Lookup for more information.
MinIO uses deny-by-default behavior where a user with no explicitly assigned or group-inherited policies cannot access any resource on the MinIO deployment.
MinIO supports querying the Active Directory / LDAP server for a list of groups in which the authenticated user has membership. MinIO attempts to match existing policies to each group DN and assigns each matching policy to the authenticated user.
The following tabs provide a reference of the environment variables and configuration settings required for enabling group lookups:
Configuring a MinIO Tenant to use an external AD/LDAP provider
Accessing the Tenant Console using AD/LDAP Credentials.
Using the MinIO AssumeRoleWithLDAPIdentity Security Token Service (STS) API to generate temporary credentials for use by applications.
Baremetal
For MinIO deployments on baremetal infrastructure, this procedure covers:
Configuring a MinIO cluster for an external AD/LDAP provider.
Accessing the MinIO Console using AD/LDAP credentials.
Using the MinIO AssumeRoleWithLDAPIdentity Security Token Service (STS) API to generate temporary credentials for use by applications.
This procedure is generic for AD/LDAP services. See the documentation for the AD/LDAP provider of your choice for specific instructions or procedures on configuration of user identities.
Prerequisites
Access to MinIO Cluster
Kubernetes
You must have access to the MinIO Operator Console web UI. You can either expose the MinIO Operator Console service using your preferred Kubernetes routing component, or use temporary port forwarding to expose the Console service port on your local machine.
Baremetal
This procedure uses mc for performing operations on the MinIO cluster. Install mc on a machine with network access to the cluster. See the mcInstallation Quickstart for instructions on downloading and installing mc.
This procedure assumes a configured alias for the MinIO cluster.
Active Directory / LDAP Compatible IDentity Provider
This procedure assumes an existing Active Directory or LDAP service. Instructions on configuring AD/LDAP are out of scope for this procedure.
Kubernetes
For AD/LDAP deployments within the same Kubernetes cluster as the MinIO Tenant, you can use Kubernetes service names to allow the MinIO Tenant to establish connectivity to the AD/LDAP service.
For AD/LDAP deployments external to the Kubernetes cluster, you must ensure the cluster supports routing communications between Kubernetes services and pods and the external network. This may require configuration or deployment of additional Kubernetes network components and/or enabling access to the public internet.
Baremetal
The MinIO deployment must have bidirectional network connectivity to the target AD / LDAP service.
MinIO requires a read-only access keys with which it binds to perform authenticated user and group queries. Ensure each AD/LDAP user and group intended for use with MinIO has a corresponding policy on the MinIO deployment. An AD/LDAP user with no assigned policy and with membership in groups with no assigned policy has no permission to access any action or resource on the MinIO cluster.
Configure MinIO with Active Directory or LDAP External Identity Management
Set the Active Directory / LDAP Configuration Settings
Configure the AD/LDAP provider using one of the following:
MinIO Client
Environment variables
All methods require starting/restarting the MinIO deployment to apply changes.
The following tabs provide a quick reference for the available configuration methods:
MinIO Client
MinIO supports specifying the AD/LDAP provider settings using mc idp ldap commands.
For distributed deployments, the mc idp ldap command applies the configuration to all nodes in the deployment.
The following example code sets all configuration settings related to configuring an AD/LDAP provider for external identity management.
The identity_ldap configuration key remains available for existing scripts and tools.
Environment Variables
MinIO supports specifying the AD/LDAP provider settings using environment variables.
The minio server process applies the specified settings on its next startup. For distributed deployments, specify these settings across all nodes in the deployment using the same values. Any differences in server configurations between nodes will result in startup or configuration failures.
The following example code sets all environment variables related to configuring an AD/LDAP provider for external identity management. The minimum required variable are:
exportMINIO_IDENTITY_LDAP_SERVER_ADDR="ldaps.example.net:636"exportMINIO_IDENTITY_LDAP_LOOKUP_BIND_DN="CN=xxxxx,OU=xxxxx,OU=xxxxx,DC=example,DC=net"exportMINIO_IDENTITY_LDAP_USER_DN_SEARCH_BASE_DN="dc=example,dc=net"exportMINIO_IDENTITY_LDAP_USER_DN_SEARCH_FILTER="(&(objectCategory=user)(sAMAccountName=%s))"exportMINIO_IDENTITY_LDAP_LOOKUP_BIND_PASSWORD="xxxxxxxxx"exportMINIO_IDENTITY_LDAP_GROUP_SEARCH_FILTER="(&(objectClass=group)(member=%d))"exportMINIO_IDENTITY_LDAP_GROUP_SEARCH_BASE_DN="ou=MinIO Users,dc=example,dc=net"exportMINIO_IDENTITY_LDAP_TLS_SKIP_VERIFY="off"exportMINIO_IDENTITY_LDAP_SERVER_INSECURE="off"exportMINIO_IDENTITY_LDAP_SERVER_STARTTLS="off"exportMINIO_IDENTITY_LDAP_SRV_RECORD_NAME=""exportMINIO_IDENTITY_LDAP_COMMENT="LDAP test server"
You must restart the MinIO deployment to apply the configuration changes.
If you configured AD/LDAP from the MinIO Console, no additional action is required. The MinIO Console automatically restarts the deployment after saving the new AD/LDAP configuration.
For MinIO Client and environment variable configuration, use the mc admin service restart command to restart the deployment:
mc admin service restart ALIAS
Replace ALIAS with the alias of the deployment to restart.
Use the MinIO Console to Log In with AD/LDAP Credentials
The MinIO Console supports the full workflow of authenticating to the AD/LDAP provider, generating temporary credentials using the MinIO AssumeRoleWithLDAPIdentity Security Token Service (STS) endpoint, and logging the user into the MinIO deployment.
You can access the Console by opening the root URL for the MinIO cluster. For example, https://minio.example.net:9000.
Once logged in, you can perform any action for which the authenticated user is authorized.
You can also create access keys for supporting applications which must perform operations on MinIO. Access Keys are long-lived credentials which inherit their privileges from the parent user. The parent user can further restrict those privileges while creating the service account.
Generate S3-Compatible Temporary Credentials using AD/LDAP Credentials
MinIO requires clients to authenticate using AWS Signature Version 4 protocol with support for the deprecated Signature Version 2 protocol. Specifically, clients must present a valid access key and secret key to access any S3 or MinIO administrative API, such as PUT, GET, and DELETE operations.
Applications can generate temporary access credentials as-needed using the AssumeRoleWithLDAPIdentity Security Token Service (STS) API endpoint and AD/LDAP user credentials. MinIO provides an example Go application ldap.go that manages this workflow.
POST https://minio.example.net?Action=AssumeRoleWithLDAPIdentity
&LDAPUsername=USERNAME
&LDAPPassword=PASSWORD
&Version=2011-06-15
&Policy={}
Replace the LDAPUsername with the username of the AD/LDAP user.
Replace the LDAPPassword with the password of the AD/LDAP user.
Replace the Policy with an inline URL-encoded JSON policy that further restricts the permissions associated to the temporary credentials.
The API response consists of an XML document containing the access key, secret key, session token, and expiration date. Applications can use the access key and secret key to access and perform operations on MinIO.
This procedure configures MinIO to use Keycloak as an external IDentity Provider (IDP) for authentication of users via the OpenID Connect (OIDC) protocol.
This page has procedures for configuring OIDC for MinIO deployments in Kubernetes and Baremetal infrastructures.
Select the tab corresponding to your infrastructure to switch between instruction sets.
Configure Keycloak for use with MinIO authentication and authorization
Configure a new or existing MinIO Tenant to use Keycloak as the OIDC provider
Create policies to control access of Keycloak-authenticated users
Log into the MinIO Tenant Console using SSO and a Keycloak-managed identity
Generate temporary S3 access credentials using the AssumeRoleWithWebIdentity Security Token Service (STS) API
Baremetal
For MinIO deployments on baremetal infrastructure, this procedure covers:
Configure Keycloak for use with MinIO authentication and authorization
Configure a new or existing MinIO cluster to use Keycloak as the OIDC provider
Create policies to control access of Keycloak-authenticated users
Log into the MinIO Console using SSO and a Keycloak-managed identity
Generate temporary S3 access credentials using the AssumeRoleWithWebIdentity Security Token Service (STS) API
This procedure was written and tested against Keycloak 21.0.0. The provided instructions may work against other Keycloak versions. This procedure assumes you have prior experience with Keycloak and have reviewed their documentation for guidance and best practices in deploying, configuring, and managing the service.
Prerequisites
Keycloak Deployment and Realm Configuration
This procedure assumes an existing Keycloak deployment to which you have administrative access. Specifically, you must have permission to create and configure Realms, Clients, Client Scopes, Realm Roles, Users, and Groups on the Keycloak deployment.
Kubernetes
For Keycloak deployments within the same Kubernetes cluster as the MinIO Tenant, this procedure assumes bidirectional access between the Keycloak and MinIO pods/services. For Keycloak deployments external to the Kubernetes cluster, this procedure assumes an existing Ingress, Load Balancer, or similar Kubernetes network control component that manages network access to and from the MinIO Tenant.
Baremetal
The MinIO deployment must have bidirectional access to the target OIDC service.
Ensure each user identity intended for use with MinIO has the appropriate claim configured such that MinIO can associate a policy to the authenticated user. An OpenID user with no assigned policy has no permission to access any action or resource on the MinIO cluster.
Access to MinIO Cluster
Kubernetes
You must have access to the MinIO Operator Console web UI. You can either expose the MinIO Operator Console service using your preferred Kubernetes routing component, or use temporary port forwarding to expose the Console service port on your local machine.
Baremetal
This procedure uses mc for performing operations on the MinIO cluster. Install mc on a machine with network access to the cluster. See the mcInstallation Quickstart for instructions on downloading and installing mc.
This procedure assumes a configured alias for the MinIO cluster.
Configure MinIO for Keycloak Identity Management
Kubernetes
Configure or Create a Client for Accessing Keycloak
Authenticate to the Keycloak Administrative Console and navigate to Clients.
Select Create client and follow the instructions to create a new Keycloak client for MinIO. Fill in the specified inputs as follows:
Client ID
Set to a unique identifier for MinIO (minio)
Client type
Set to OpenID Connect
Always display in console
Toggle to On
Client authentication
Toggle to On
Authentication flow
Toggle on Standard flow
(Optional) Authentication flow
Toggle on Direct access grants (API testing)
Keycloak deploys the client with a default set of configuration values. Modify these values as necessary for your Keycloak setup and desired behavior. The following table provides a baseline of settings and values to configure:
Root URL
Set to ${authBaseUrl}
Home URL
Set to the Realm you want MinIO to use (/realms/master/account/)
Client scopes allow Keycloak to map user attributes as part of the JSON Web Token (JWT) returned in authentication requests. This allows MinIO to reference those attributes when assigning policies to the user. This step creates the necessary client scope to support MinIO authorization after successful Keycloak authentication.
Navigate to the Client scopes view and create a new client scope for MinIO authorization:
Name
Set to any recognizable name for the policy (minio-authorization)
Include in token scope
Toggle to On
Once created, select the scope from the list and navigate to Mappers.
Select Configure a new mapper to create a new mapping:
User Attribute
Select the Mapper Type
Name
Set to any recognizable name for the mapping (minio-policy-mapper)
User Attribute
Set to policy
Token Claim Name
Set to policy
Add to ID token
Set to On
Claim JSON Type
Set to String
Multivalued
Set to On
This allows setting multiple policy values in the single claim.
Aggregate attribute values
Set to On
This allows users to inherit any policy set in their Groups
Once created, assign the Client Scope to the MinIO client.
Navigate to Clients and select the MinIO client.
Select Client scopes, then select Add client scope.
Select the previously created scope and set the Assigned type to default.
Apply the Necessary Attribute to Keycloak Users/Groups
You must assign an attribute named policy to the Keycloak Users or Groups. Set the value to any policy on the MinIO deployment.
For Users, navigate to Users and select or create the User:
Credentials
Set the user password to a permanent value if not already set
Attributes
Create a new attribute with key policy and value of any policy (consoleAdmin)
For Groups, navigate to Groups and select or create the Group:
Attributes
Create a new attribute with key policy and value of any policy (consoleAdmin)
You can assign users to groups such that they inherit the specified policy attribute. If you set the Mapper settings to enable Aggregate attribute values, Keycloak includes the aggregated array of policies as part of the authenticated user’s JWT token. MinIO can use this list of policies when authorizing the user.
You can test the configured policies of a user by using the Keycloak API:
mc idp openid add ALIAS PRIMARY_IAM \
client_id=MINIO_CLIENT \
client_secret=MINIO_CLIENT_SECRET \
config_url="https://keycloak-service.keycloak-namespace.svc.cluster-domain.example/realms/REALM/.well-known/openid-configuration"\
display_name="SSO_IDENTIFIER"scopes="openid,email,preferred_username"\
redirect_uri_dynamic="on"
PRIMARY_IAM
Set to a unique identifier for the Keycloak service, such as keycloak_primary
MINIO_CLIENT MINIO_CLIENT_SECRET
Set to the Keycloak client ID and secret configured in Step 1
config_url
Set to the address of the Keycloak OpenID configuration document (keycloak-url.example.net:8080)
display_name
Set to a user-facing name the MinIO Console displays as part of the Single-Sign On (SSO) workflow for the configured Keycloak service
scopes
Set to a list of OpenID scopes you want to include in the JWT, such as preferred_username or email
redirect_uri_dynamic
Set to on
Substitutes the MinIO Console address used by the client as part of the Keycloak redirect URI.
Keycloak returns authenticated users to the Console using the provided URI.
For MinIO Console deployments behind a reverse proxy, load balancer, or similar network control plane, you can instead use the MINIO_BROWSER_REDIRECT_URL variable to set the redirect address for Keycloak to use.
Restart the MinIO deployment for the changes to apply.
Check the MinIO logs and verify that startup succeeded with no errors related to the OIDC configuration.
Generate Application Credentials using the Security Token Service (STS)
Applications using an S3-compatible SDK must specify credentials in the form of an access key and secret key. The MinIO AssumeRoleWithWebIdentity API returns the necessary temporary credentials, including a required session token, using a JWT returned by Keycloak after authentication.
You can test this workflow using the following sequence of HTTP calls and the curl utility:
Authenticate as a Keycloak user and retrieve the JWT token
Replace the USER and PASSWORD with the credentials of a Keycloak user on the REALM.
Replace the CLIENT and SECRET with the client ID and secret for the MinIO-specific Keycloak client on the REALM
You can process the results using jq or a similar JSON-formatting utility. Extract the access_token field to retrieve the necessary access token. Pay attention to the expires_in field to note the number of seconds before the token expires.
Generate MinIO Credentials using the AssumeRoleWithWebIdentity API
Applications should implement the STS AssumeRoleWithWebIdentity flow using their SDK of choice. When STS credentials expire, applications should have logic in place to regenerate the JWT token, STS token, and MinIO credentials before retrying and continuing operations.
Alternatively, users can generate access keys through the MinIO Console for the purpose of creating long-lived API-key like access using their Keycloak credentials.
Baremetal
Configure or Create a Client for Accessing Keycloak
Authenticate to the Keycloak Administrative Console and navigate to Clients.
Select Create client and follow the instructions to create a new Keycloak client for MinIO. Fill in the specified inputs as follows:
Client ID
Set to a unique identifier for MinIO (minio)
Client type
Set to OpenID Connect
Always display in console
Toggle to On
Client authentication
Toggle to On
Authentication flow
Toggle on Standard flow
(Optional) Authentication flow
Toggle on Direct access grants (API testing)
Keycloak deploys the client with a default set of configuration values. Modify these values as necessary for your Keycloak setup and desired behavior. The following table provides a baseline of settings and values to configure:
Root URL
Set to ${authBaseUrl}
Home URL
Set to the Realm you want MinIO to use (/realms/master/account/)
Client scopes allow Keycloak to map user attributes as part of the JSON Web Token (JWT) returned in authentication requests. This allows MinIO to reference those attributes when assigning policies to the user. This step creates the necessary client scope to support MinIO authorization after successful Keycloak authentication.
Navigate to the Client scopes view and create a new client scope for MinIO authorization:
Name
Set to any recognizable name for the policy (minio-authorization)
Include in token scope
Toggle to On
Once created, select the scope from the list and navigate to Mappers.
Select Configure a new mapper to create a new mapping:
User Attribute
Select the Mapper Type
Name
Set to any recognizable name for the mapping (minio-policy-mapper)
User Attribute
Set to policy
Token Claim Name
Set to policy
Add to ID token
Set to On
Claim JSON Type
Set to String
Multivalued
Set to On
This allows setting multiple policy values in the single claim.
Aggregate attribute values
Set to On
This allows users to inherit any policy set in their Groups
Once created, assign the Client Scope to the MinIO client.
Navigate to Clients and select the MinIO client.
Select Client scopes, then select Add client scope.
Select the previously created scope and set the Assigned type to default.
Apply the Necessary Attribute to Keycloak Users/Groups
You must assign an attribute named policy to the Keycloak Users or Groups. Set the value to any policy on the MinIO deployment.
For Users, navigate to Users and select or create the User:
Credentials
Set the user password to a permanent value if not already set
Attributes
Create a new attribute with key policy and value of any policy (consoleAdmin)
For Groups, navigate to Groups and select or create the Group:
Attributes
Create a new attribute with key policy and value of any policy (consoleAdmin)
You can assign users to groups such that they inherit the specified policy attribute. If you set the Mapper settings to enable Aggregate attribute values, Keycloak includes the aggregated array of policies as part of the authenticated user’s JWT token. MinIO can use this list of policies when authorizing the user.
You can test the configured policies of a user by using the Keycloak API:
mc idp openid add ALIAS PRIMARY_IAM \
client_id=MINIO_CLIENT \
client_secret=MINIO_CLIENT_SECRET \
config_url="https://keycloak-url.example.net:8080/realms/REALM/.well-known/openid-configuration"\
display_name="SSO_IDENTIFIER"scopes="openid,email,preferred_username"\
redirect_uri_dynamic="on"
PRIMARY_IAM
Set to a unique identifier for the Keycloak service, such as keycloak_primary
MINIO_CLIENT MINIO_CLIENT_SECRET
Set to the Keycloak client ID and secret configured in Step 1
config_url
Set to the address of the Keycloak OpenID configuration document (keycloak-url.example.net:8080)
display_name
Set to a user-facing name the MinIO Console displays as part of the Single-Sign On (SSO) workflow for the configured Keycloak service
scopes
Set to a list of OpenID scopes you want to include in the JWT, such as preferred_username or email
redirect_uri_dynamic
Set to on
Substitutes the MinIO Console address used by the client as part of the Keycloak redirect URI.
Keycloak returns authenticated users to the Console using the provided URI.
For MinIO Console deployments behind a reverse proxy, load balancer, or similar network control plane, you can instead use the MINIO_BROWSER_REDIRECT_URL variable to set the redirect address for Keycloak to use.
Environment Variables
Set the following environment variables prior to starting the container using the -e ENVVAR=VALUE flag.
The following example code sets the minimum required environment variables related to configuring Keycloak as an external identity management provider.
Replace the suffix _PRIMARY_IAM with a unique identifier for this Keycloak configuration.
For example, MINIO_IDENTITY_OPENID_CONFIG_URL_KEYCLOAK_PRIMARY.
You can omit the suffix if you intend to only configure a single OIDC provider for the deployment.
Substitutes the MinIO Console address used by the client as part of the Keycloak redirect URI.
Keycloak returns authenticated users to the Console using the provided URI.
For MinIO Console deployments behind a reverse proxy, load balancer, or similar network control plane, you can instead use the MINIO_BROWSER_REDIRECT_URL variable to set the redirect address for Keycloak to use.
Restart the MinIO deployment for the changes to apply.
Check the MinIO logs and verify that startup succeeded with no errors related to the OIDC configuration.
If you attempt to log in with the Console, you should now see an (SSO) button using the configured Display Name.
Specify a configured user and attempt to log in. MinIO should automatically redirect you to the Keycloak login entry. Upon successful authentication, Keycloak should redirect you back to the MinIO Console using either the originating Console URL or the Redirect URI if configured.
5. Generate Application Credentials using the Security Token Service (STS)
Applications using an S3-compatible SDK must specify credentials in the form of an access key and secret key. The MinIO AssumeRoleWithWebIdentity API returns the necessary temporary credentials, including a required session token, using a JWT returned by Keycloak after authentication.
You can test this workflow using the following sequence of HTTP calls and the curl utility:
Authenticate as a Keycloak user and retrieve the JWT token
Replace the USER and PASSWORD with the credentials of a Keycloak user on the REALM.
Replace the CLIENT and SECRET with the client ID and secret for the MinIO-specific Keycloak client on the REALM
You can process the results using jq or a similar JSON-formatting utility. Extract the access_token field to retrieve the necessary access token. Pay attention to the expires_in field to note the number of seconds before the token expires.
Generate MinIO Credentials using the AssumeRoleWithWebIdentity API
Applications should implement the STS AssumeRoleWithWebIdentity flow using their SDK of choice. When STS credentials expire, applications should have logic in place to regenerate the JWT token, STS token, and MinIO credentials before retrying and continuing operations.
Alternatively, users can generate access keys through the MinIO Console for the purpose of creating long-lived API-key like access using their Keycloak credentials.
Enable the Keycloak Admin REST API
MinIO supports using the Keycloak Admin REST API for checking if an authenticated user exists and is enabled on the Keycloak realm. This functionality allows MinIO to more quickly remove access from previously authenticated Keycloak users. Without this functionality, the earliest point in time that MinIO could disable access for a disabled or removed user is when the last retrieved authentication token expires.
This procedure assumes an existing MinIO deployment configured with Keycloak as an external identity manager.
1) Create the Necessary Client Scopes
Navigate to the Client scopes view and create a new scope:
Name
Set to a recognizable name for the scope (minio-admin-API-access)
Mappers
Select Configure a new mapper
Audience
Set the Name to any recognizable name for the mapping (minio-admin-api-access-mapper)
Included Client Audience
Set to security-admin-console.
Navigate to Clients and select the MinIO client
From Service account roles, select Assign role and assign the admin role
From Client scopes, select Add client scope and add the previously created scope
Navigate to Settings and ensure Authentication flow includes Service accounts roles.
2) Validate Admin API Access
You can validate the functionality by using the Admin REST API with the MinIO client credentials to retrieve a bearer token and user data:
MinIO would revoke access for an authenticated user if the returned value has enabled: false or null (user was removed from Keycloak).
3) Enable Keycloak Admin Support on MinIO
MinIO supports multiple methods for configuring Keycloak Admin API Support:
Using a terminal/shell and the mc idp openid command
Using environment variables set prior to starting MinIO
CLI
You can use the mc idp openid update command to modify the configuration settings for an existing Keycloak service. You can alternatively include the following configuration settings when setting up Keycloak for the first time. The command takes all supported OpenID Configuration Settings:
mc idp openid update ALIAS KEYCLOAK_IDENTIFIER \
vendor="keycloak"\
keycloak_admin_url="https://keycloak-url:port/admin"keycloak_realm="REALM"
Replace KEYCLOAK_IDENTIFIER with the name of the configured Keycloak IDP. You can use mc idp openid ls to view all configured IDP configurations on the MinIO deployment
Specify the Keycloak admin URL in the keycloak_admin_url configuration setting
Set the following environment variables in the appropriate configuration location, such as /etc/default/minio.
The following example code sets the minimum required environment variables related to enabling the Keycloak Admin API for an existing Keycloak configuration. Replace the suffix _PRIMARY_IAM with the unique identifier for the target Keycloak configuration.
MinIO supports using an OpenID Connect (OIDC) compatible IDentity Provider (IDP) such as Okta, KeyCloak, Dex, Google, or Facebook for external management of user identities.
This page has procedures for configuring OIDC for MinIO deployments in Kubernetes and Baremetal infrastructures.
This procedure covers:
Configuring a MinIO cluster for an external OIDC provider.
Using the MinIO AssumeRoleWithWebIdentity Security Token Service (STS) API to generate temporary credentials for use by applications.
This procedure is generic for OIDC compatible providers. Defer to the documentation for the OIDC provider of your choice for specific instructions or procedures on authentication and JWT retrieval.
This procedure assumes an existing OIDC provider such as Okta, KeyCloak, Dex, Google, or Facebook. Instructions on configuring these services are out of scope for this procedure.
The MinIO cluster must have bidirectional access to the OIDC provider.
Review Access Management Behavior
Ensure each user identity intended for use with MinIO has the appropriate claim configured such that MinIO can associate a policy to the authenticated user. An OpenID user with no assigned policy has no permission to access any action or resource on the MinIO cluster.
This procedure uses mc for performing operations on the MinIO cluster. Install mc on a machine with network access to the cluster. See the mcInstallation Quickstart for instructions on downloading and installing mc. This procedure assumes a configured alias for the MinIO cluster.
Configure MinIO with OpenID External Identity Management
Create a new OpenID Configuration
Use the mc idp openid add command to create a new OIDC configuration for the MinIO cluster. The following example command assumes using the JWT claims returned by the OIDC provider for authorization through policy assignment.
mc idp openid add ALIAS \
client_id=minio-oidc-client-id \
client_secret=minio-oidc-client-secret \
config_url="https://openid-provider.example.net/REALM/.well-known/openid-configuration"\
claim_name="minio-policies"\
scopes="openid,groups"
You can also configure RoleArn-based functionality where all authenticated users have a single policy dictated by the role_policy setting. For example, set role_policy="readOnly" to assign all authenicated users the built-in read-only policy.
Review the MinIO Server logs
The MinIO process restarts as part of the new configuration. Examine the logs to ensure the OIDC configuration persisted successfully.
If configuring role_policy for one or more configurations, the output includes an ARN for use with the STS API.
Generate S3-Compatible Temporary Credentials using OIDC Credentials
MinIO requires clients authenticate using AWS Signature Version 4 protocol with support for the deprecated Signature Version 2 protocol. Specifically, clients must present a valid access key and secret key to access any S3 or MinIO administrative API, such as PUT, GET, and DELETE operations.
Applications can generate temporary access credentials as-needed using the AssumeRoleWithWebIdentity Security Token Service (STS) API endpoint and the JSON Web Token (JWT) returned by the OIDC provider.
The application must provide a workflow for logging into the OIDC provider and retrieving the JSON Web Token (JWT) associated to the authentication session. Defer to the provider documentation for obtaining and parsing the JWT token after successful authentication. MinIO provides an example Go application web-identity.go with an example of managing this workflow.
Once the application retrieves the JWT token, use the AssumeRoleWithWebIdentity endpoint to generate the temporary credentials:
POST https://minio.example.net?Action=AssumeRoleWithWebIdentity
&WebIdentityToken=TOKEN
&Version=2011-06-15
&DurationSeconds=86400&Policy=Policy
Replace the TOKEN with the JWT token returned in the previous step.
Replace the DurationSeconds with the duration in seconds until the temporary credentials expire. The example above specifies a period of 86400 seconds, or 24 hours.
Replace the Policy with an inline URL-encoded JSON policy that further restricts the permissions associated to the temporary credentials.
Omit to use the policy associated to the OpenID user policy claim.
You can optionally include the RoleArn parameter with the ARN string of your preferred single-policy OIDC configuration.
The API response consists of an XML document containing the access key, secret key, session token, and expiration date. Applications can use the access key and secret key to access and perform operations on MinIO.
MinIO Server-Side Encryption (SSE) protects objects as part of write operations, allowing clients to take advantage of server processing power to secure objects at the storage layer (encryption-at-rest). SSE also provides key functionality to regulatory and compliance requirements around secure locking and erasure.
MinIO SSE uses the MinIO Key Encryption Service (KES) and an external Key Management Service (KMS) for performing secured cryptographic operations at scale. MinIO also supports client-managed key management, where the application takes full responsibility for creating and managing encryption keys for use with MinIO SSE.
MinIO supports the following KMS as the central key store:
MinIO SSE is feature and API compatible with AWS Server-Side Encryption and supports the following encryption strategies:
SSE-KMS Recommended
MinIO supports enabling automatic SSE-KMS encryption of all objects written to a bucket using a specific External Key (EK) stored on the external KMS. Clients can override the bucket-default EK by specifying an explicit key as part of the write operation.
For buckets without automatic SSE-KMS encryption, clients can specify an EK as part of the write operation instead.
MinIO encrypts backend data as part of enabling server-side encryption. You cannot disable SSE-KMS encryption once enabled.
SSE-KMS provides more granular and customizable encryption compared to SSE-S3 and SSE-C and is recommended over the other supported encryption methods.
For a tutorial on enabling SSE-KMS in a local (non-production) MinIO Deployment, see Quickstart.
SSE-S3
MinIO supports enabling automatic SSE-S3 encryption of all objects written to a bucket using an EK stored on the external KMS. MinIO SSE-S3 supports one EK for the entire deployment.
For buckets without automatic SSE-S3 encryption, clients can request SSE encryption as part of the write operation instead.
MinIO encrypts backend data as part of enabling server-side encryption. You cannot disable SSE-KMS encryption once enabled.
For a tutorial on enabling SSE-s3 in a local (non-production) MinIO Deployment, see Quickstart.
SSE-C
Clients specify an EK as part of the write operation for an object. MinIO uses the specified EK to perform SSE-S3.
SSE-C does not support bucket-default encryption settings and requires clients perform all key management operations.
7.1 - Server-Side Object Encryption with KES
Deploy Silo with server-side object encryption
Warning
Community KES and its documentation are deprecated and archived. The Kubernetes tab below also refers to the Operator Console, which was removed in MinIO Operator 6.0.0; it is retained only as a historical migration reference and is not a current v7.1.1 deployment procedure. For a new deployment, select a maintained KMS integration and validate a migration or replacement plan before enabling irreversible server-side encryption.
Kubernetes
This procedure assumes you have access to a Kubernetes cluster with an active MinIO Operator installation. For instructions on running KES, see the KES docs.
As part of this procedure, you will:
Create or modify a MinIO deployment with support for SSE using KES. Defer to the Deploy Distributed MinIO tutorial for guidance on production-ready MinIO deployments.
Use the MinIO Operator Console to create or manage a MinIO Tenant.
This procedure provides guidance for deploying MinIO configured to use KES and enable Server Side Encryption. For instructions on running KES, see the KES docs.
As part of this procedure, you will:
Create a new EK for use with SSE.
Create or modify a MinIO deployment with support for SSE using KES. Defer to the Deploy Distributed MinIO tutorial for guidance on production-ready MinIO deployments.
Enabling SSE on a MinIO deployment automatically encrypts the backend data for that deployment using the default encryption key.
MinIO requires access to KES and the external KMS to decrypt the backend and start normally. The KMS must maintain and provide access to the MINIO_KMS_KES_KEY_NAME. You cannot disable KES later or “undo” the SSE configuration at a later point.
Prerequisites
Access to MinIO Cluster
Kubernetes
You must have access to the Kubernetes cluster, with administrative permissions associated to your kubectl configuration.
This procedure assumes your permission sets extends sufficiently to support deployment or modification of MinIO-associated resources on the Kubernetes cluster, including but not limited to pods, statefulsets, replicasets, deployments, and secrets.
Baremetal
This procedure uses mc for performing operations on the MinIO cluster. Install mc on a machine with network access to the cluster. See the mcInstallation Quickstart for instructions on downloading and installing mc.
This procedure assumes a configured alias for the MinIO cluster.
For deployments within the same Kubernetes cluster as the MinIO Tenant, you can use Kubernetes service names to allow the MinIO Tenant to establish connectivity to the target KMS service.
For deployments external to the Kubernetes cluster, you must ensure the cluster supports routing communications between Kubernetes services and pods and the external network. This may require configuration or deployment of additional Kubernetes network components and/or enabling access to the public internet.
Defer to the documentation for your chosen KMS solution for guidance on deployment and configuration.
Baremetal
This procedure assumes an existing KES installation connected to a supported KMS installation accessible, both accessible from the local host. Refer to the installation instructions for your supported KMS target to deploy KES and connect it to a KMS solution.
Note
KES Operations Require Unsealed Target
Some supported KMS targets allow you to seal or unseal the vault instance. KES returns an error if the configured KMS service is sealed.
If you restart or otherwise seal your vault instance, KES cannot perform any cryptographic operations against the vault. You must unseal the Vault to ensure normal operations.
See the documentation for your chosen KMS solution for more information on whether unsealing may be required.
Refer to the configuration instruction in the KES documentation for your chosen supported KMS:
This procedure provides instructions for configuring and enabling Server-Side Encryption using your selected supported KMS solution in production environments. Specifically, this procedure assumes the following:
An existing production-grade KMS target
One or more KES servers connected to the KMS target
One or more hosts for a new or existing MinIO deployment
You must prepare all necessary configurations associated to your external Key Management Service of choice before proceeding.
Create or Modify your Tenant YAML to set the values of KesConfig as necessary:
You must modify your Tenant YAML or Kustomize templates to reflect the necessary KES configuration. The following example is taken from the pinned MinIO Operator v7.1.1 Kustomize examples.
The kes-configuration secret must reference a Kubernetes Opaque Secret which contains a stringData object with the full KES configuration as server-config.yaml. The keystore field must contain the full configuration associated with your preferred Key Management System.
Create or Modify your Tenant YAML to set the values of TenantSpec.configuration as necessary.
Create an Opaque Secret whose config.env key contains the environment variables required by the Tenant, then reference that Secret by name. Do not commit real root credentials to source control.
If required by your chosen provider, you must unseal the backing vault instance before creating new encryption keys. See the documentation for your chosen KMS solution for more information.
MinIO requires that the EK for a given bucket or object exist on the root KMS before performing SSE operations using that key. You can use the mc admin kms key create command against the MinIO Tenant.
You must ensure your local host can access the MinIO Tenant pods and services before using mc to manage the Tenant. For hosts internal to the Kubernetes cluster, you can use the service DNS name. For hosts external to the Kubernetes cluster, specify the hostname of the service exposed by Ingress, Load Balancer, or similar Kubernetes network control component.
Run this command in a separate Terminal or Shell:
# Replace '-n minio' with the namespace of the MinIO deployment# If you deployed the Tenant without TLS you may need to change the port range# You can validate the ports in use by running# kubectl get svc/minio -n miniokubectl port forward svc/minio 443:443 -n minio
The following commands in a new Terminal or Shell window:
See Quickstart for instructions on installing mc on your local host.
# Replace USERNAME and PASSWORD with a user on the tenant with administrative permissions# such as the root usermc alias add k8s https://localhost:443 ROOTUSER ROOTPASSWORD
# Replace my-new-key with the name of the key you want to use for SSE-KMSmc admin kms key create k8s encrypted-bucket-key
Enable SSE-KMS for a Bucket
You can use either the MinIO Tenant Console or the MinIO mc CLI to enable bucket-default SSE-KMS with the generated key:
MinIO Tenant Console
Connect to the MinIO Tenant Console service and log in. For clients internal to the Kubernetes cluster, you can specify the service DNS name. For clients external to the Kubernetes cluster, specify the hostname of the service exposed by Ingress, Load Balancer, or similar Kubernetes network control component.
Once logged in, create a new Bucket and name it to your preference. Select the Gear icon to open the management view.
Select the pencil icon next to the Encryption field to open the modal for configuring a bucket default SSE scheme.
Select SSE-KMS, then enter the name of the key created in the previous step.
Once you save your changes, try to upload a file to the bucket. When viewing that file in the object browser, note that in the sidebar the metadata includes the SSE encryption scheme and information on the key used to encrypt that object. This indicates the successful encrypted state of the object.
MinIO CLI
Use the MinIO API Service to create a new alias for the MinIO deployment. You can then use the mc encrypt set command to enable SSE-KMS encryption for a bucket:
mc aliasset k8s https://minio.minio-tenant-1.svc.cluster-domain.example:443 ROOTUSER ROOTPASSWORD
mc mb k8s/encryptedbucket
mc encrypt set SSE-KMS encrypted-bucket-key k8s/encryptedbucket
For clients external to the Kubernetes cluster, specify the hostname of the service exposed by Ingress, Load Balancer, or similar Kubernetes network control component.
Write a file to the bucket using mc cp or any S3-compatible SDK with a PutObject function. You can then run mc stat on the file to confirm the associated encryption metadata.
Baremetal
Generate a KES API Key for use by MinIO
Use the kes identity new command to generate a new API key for use by the MinIO Server:
kes identity new
The output includes both the API Key for use with MinIO and the Identity hash for use with the KES Policy configuration.
Configure the MinIO Environment File
Create or modify the MinIO Server environment file for all hosts in the target deployment to include the following environment variables:
# Add these environment variables to the existing environment fileMINIO_KMS_KES_ENDPOINT=https://HOSTNAME:7373
MINIO_KMS_KES_API_KEY="kes:v1:ACTpAsNoaGf2Ow9o5gU8OmcaG6Af/VcZ1Mt7ysuKoBjv"# Allows validation of the KES Server Certificate (Self-Signed or Third-Party CA)# Change this path to the location of the KES CA PathMINIO_KMS_KES_CAPATH=|kescertpath|/kes-server.cert
# Sets the default KMS key for the backend and SSE-KMS/SSE-S3 Operations)MINIO_KMS_KES_KEY_NAME=minio-backend-default-key
Replace HOSTNAME with the IP address or hostname of the KES server. If the MinIO server host machines cannot resolve or reach the specified HOSTNAME, the deployment may return errors or fail to start.
If using a single KES server host, specify the IP or hostname of that host
If using multiple KES server hosts, specify a comma-separated list of IPs or hostnames of each host
MinIO defaults to expecting this file at /etc/default/minio. If you modified your deployment to use a different location for the environment file, modify the file at that location.
Start MinIO
Note
KES Operations Requires Unsealed Vault
Depending on your selected KMS solution, you may need to unseal the key instance to allow normal cryptographic operations, including key creation or retrieval. KES requires an unsealed key target to perform its operations.
MinIO requires that the EK exist on the KMS before performing SSE operations using that key. Use kes key createormc admin kms key create to add a new EK for use with SSE.
The following command uses the mc admin kms key create command to add a new External Key (EK) stored on the KMS server for use with encrypting the MinIO backend.
mc admin kms key create ALIAS KEYNAME
Enable SSE-KMS for a Bucket
Use the MinIO mc CLI to enable bucket-default SSE-KMS with the generated key:
mc aliassetlocal http://127.0.0.1:9000 ROOTUSER ROOTPASSWORD
mc mb local/encryptedbucket
mc encrypt set SSE-KMS encrypted-bucket-key ALIAS/encryptedbucket
Write a file to the bucket using mc cp or any S3-compatible SDK with a PutObject function. You can then run mc stat on the file to confirm the associated encryption metadata.
8 - Network Encryption (TLS)
Note
SSL is Deprecated
TLS is the successor to Secure Socket Layer (SSL) encryption. SSL is fully deprecated as of June 30th, 2018.
Overview
MinIO supports Transport Layer Security (TLS) 1.2+ encryption of incoming and outgoing traffic. MinIO can automatically detect certificates specified to either a default or custom search path and enable TLS for all connections. MinIO supports Server Name Indication (SNI) requests from clients, where MinIO attempts to locate the appropriate TLS certificate for the hostname specified by the client.
MinIO requires at minimum a single default TLS certificate and can support multiple TLS certificates in support of SNI connectivity. MinIO uses the TLS Subject Alternate Name (SAN) list to determine which certificate to return to the client. If MinIO cannot find a TLS certificate whose SAN covers the client-requested hostname, MinIO uses the default certificate and attempts to establish the handshake.
You can specify a single TLS certificate which covers all possible SANs for which the MinIO deployment accepts connections.
This configuration requires the least configuration, but necessarily exposes all hostnames configured in the TLS SAN to connecting clients. Depending on your TLS configuration, this may include internal or private SAN domains.
You can instead specify multiple TLS certificates separated by domain(s) with a single default certificate for any non-matching hostname requests. This configuration requires more configuration, but only exposes those hostnames configured in the returned TLS SAN array.
MinIO TLS on Kubernetes
The MinIO Kubernetes Operator provides three approaches for configuring TLS on MinIO Tenants:
The Kubernetes TLS API uses the Kubernetes cluster Certificate Authority (CA) signature algorithm when generating new TLS certificates. See Supported TLS Cipher Suites for a complete list of MinIO’s supported TLS Cipher Suites and recommended signature algorithms.
By default, Kubernetes places a certificate bundle on each pod at /var/run/secrets/kubernetes.io/serviceaccount/ca.crt. This CA bundle should include the cluster or root CA used to sign the MinIO Tenant TLS certificates. Other applications deployed within the Kubernetes cluster can trust this cluster certificate to connect to a MinIO Tenant using the MinIO service DNS name (e.g. https://minio.minio-tenant-1.svc.cluster-domain.example:443).
Note
Subject Alternative Name Certificates
If you have a custom Subject Alternative Name (SAN) certificate that is not also a wildcard cert, the TLS certificate SAN must apply to the hostname for its parent node. Without a wildcard, the SAN must match exactly to be able to connect to the tenant.
cert-manager Certificate Management
The MinIO Operator supports using cert-manager as a full replacement for its built-in automatic certificate management or user-driven manual certificate management. For instructions for deploying the MinIO Operator and tenants using cert-manager, refer to the cert-manager page.
Manual Certificate Management
The Tenant CRD spec spec.externalCertsSecret supp .. include:: /includes/common/common-configure-keycloak-identity-management.rst
start-after: start-configure-keycloak-minio-cli
orts specifying either opaque or kubernetes.io/tls type secrets containing the private.key and public.crt to use for TLS.
You can specify multiple certificates to support Tenants which have multiple assigned hostnames.
Self-signed, Internal, Private Certificates, and Public CAs with Intermediate Certificates
If deploying MinIO Tenants with certificates minted by a non-global or non-public Certificate Authority, or if using a global CA that requires the use of intermediate certificates, you must provide those CAs to the Operator to ensure it can trust those certificates.
The Operator may log warnings related to TLS cert validation for Tenants deployed with untrusted certificates.
The following procedure attaches a secret containing the public.crt of the Certificate Authority to the MinIO Operator. You can specify multiple CAs in a single certificate, as long as you maintain the BEGIN and END delimiters as-is.
Create the operator-ca-tls secret
The following creates a Kubernetes secret in the MinIO Operator namespace (minio-operator).
The MinIO Kubernetes Operator can automatically attach third-party Certificate Authorities when deploying or modifying a MinIO Tenant.
You can add, update, or remove CAs from the tenant at any time. You must restart the MinIO Tenant for the changes to the configured CAs to apply.
The Operator places the specified CAs on each MinIO Server pod such that all pods have a consistent set of trusted CAs.
If the MinIO Server cannot match an incoming client’s TLS certificate issuer against any of the available CAs, the server rejects the connection as invalid.
MinIO TLS on Baremetal
The MinIO Server searches for TLS keys and certificates for each node and uses those credentials for enabling TLS. MinIO automatically enables TLS upon discovery and validation of certificates. The search location depends on your MinIO configuration:
Default Path
By default, the MinIO server looks for the TLS keys and certificates for each node in the following directory:
${HOME}/.minio/certs
Where ${HOME} is the home directory of the user running the MinIO Server process. You may need to create the ${HOME}/.minio/certs directory if it does not exist.
For systemd managed deployments this must correspond to the USER running the MinIO process. If that user has no home directory, use the Custom Path option instead.
Custom Path
You can specify a path for the MinIO server to search for certificates using the minio server --certs-dir or -S parameter.
For example, the following command fragment directs the MinIO process to use the /opt/minio/certs directory for TLS certificates.
minio server --certs-dir /opt/minio/certs ...
The user running the MinIO service must have read and write permissions to this directory.
Place the TLS certificates for the default domain (e.g. minio.example.net) in the /certs directory, with the private key as private.key and public certificate as public.crt.
For distributed MinIO deployments, each node in the deployment must have matching TLS certificate configurations.
Self-signed, Internal, Private Certificates, and Public CAs with Intermediate Certificates
If using Certificates signed by a non-global or non-public Certificate Authority, or if using a global CA that requires the use of intermediate certificates, you must provide those CAs to the MinIO Server. If the MinIO server does not have the necessary CAs, it may return warnings or errors related to TLS validation when connecting to other services.
Place the CA certificates in the /certs/CAs folder. The root path for this folder depends on whether you use the default certificate path or a custom certificate path (minio server --certs-dir or -S)
Default Certificate Path
mv myCA.crt ${HOME}/.minio/certs/CAs
Custom Certificate Path
The following example assumes the MinIO Server was started with --certs dir /opt/minio/certs:
mv myCA.crt /opt/minio/certs/CAs/
For a self-signed certificate, the Certificate Authority is typically the private key used to sign the cert.
For certificates signed by an internal, private, or other non-global Certificate Authority, use the same CA that signed the cert. A non-global CA must include the full chain of trust from the intermediate certificate to the root.
If the provided file is not an X.509 certificate, MinIO ignores it and may return errors for validating certificates signed by that CA.
Third-Party Certificate Authorities
The MinIO Server validates the TLS certificate presented by each connecting client against the host system’s trusted root certificate store.
Place the CA certificates in the /certs/CAs folder. The root path for this folder depends on whether you use the default certificate path or a custom certificate path (minio server --certs-dir or -S)
Default Certificate Path
mv myCA.crt ${HOME}/certs/CAs
Custom Certificate Path
The following example assumes the MinIO Server was started with --certs dir /opt/minio/certs:
mv myCA.crt /opt/minio/certs/CAs/
Place the certificate file for each CA into the /CAs subdirectory. Ensure all hosts in the MinIO deployment have a consistent set of trusted CAs in that directory. If the MinIO Server cannot match an incoming client’s TLS certificate issuer against any of the available CAs, the server rejects the connection as invalid.
Supported TLS Cipher Suites
MinIO recommends generating ECDSA (e.g. NIST P-256 curve) or EdDSA (e.g. Curve25519) TLS private keys/certificates due to their lower computation requirements compared to RSA.
MinIO supports the following TLS 1.2 and 1.3 cipher suites as supported by Go. The lists mark recommended algorithms with a icon:
TLS 1.3
TLS_CHACHA20_POLY1305_SHA256
TLS_AES_128_GCM_SHA256
TLS_AES_256_GCM_SHA384
TLS 1.2
TLS_ECDHE_ECDSA_WITH_CHACHA20_POLY1305
TLS_ECDHE_ECDSA_WITH_AES_128_GCM_SHA256
TLS_ECDHE_ECDSA_WITH_AES_256_GCM_SHA384
TLS_ECDHE_RSA_WITH_CHACHA20_POLY1305
TLS_ECDHE_RSA_WITH_AES_128_GCM_SHA256
TLS_ECDHE_RSA_WITH_AES_256_GCM_SHA384
8.1 - Enable TLS for Silo
MinIO supports Transport Layer Security (TLS) 1.2+ encryption of incoming and outgoing traffic.
Kubernetes
The MinIO Operator supports the following approaches to enabling TLS on a MinIO Tenant:
Automatic TLS provisioning using Kubernetes Cluster Signing Certificates
User-specified TLS using Kubernetes secrets
Certmanager-managed TLS certificates
Baremetal
MinIO automatically detects TLS certificates in the configured or default directory and starts with TLS enabled.
This procedure documents enabling TLS for a single domain in MinIO. To serve more than one hostname with SNI, use the multiple-domain TLS guide.
Prerequisites
Access to MinIO Cluster
Kubernetes
You must have access to the Kubernetes cluster, with administrative permissions associated to your kubectl configuration.
This procedure assumes your permission sets extends sufficiently to support deployment or modification of MinIO-associated resources on the Kubernetes cluster, including but not limited to pods, statefulsets, replicasets, deployments, and secrets.
Baremetal
This procedure uses mc for performing operations on the MinIO cluster. Install mc on a machine with network access to the cluster. See the mcInstallation Quickstart for instructions on downloading and installing mc.
This procedure assumes a configured alias for the MinIO cluster.
This procedure also assumes SSH or similar shell-level access with administrative permissions to each MinIO host server.
TLS Certificates
Provision the necessary TLS certificates with a supported cipher suite for use by MinIO.
Kubernetes
See MinIO TLS on Kubernetes for more complete guidance on the supported Tenant TLS configurations.
Baremetal
Provision certificates using your preferred path, such as your organization’s internal Certificate Authority or a well-known public provider.
You can create self-signed certificates using openssl or the MinIO certgen tool.
For example, the following command generates a self-signed certificate with a set of IP and DNS Subject Alternate Names (SANs) associated to the MinIO Server hosts:
certgen -host "localhost,minio-*.example.net"
See MinIO TLS on Baremetal for more complete guidance on certificate generation and placement.
Procedure
Kubernetes
The MinIO Operator supports three methods of TLS certificate management on MinIO Tenants:
MinIO automatic TLS certificate generation
cert-manager managed TLS certificates
User managed TLS certificates
You can use any combination of the above methods to enable and configure TLS. MinIO strongly recommends using cert-manager for user-specified certificates for a streamlined management and renewal proces.
You can also deploy MinIO Tenants without TLS enabled.
MinIO Auto-TLS
The following steps apply to both new and existing MinIO Deployments using Kustomize:
Review the Tenant CRDTenantSpec.requestAutoCert and TenantSpec.certConfig fields.
For existing MinIO Tenants, review the Kustomize resources used to create the Tenant and introspect those fields and their current configuration, if any.
Create or Modify your Tenant YAML to set the values of requestAutoCert and certConfig as necessary. For example:
Once you apply the changes, the MinIO Operator automatically redeploys the Tenant with the updated configuration.
CertManager
The following steps apply to both new and existing MinIO Deployments using Kustomize:
Review the Tenant CRDTenantSpec.externalCertsCecret fields
For existing MinIO Tenants, review the Kustomize resources used to create the Tenant and introspect that field’s current configuration, if any.
Create or Modify your Tenant YAML to reference the appropriate cert-manager resource.
For example, the following Tenant YAML fragment references a cert-manager resource myminio-tls:
apiVersion:minio.min.io/v2kind:Tenantmetadata:name:myminionamespace:minio-tenantspec:## Disable default tls certificates.requestAutoCert:false## Use certificates generated by cert-manager.externalCertSecret:- name:myminio-tlstype:cert-manager.io/v1
Apply the new Kustomization Template
Once you apply the changes, the MinIO Operator automatically redeploys the Tenant with the updated configuration.
User-Managed
The following steps apply to both new and existing MinIO deployments using Kustomize:
Review the Tenant CRDTenantSpec.externalCertSecret field.
For existing MinIO Tenants, review the Kustomize resources used to create the Tenant and introspect that field’s current configuration, if any.
Create or modify your Tenant YAML to reference a secret of type kubernetes.io/tls:
For example, the following Tenant YAML fragment references a TLS secret which covers the domain on which the MinIO Tenant accepts connections.
apiVersion:minio.min.io/v2kind:Tenantmetadata:name:myminionamespace:minio-tenantspec:## Disable default tls certificates.requestAutoCert:false## Use certificates generated by cert-manager.externalCertSecret:- name:domain-certificatetype:kubernetes.io/tls
Apply the new Kustomization Template
Once you apply the changes, the MinIO Operator automatically redeploys the Tenant with the updated configuration.
Baremetal
The MinIO Server searches for TLS keys and certificates for each node and uses those credentials for enabling TLS. MinIO automatically enables TLS upon discovery and validation of certificates. The search location depends on your MinIO configuration:
Default Path
By default, the MinIO server looks for the TLS keys and certificates for each node in the following directory:
${HOME}/.minio/certs
Where ${HOME} is the home directory of the user running the MinIO Server process. You may need to create the ${HOME}/.minio/certs directory if it does not exist.
For systemd managed deployments this must correspond to the USER running the MinIO process. If that user has no home directory, use the Custom Path option instead.
Custom Path
You can specify a path for the MinIO server to search for certificates using the minio server --certs-dir or -S parameter.
For example, the following command fragment directs the MinIO process to use the /opt/minio/certs directory for TLS certificates.
minio server --certs-dir /opt/minio/certs ...
The user running the MinIO service must have read and write permissions to this directory.
Place the TLS certificates for the default domain (e.g. minio.example.net) in the /certs directory, with the private key as private.key and public certificate as public.crt.
For example:
/path/to/certs
private.key
public.crt
You can use the MinIO certgen to mint self-signed certificates for evaluating MinIO with TLS enabled. For example, the following command generates a self-signed certificate with a set of IP and DNS Subject Alternate Names (SANs) associated to the MinIO Server hosts:
certgen -host "localhost,minio-*.example.net"
Place the generated public.crt and private.key into the /path/to/certs directory to enable TLS for the MinIO deployment. Applications can use the public.crt as a trusted Certificate Authority to allow connections to the MinIO deployment without disabling certificate validation.
If you are reconfiguring an existing deployment that did not previously have TLS enabled, update MINIO_VOLUMES to specify https instead of http. You may also need to update URLs used by applications or clients.
8.2 - Enable Multiple-Domain TLS for Silo
MinIO supports Transport Layer Security (TLS) 1.2+ encryption of incoming and outgoing traffic.
Kubernetes
The MinIO Operator supports the following approaches to enabling TLS on a MinIO Tenant:
Automatic TLS provisioning using Kubernetes Cluster Signing Certificates
User-specified TLS using Kubernetes secrets
Certmanager-managed TLS certificates
The MinIO Operator supports attaching user-specified TLS certificates when deploying or modifying the MinIO Tenant.
These custom certificates support Server Name Indication (SNI), where the MinIO server identifies which certificate to use based on the hostname specified by the connecting client. For example, you can generate certificates signed by your organization’s preferred Certificate Authority (CA) and attach those to the MinIO Tenant. Applications which trust that CA can connect to the MinIO Tenant and fully validate the Tenant TLS certificates.
Baremetal
MinIO automatically detects TLS certificates in the configured or default directory and starts with TLS enabled.
The MinIO server supports multiple TLS certificates, where the server uses Server Name Indication (SNI) to identify which certificate to use when responding to a client request. When a client connects using a specific hostname, MinIO uses SNI to select the appropriate TLS certificate for that hostname.
This procedure documents enabling TLS for multiple domains in MinIO. For a deployment that serves one hostname, use the single-domain TLS guide.
Prerequisites
Access to MinIO Cluster
Kubernetes
You must have access to the Kubernetes cluster, with administrative permissions associated to your kubectl configuration.
This procedure assumes your permission sets extends sufficiently to support deployment or modification of MinIO-associated resources on the Kubernetes cluster, including but not limited to pods, statefulsets, replicasets, deployments, and secrets.
Baremetal
This procedure uses mc for performing operations on the MinIO cluster. Install mc on a machine with network access to the cluster. See the mcInstallation Quickstart for instructions on downloading and installing mc.
This procedure assumes a configured alias for the MinIO cluster.
This procedure also assumes SSH or similar shell-level access with administrative permissions to each MinIO host server.
TLS Certificates
Provision the necessary TLS certificates with a supported cipher suite for use by MinIO.
Kubernetes
See MinIO TLS on Kubernetes for more complete guidance on the supported Tenant TLS configurations.
Baremetal
Provision certificates using your preferred path, such as your organization’s internal Certificate Authority or a well-known public provider.
You can create self-signed certificates using openssl or the MinIO certgen tool.
For example, the following command generates a self-signed certificate with a set of IP and DNS Subject Alternate Names (SANs) associated to the MinIO Server hosts:
certgen -host "localhost,minio-*.example.net"
See MinIO TLS on Baremetal for more complete guidance on certificate generation and placement.
Procedure
Kubernetes
The MinIO Operator supports three methods of TLS certificate management on MinIO Tenants:
MinIO automatic TLS certificate generation
User-specified TLS certificates
cert-manager managed TLS certificates
You can also deploy MinIO Tenants without TLS enabled.
MinIO Auto-TLS
The following steps apply to both new and existing MinIO Deployments using Kustomize:
Review the Tenant CRDTenantSpec.requestAutoCert and TenantSpec.certConfig fields.
For existing MinIO Tenants, review the Kustomize resources used to create the Tenant and introspect those fields and their current configuration, if any.
Create or Modify your Tenant YAML to set the values of requestAutoCert and certConfig as necessary. For example:
Once you apply the changes, the MinIO Operator automatically redeploys the Tenant with the updated configuration.
CertManager
The following steps apply to both new and existing MinIO Deployments using Kustomize:
Review the Tenant CRDTenantSpec.externalCertsCecret fields
For existing MinIO Tenants, review the Kustomize resources used to create the Tenant and introspect that field’s current configuration, if any.
Create or Modify your Tenant YAML to reference the appropriate cert-manager resources.
For example, the following Tenant YAML fragment references a cert-manager resource myminio-tls:
apiVersion:minio.min.io/v2kind:Tenantmetadata:name:myminionamespace:minio-tenantspec:## Disable default tls certificates.requestAutoCert:false## Use certificates generated by cert-manager.externalCertSecret:- name:default-domaintype:cert-manager.io/v1- name:internal-domaintype:cert-manager.io/v1- name:external-domaintype:cert-manager.io/v1
Apply the new Kustomization Template
Once you apply the changes, the MinIO Operator automatically redeploys the Tenant with the updated configuration.
User-Specified
The following steps apply to both new and existing MinIO deployments using Kustomize:
Review the Tenant CRDTenantSpec.externalCertSecret field.
For existing MinIO Tenants, review the Kustomize resources used to create the Tenant and introspect that field’s current configuration, if any.
Create or modify your Tenant YAML to reference a secret of type kubernetes.io/tls:
For example, the following Tenant YAML fragment references two TLS secrets for each domain for which the MinIO Tenant accepts connections:
apiVersion:minio.min.io/v2kind:Tenantmetadata:name:myminionamespace:minio-tenantspec:## Disable default tls certificates.requestAutoCert:false## Use certificates generated by cert-manager.externalCertSecret:- name:domain-certificate-1type:kubernetes.io/tls- name:domain-certificate-2type:kubernetes.io/tls
Apply the new Kustomization Template
Once you apply the changes, the MinIO Operator automatically redeploys the Tenant with the updated configuration.
Baremetal
The MinIO Server searches for TLS keys and certificates for each node and uses those credentials for enabling TLS. MinIO automatically enables TLS upon discovery and validation of certificates. The search location depends on your MinIO configuration:
Default Path
By default, the MinIO server looks for the TLS keys and certificates for each node in the following directory:
${HOME}/.minio/certs
Where ${HOME} is the home directory of the user running the MinIO Server process. You may need to create the ${HOME}/.minio/certs directory if it does not exist.
For systemd managed deployments this must correspond to the USER running the MinIO process. If that user has no home directory, use the Custom Path option instead.
Custom Path
You can specify a path for the MinIO server to search for certificates using the minio server --certs-dir or -S parameter.
For example, the following command fragment directs the MinIO process to use the /opt/minio/certs directory for TLS certificates.
minio server --certs-dir /opt/minio/certs ...
The user running the MinIO service must have read and write permissions to this directory.
Place the certificates in the /certs folder, creating a subfolder in /certs for each additional domain for which MinIO should present TLS certificates. While MinIO has no requirements for folder names, consider creating subfolders whose name matches the domain to improve human readability. Place the TLS private and public key for that domain in the subfolder.
The main difference is that you must provide that Issuer CA certificate to MinIO, instead of the CA’s mentioned in this guide.
Refer to the cert-manager documentation and your own organization’s certificate requirements for more advanced configurations.
cert-manager manages certificates within Kubernetes clusters. The MinIO Operator supports using cert-manager for managing and provisioning certificates as an alternative to the MinIO Operator managing certificates for itself and its tenants.
cert-manager obtains valid certificates from an Issuer or ClusterIssuer and can automatically renew certificates prior to expiration.
A ClusterIssuer issues certificates for multiple namespaces. An Issuer only mints certificates for its own namespace.
The following graphic depicts how cert-manager provides certificates in namespaces across a Kubernetes cluster.
A ClusterIssuer exists at the root level of the Kubernetes cluster, typically the default namespace, to provide certificates to all other namespaces.
The minio-operator namespace receives its own, local Issuer.
Each tenant’s namespace receives its own, local Issuer.
The certificates issued by each tenant namespace must be made known to and trusted by the MinIO Operator.
The following checklists provide a high-level guideline for validating production-readiness of MinIO deployments.
These checklists may not meet the precise requirements of your unique deployment topology or architecture, and are intended as a best-effort guide to reliable production deployments.
MinIO SUBNET users can log in and create a new issue for pre-production deployment reviews. Coordination with MinIO Engineering via SUBNET ensures end-to-end support for performant and reliable deployments.
Community users can seek support on the MinIO Community Slack. Community Support is best-effort only and has no SLAs around responsiveness.
Use the following checklist when planning the hardware configuration for a production, distributed MinIO deployment.
Considerations
When selecting hardware for your MinIO implementation, take into account the following factors:
Expected amount of data in tebibytes to store at launch
Expected growth in size of data for at least the next two years
Number of objects by average object size
Average retention time of data in years
Number of sites to be deployed
Number of expected buckets
Production Hardware Recommendations
The following checklist follows MinIO’s Recommended Configuration for production deployments. The provided guidance is intended as a baseline and cannot replace MinIO SUBNET Performance Diagnostics, Architecture Reviews, and direct-to-engineering support.
MinIO, like any distributed system, benefits from selecting identical configurations for all nodes in a given server pool. Ensure a consistent selection of hardware (CPU, memory, motherboard, storage adapters) and software (operating system, kernel settings, system services) across pool nodes.
Deployments may exhibit unpredictable performance if nodes have varying hardware or software configurations. Workloads that benefit from storing aged data on lower-cost hardware should instead deploy a dedicated “warm” or “cold” MinIO deployment and transition data to that tier.
Note
MinIO does not provide hosted services or hardware sales
See our Reference Hardware page for a curated selection of servers and storage components from our hardware partners.
Kubernetes
Description
Minimum
Recommended
Kubernetes worker nodes to exclusively service the MinIO Tenant.
The following areas have the greatest impact on MinIO performance, listed in order of importance:
Network Infrastructure
Insufficient or limited throughput constrains performance
Storage Controller
Old firmware, limited throughput, or failing hardware constrains performance and affects reliability
Storage (Drive)
Old firmware, or slow/aging/failing hardware constrains performance and affects reliability
Prioritize securing the necessary components for each of these areas before focusing on other hardware resources, such as compute-related constraints.
The minimum recommendations above reflect MinIO’s experience with assisting enterprise customers in deploying on a variety of IT infrastructures while maintaining the desired SLA/SLO. While MinIO may run on less than the minimum recommended topology, any potential cost savings come at the risk of decreased reliability, performance, or overall functionality.
Networking
MinIO recommends high speed networking to support the maximum possible throughput of the attached storage (aggregated drives, storage controllers, and PCIe busses). The following table provides a general guideline for the maximum storage throughput supported by a given physical or virtual network interface. This table assumes all network infrastructure components, such as routers, switches, and physical cabling, also supports the NIC bandwidth.
NIC Bandwidth (Gbps)
Estimated Aggregated Storage Throughput (GBps)
10Gbps
1.25GBps
25Gbps
3.125GBps
50Gbps
6.25GBps
100Gbps
12.5GBps
Networking has the greatest impact on MinIO performance, where low per-host bandwidth artificially constrains the potential performance of the storage. The following examples of network throughput constraints assume spinning disks with ~100MB/S sustained I/O
1GbE network link can support up to 125MB/s, or one spinning disk
10GbE network can support approximately 1.25GB/s, potentially supporting 10-12 spinning disks
25GbE network can support approximately 3.125GB/s, potentially supporting ~30 spinning disks
Memory
Memory primarily constrains the number of concurrent simultaneous connections per node.
You can calculate the maximum number of concurrent requests per node with this formula:
totalRam/ramPerRequest
To calculate the amount of RAM used for each request, use this formula:
((2MiB+128KiB)×driveCount)+(2×10MiB)+(2×1MiB)
10MiB is the default erasure block size v1. 1 MiB is the default erasure block size v2.
The following table lists the maximum concurrent requests on a node based on the number of host drives and the free system RAM:
Number of Drives
32 GiB of RAM
64 GiB of RAM
128 GiB of RAM
256 GiB of RAM
512 GiB of RAM
4 Drives
1,074
2,149
4,297
8,595
17,190
8 Drives
840
1,680
3,361
6,722
13,443
16 Drives
585
1,170
2.341
4,681
9,362
The following table provides general guidelines for allocating memory for use by MinIO based on the total amount of local storage on the node:
Total Host Storage
Recommended Host Memory
Up to 1 Tebibyte (Ti)
8GiB
Up to 10 Tebibyte (Ti)
16GiB
Up to 100 Tebibyte (Ti)
32GiB
Up to 1 Pebibyte (Pi)
64GiB
More than 1 Pebibyte (Pi)
128GiB
Warning
Important
Starting with RELEASE.2024-01-28T22-35-53Z, MinIO preallocates 2GiB of memory per node in distributed setups and 1GiB of memory for a single-node setup.
Storage
Note
Exclusive access to drives
MinIO requiresexclusive access to the drives or volumes provided for object storage. No other processes, software, scripts, or persons should perform any actions directly on the drives or volumes provided to MinIO or the objects or files MinIO places on them.
Unless directed by MinIO Engineering, do not use scripts or tools to directly modify, delete, or move any of the data shards, parity shards, or metadata files on the provided drives, including from one drive or node to another. Such operations are very likely to result in widespread corruption and data loss beyond MinIO’s ability to heal.
Recommended Storage Mediums
Kubernetes
MinIO recommends provisioning a storage class for each MinIO Tenant that meets the performance objectives for that tenant.
Where possible, configure the Storage Class, CSI, or other provisioner underlying the PV to format volumes as XFS to ensure best performance.
Ensure a consistent underlying storage type (NVMe, SSD, HDD) for all PVs provisioned in a Tenant.
Ensure the same presented capacity of each PV across all nodes in each Tenant server pool. MinIO limits the maximum usable size per PV to the smallest PV in the pool. For example, if a pool has 15 10TB PVs and 1 1TB PV, MinIO limits the per-PV capacity to 1TB.
Baremetal
MinIO recommends using flash-based storage (NVMe or SSD) for all workload types and scales. Workloads that require high performance should prefer NVMe over SSD.
MinIO does not recommends HDD storage for production environments. HDD storage typically does not provide the necessary performance to meet the expectations of modern workloads, and any cost efficiencies at scale are offset by the performance constraints of the medium.
Prefer Direct-Attached “Local” Storage (DAS)
DAS, such as locally-attached JBOD (Just a Bunch of Disks) arrays, provide significant performance and consistency advantages over networked (NAS, SAN, NFS) storage.
Kubernetes
While MinIO Tenants can make use of remote Persistent Volume (PV) resources, the cost of performing I/O over the network typically constrains overall performance.
MinIO strongly recommends using CSIs which can provision storage attached to the worker node on which Kubernetes schedules your MinIO pods, such as MinIO DirectPV.
For all other cases, make every effort possible to select a CSI which presents the storage to MinIO as if it were a locally-attached filesystem. CSIs which add layers of software or translations between MinIO and the OS-level storage access APIs necessarily increase the complexity of the syste and can contribute to unexpected or undesired behavior.
Baremetal
Configure the JBOD arrays without any RAID, pooling, or similar software-level layers, such that the storage is presented directly to MinIO.
For virtual machines or systems that require provising storage as a virtual volume, MinIO recommends using thick LUNs only.
Network File System Volumes Break Consistency Guarantees
MinIO’s strict read-after-write and list-after-write consistency model requires local drive filesystems. MinIO cannot provide consistency guarantees if the underlying storage volumes are NFS or a similar network-attached storage volume.
Use XFS-Formatted Drives with Consistent Mounting
Kubernetes
MinIO recommends formatting the drives underlying MinIO Persistent Volumes as xfs.
If using a CSI, review the documentation for that CSI and ensure it supports specifying the xfs filesystem. MinIO strongly recommends avoiding any CSI which formats drives as ext4, btrfs or other filesystems.
MinIO expects all provisioned Persistent Volumes (PV) to be intended for its exclusive use, where the underlying storage medium guarantees access to the stored data at the assigned mount path. Modifications to the underlying storage medium, including but not limited to external or third-party applications or the arbitrary re-mounting of locally-attached storage, may result in unexpected behavior or data loss.
Baremetal
Format drives as XFS and present them to MinIO as a JBOD array with no RAID or other pooling configurations. Using any other type of backing storage (SAN/NAS, ext4, RAID, LVM) typically results in a reduction in performance, reliability, predictability, and consistency.
When formatting XFS drives, apply a unique label per drive. For example, the following command formats four drives as XFS and applies a corresponding drive label.
MinIO requires that drives maintain their ordering at the mounted position across restarts. MinIO does not support arbitrary migration of a drive with existing MinIO data to a new mount position, whether intentional or as the result of OS-level behavior.
You must use /etc/fstab or a similar mount control system to mount drives at a consistent path. For example:
You can use mount -a to mount those drives at those paths during initial setup. The Operating System should otherwise mount these drives as part of the node startup process.
MinIO strongly recommends using label-based mounting rules over UUID-based rules. Label-based rules allow swapping an unhealthy or non-working drive with a replacement that has matching format and label. UUID-based rules require editing the /etc/fstab file to replace mappings with the new drive UUID.
Note
Note
Cloud environment instances which depend on mounted external storage may encounter boot failure if one or more of the remote file mounts return errors or failure. For example, an AWS ECS instance with mounted persistent EBS volumes may not boot with the standard /etc/fstab configuration if one or more EBS volumes fail to mount.
You can set the nofail option to silence error reporting at boot and allow the instance to boot with one or more mount issues.
You should not use this option on systems with locally attached disks, as silencing drive errors prevents both MinIO and the OS from responding to those errors in a normal fashion.
Disable XFS Retry On Error
MinIO strongly recommends disabling retry-on-error behavior using the max_retries configuration for the following error classes:
EIO Error when reading or writing
ENOSPC Error no space left on device
default All other errors
The default max_retries setting typically directs the filesystem to retry-on-error indefinitely instead of propagating the error. MinIO can handle XFS errors appropriately, such that the retry-on-error behavior introduces at most unnecessary latency or performance degradation.
Kubernetes
Defer to the documentation for your preferred CSI or StorageClass on options for configuring filesystem-level settings.
Baremetal
The following script iterates through all drives at the specified mount path and sets the XFS max_retries setting to 0 or “fail immediately on error” for the recommended error classes. The script ignores any drives not mounted, either manually or through /etc/fstab. Modify the /mnt/drive line to match the pattern used for your MinIO drives.
#!/bin/bash
for i in $(df -h | grep /mnt/drive | awk '{ print $1 }');domountPath="$(df -h | grep $i| awk '{ print $6 }')"deviceName="$(basename $i)"echo"Modifying xfs max_retries and retry_timeout_seconds for drive $i mounted at $mountPath"echo0 > /sys/fs/xfs/$deviceName/error/metadata/EIO/max_retries
echo0 > /sys/fs/xfs/$deviceName/error/metadata/ENOSPC/max_retries
echo0 > /sys/fs/xfs/$deviceName/error/metadata/default/max_retries
doneexit0
You must run this script on all MinIO nodes and configure the script to re-run on reboot, as Linux Operating Systems do not typically persist these changes. You can use a cron job with the @reboot timing to run the above script whenever the node restarts and ensure all drives have retry-on-error disabled. Use crontab -e to create the following job, modifying the script path to match that on each node:
@reboot /opt/minio/xfs-retry-settings.sh
Use Consistent Drive Type and Capacity
Ensure a consistent drive type (NVMe, SSD, HDD) for the underlying storage in a MinIO deployment. MinIO does not distinguish between storage types and does not support configuring “hot” or “warm” drives within a single deployment. Mixing drive types typically results in performance degradation, as the slowest drives in the deployment become a bottleneck regardless of the capabilities of the faster drives.
Use the same capacity and type of drive across all nodes in each MinIO server pool. MinIO limits the maximum usable size per drive to the smallest size in the deployment. For example, if a deployment has 15 10TB drives and 1 1TB drive, MinIO limits the per-drive capacity to 1TB.
Recommended Hardware Tests
Operating System Diagnostic Tools
If you cannot run the mc support diag or the results show unexpected results, you can use the operating system’s default tools.
Test each drive independently on all servers to ensure they are identical in performance. Use the results of these OS-level tools to verify the capabilities of your storage hardware. Record the results for later reference.
Test the drive’s performance during write operations
This tests checks a drive’s ability to write new data (uncached) to the drive by creating a specified number of blocks at up to a certain number of bytes at a time to mimic how a drive would function with writing uncached data. This allows you to see the actual drive performance with consistent file I/O.
Replace driveN with the path for the drive you are testing.
dd
The command to copy and paste data.
if=/dev/zero
Read from /dev/zero, an system-generated endless stream of 0 bytes used to create a file of a specified size
of=/mnt/driveN/testfile
Write to /mnt/driveN/testfile
bs=128k
Write up to 128,000 bytes at a time
count=80000
Write up to 80000 blocks of data
oflag=direct
Use direct I/O to write to avoid data from caching
conv=fdatasync
Physically write output file data before finishing
> dd-write-drive1.txt
Write the contents of the operation’s output to dd-write-drive1.txt in the current working directory
The operation returns the number of files written, total size written in bytes, the total length of time for the operation (in seconds), and the speed of the writing in some order of bytes per second.
Test the drive’s performance during read operations
Replace driveN with the path for the drive you are testing.
dd
The command to copy and paste data
if=/mnt/driveN/testfile
Read from /mnt/driveN/testfile; replace with the path to the file to use for testing the drive’s read performance
of=/dev/null
Write to /dev/null, a virtual file that does not persist after the operation completes
bs=128k
Write up to 128,000 bytes at a time
count=80000
Write up to 80000 blocks of data
iflag=direct
Use direct I/O to read and avoid data from caching
> dd-read-drive1.txt
Write the contents of the operation’s output to dd-read-drive1.txt in the current working directory
Use a sufficiently sized file that mimics the primary use case for your deployment to get accurate read test results.
The following guidelines may help during performance testing:
Small files: < 128KB
Normal files: 128KB – 1GB
Large files: > 1GB
You can use the head command to create a file to use. The following command example creates a 10 Gigabyte file called testfile.
head -c 10G </dev/urandom > testfile
The operation returns the number of files read, total size read in bytes, the total length of time for the operation (in seconds), and the speed of the reading in bytes per second.
Third Party Diagnostic Tools
IO Controller test
Use IOzone to test the input/output controller and all drives in combination. Document the performance numbers for each server in your deployment.
list of files (the above command tests with 16 files per drive)
Local SILO diagnostic tools
SILO local diagnostics do not require a MinIO subscription or upload automatically. Administrators inspect and share their results deliberately.
Health diagnostic tool
Generate a summary of the health status of your deployment. If you have access to SUBNET, you can upload the results there.
mc support diag ALIAS --airgap
Replace ALIAS with the alias defined for the deployment.
Network test
Run a network throughput test on a cluster with alias minio1.
mc support perf net minio1
Drive test
Run drive read/write performance measurements on all drive on all nodes for a cluster with alias minio1. The command uses the default blocksize of 4MiB.
mc support perf drive minio1
Object test
Measure the performance of S3 read/write of an object on the alias minio1. MinIO autotunes concurrency to obtain maximum throughput and IOPS (Input/Output Per Second).
mc support perf object minio1
9.2 - Security Checklist
Use the following checklist when planning the security configuration for a production, distributed MinIO deployment.
Required Steps
Define group policies either on MinIO or the selected 3rd party Identity Provider (LDAP/Active Directory or OpenID)
Define individual access policies on MinIO or the selected 3rd party Identity Provider
(For Kubernetes deployments only) Configure the tenant(s) to use the selected 3rd party Identity Provider
Grant firewall access for TCP traffic to the MinIO Server S3 API Listen Port (Default: 9000).
Use the following checklist when planning the software configuration for a production, distributed MinIO deployment.
MinIO Pre-requisites
Servers running a Linux operating system with a 6.6+ kernel. Red Hat Enterprise Linux (RHEL) 10 or Ubuntu LTS 22.04.01+ ship with these Kernel’s by default.
Ensure the chosen OS uses LTS and in-support releases of a 6.6+ Linux kernel.
A method to synchronize time servers across nodes, such as with ntp, timedatectl or timesyncd.
The method to use varies by operating system.
Check with your operating system’s documentation for how to synchronize time with a time server.
Disable system services that index, scan, or audit the filesystem, system-level calls, or kernel-level calls.
These services can reduce performance due to resource contention or interception of MinIO operations.
MinIO strongly recommends uninstalling or disabling the following services on hosts running MinIO:
mlocate or plocate
updatedb
auditd
Crowdstrike Falcon
Antivirus software (clamav)
The above list represents the most common services or softwares known to cause performance or behavioral issues with high performance systems like MinIO.
Consider removing or disabling any other service or software which functions similarly to those listed above on MinIO hosts.
Alternatively, configure these services to ignore or exclude the MinIO Server process and all drives or drive paths accessed by MinIO.
System administrator access to the remote servers
A management tool for distributed systems, such as Ansible, Terraform, or Kubernetes for orchestrated environments.
Kubernetes infrastructures should use the MinIO Operator for best results.
Load balancer to handle routing of requests (for example, NGINX)
Prometheus or a Prometheus-compatible setup for monitoring and metrics
Install a matching version of MinIO across all nodes in the deployment.
Post Install Tasks
(optional) Create an mc alias for each server with mc alias set from your local machine for command line access to work with the MinIO deployment from a local machine
Configure Bucket replication to duplicate contents of a bucket to another bucket location
Configure Site replication to synchronize contents of multiple dispersed data center locations
MinIO requiresexclusive access to the drives or volumes provided for object storage. No other processes, software, scripts, or persons should perform any actions directly on the drives or volumes provided to MinIO or the objects or files MinIO places on them.
Unless directed by MinIO Engineering, do not use scripts or tools to directly modify, delete, or move any of the data shards, parity shards, or metadata files on the provided drives, including from one drive or node to another. Such operations are very likely to result in widespread corruption and data loss beyond MinIO’s ability to heal.
Distributed MinIO deployments rely on Erasure Coding to provide built-in tolerance for multiple drive or node failures. Depending on the deployment topology and the selected erasure code parity, MinIO can tolerate the loss of up to half the drives or nodes in the deployment while maintaining read access (“read quorum”) to objects.
The following table lists the typical types of failure in a MinIO deployment and links to procedures for recovering from each:
MinIO detects when a node rejoins the deployment and begins proactively healing the node shortly after it is joined back to the cluster healing data previously stored on that node.
MinIO Site Replication supports complete resynchronization of buckets, objects, and replication-eligible configuration settings after total site loss.
Since MinIO can operate in a degraded state without significant performance loss, administrators can schedule hardware replacement in proportion to the rate of hardware failure. “Normal” failure rates (single drive or node failure) may allow for a more reasonable replacement timeframe, while “critical” failure rates (multiple drives or nodes) may require a faster response.
For nodes with one or more drives that are either partially failed or operating in a degraded state (increasing drive errors, SMART warnings, timeouts in MinIO logs, etc.), you can safely unmount the drive if the cluster has sufficient remaining healthy drives to maintain read and write quorum. Missing drives are less disruptive to the deployment than drives that are consistently producing read and write errors.
Note
Exclusive access to drives
MinIO requiresexclusive access to the drives or volumes provided for object storage. No other processes, software, scripts, or persons should perform any actions directly on the drives or volumes provided to MinIO or the objects or files MinIO places on them.
Unless directed by MinIO Engineering, do not use scripts or tools to directly modify, delete, or move any of the data shards, parity shards, or metadata files on the provided drives, including from one drive or node to another. Such operations are very likely to result in widespread corruption and data loss beyond MinIO’s ability to heal.
Note
MinIO Professional Support
MinIO SUBNET users can log in and create a new issue related to drive, node, or site failures. Coordination with MinIO Engineering via SUBNET can ensure successful recovery operations of production MinIO deployments, including root-cause analysis, and health diagnostics.
Community users can seek support on the MinIO Community Slack. Community Support is best-effort only and has no SLAs around responsiveness.
10.1 - Drive Failure Recovery
MinIO supports hot-swapping failed drives with new healthy drives. MinIO detects and heals those drives without requiring any node or deployment-level restart. MinIO healing occurs only on the replaced drive(s) and in most cases has minimal or negligible impact on deployment performance.
MinIO healing ensures consistency and correctness of all data restored onto the drive.
Note
Exclusive access to drives
MinIO requiresexclusive access to the drives or volumes provided for object storage. No other processes, software, scripts, or persons should perform any actions directly on the drives or volumes provided to MinIO or the objects or files MinIO places on them.
Unless directed by MinIO Engineering, do not use scripts or tools to directly modify, delete, or move any of the data shards, parity shards, or metadata files on the provided drives, including from one drive or node to another. Such operations are very likely to result in widespread corruption and data loss beyond MinIO’s ability to heal.
The following steps provide a more detailed walkthrough of drive replacement. These steps assume a MinIO deployment where each node manages drives using /etc/fstab with per-drive labels as per the documented prerequisites.
1) Unmount the failed drive(s)
Unmount each failed drive using umount. For example, the following command unmounts the drive at /dev/sdb:
umount /dev/sdb
2) Replace the failed drive(s)
Remove the failed drive(s) from the node hardware and replace it with known healthy drive(s). Replacement drives must meet the following requirements:
Using a replacement drive with greater capacity does not increase the total cluster storage. MinIO uses the smallest drive’s capacity as the ceiling for all drives in the Server Pool.
The following command formats a drive as XFS and assigns it a label to match the failed drive.
mkfs.xfs /dev/sdb -L DRIVE1
MinIO strongly recommends using label-based mounting to ensure consistent drive order that persists through system restarts.
3) Review and Update fstab
Review the /etc/fstab file and update as needed such that the entry for the failed drive points to the newly formatted replacement.
If using label-based drive assignment, ensure that each label points to the correct newly formatted drive.
If using UUID-based drive assignment, update the UUID for each point based on the newly formatted drive. You can use lsblk to view drive UUIDs.
Cloud environment instances which depend on mounted external storage may encounter boot failure if one or more of the remote file mounts return errors or failure. For example, an AWS ECS instances with mounted persistent EBS volumes may fail to boot with the standard /etc/fstab configuration if one or more EBS volumes fail to mount.
You can set the nofail option to silence error reporting at boot and allow the instance to boot with one or more mount issues.
You should not use this option on systems which have locally attached disks, as silencing drive errors prevents both MinIO and the OS from responding to those errors in a normal fashion.
Given the previous example command, no changes are required to fstab since the replacement drive at /mnt/drive1 uses the same label DRIVE1 as the failed drive.
4) Remount the Replaced Drive(s)
Use mount -a to remount the drives unmounted at the beginning of this procedure:
mount -a
The command should result in remounting of all of the replaced drives.
5) Monitor MinIO for Drive Detection and Healing Status
Use mc admin logs command orjournalctl -u minio for systemd-managed installations to monitor the server log output after remounting drives. The output should include messages identifying each formatted and empty drive.
Use mc admin heal to monitor the overall healing status on the deployment. MinIO aggressively heals replaced drive(s) to ensure rapid recovery from the degraded state.
6) Next Steps
Monitor the cluster for any further drive failures. Some drive batches may fail in close proximity to each other. Deployments seeing higher than expected drive failure rates should schedule dedicated maintenance around replacing the known bad batch. Consider using MinIO SUBNET to coordinate with MinIO engineering around guidance for any such operations.
10.2 - Node Failure Recovery
If a MinIO node suffers complete hardware failure (e.g. loss of all drives, data, etc.), the node begins healing operations once it rejoins the deployment. MinIO healing occurs only on the replaced hardware and does not typically impact deployment performance.
MinIO healing ensures consistency and correctness of all data restored onto the drive.
Note
Exclusive access to drives
MinIO requiresexclusive access to the drives or volumes provided for object storage. No other processes, software, scripts, or persons should perform any actions directly on the drives or volumes provided to MinIO or the objects or files MinIO places on them.
Unless directed by MinIO Engineering, do not use scripts or tools to directly modify, delete, or move any of the data shards, parity shards, or metadata files on the provided drives, including from one drive or node to another. Such operations are very likely to result in widespread corruption and data loss beyond MinIO’s ability to heal.
The replacement node hardware should be substantially similar to the failed node. There are no negative performance implications to using improved hardware.
The replacement drive hardware should be substantially similar to the failed drive. For example, replace a failed SSD with another SSD drive of the same capacity. While you can use drives with larger capacity, MinIO uses the smallest drive’s capacity as the ceiling for all drives in the Server Pool.
The following steps provide a more detailed walkthrough of node replacement. These steps assume a MinIO deployment where each node has a DNS hostname as per the documented prerequisites.
1) Start the Replacement Node
Ensure the new node has received all necessary security, firmware, and OS updates as per industry, regulatory, or organizational standards and requirements.
The new node software configuration must match that of the other nodes in the deployment, including but not limited to the OS and Kernel versions and configurations. Heterogeneous software configurations may result in unexpected or undesired behavior in the deployment.
2) Update Hostname for the New Node
Optional This step is only required if the replacement node has a different IP address from the failed host.
Ensure the hostname associated to the failed node now resolves to the new node.
For example, if https://minio-1.example.net previously resolved to the failed host, it should now resolve to the new host.
3) Download and Prepare the MinIO Server
Follow the deployment procedure to download and run the MinIO server using a matching configuration as all other nodes in the deployment.
The MinIO server version must match across all nodes
The MinIO service and environment file configurations must match across all nodes.
4) Rejoin the node to the deployment
Start the MinIO server process on the node and monitor the process output using mc admin logs or by monitoring the MinIO service logs using journalctl -u minio for systemd managed installations.
The server output should indicate that it has detected the other nodes in the deployment and begun healing operations.
Use mc admin heal to monitor overall healing status on the deployment. MinIO aggressively heals the node to ensure rapid recovery from the degraded state.
5) Next Steps
Continue monitoring the deployment until healing completes. Deployments with persistent and repeated node failures should schedule dedicated maintenance to identify the root cause. Consider using MinIO SUBNET to coordinate with MinIO engineering around guidance for any such operations.
10.3 - Site Failure Recovery
MinIO can make the loss of an entire site, while significant, a relatively minor incident. Site recovery depends on the replication option you use for the site.
Site Replication
Total restoration of IAM configurations, bucket configurations, and data from the healthy peer site(s)
Bucket Replication
Data restoration of objects and metadata from a healthy remote location for each bucket configured for replication
Data restoration of objects only from a healthy remote location with no versioning
Site replication healing automatically adds IAM settings, buckets, bucket configurations, and objects from the existing site(s) to the new site with no further action required.
You cannot configure site replication if any bucket replication rules remain in place on other healthy sites. Bucket replication is mutually exclusive with site replication.
If you are switching from using bucket replication to using site replication, you must first remove all bucket replication rules from the healthy site prior to setting up site replication.
Restore an Unhealthy Peer to Site Replication
Warning
Important
The RELEASE.2023-01-02T09-40-09Z MinIO server release includes important fixes for removing a downed site in replication configurations containing three or more peer sites.
For deployments configured for site replication, plan to test and upgrade all peer sites to the specified release. In the event of a site failure, you can update the remaining healthy sites to the specified version and use this procedure.
Site replication keeps two or more MinIO deployments in sync with IAM policies, buckets, bucket configurations, objects, and object metadata. If a peer site fails, such as due to a major disaster or long power outage, you can use the remaining healthy site(s) to restore the replicable data.
The following procedure can restore data in scenarios where site replication was active prior to the site loss. This procedure assumes a total loss of one or more peer sites versus replication lag or delays due to latency or transient deployment downtime.
Remove the failed site from the MinIO site replication configuration using the mc admin replicate rm command with the --force option.
The following command force-removes an unhealthy peer site from the replication configuration:
mc admin replicate rm HEALTHY_PEER UNHEALTHY_PEER --force
Replace HEALTHY_PEER with the alias of any healthy peer in the replication configuration
Replace UNHEALTHY_PEER with the alias of the unhealthy peer site
All healthy peers in the site replication configuration update to remove the unhealthy peer automatically. You can use the mc admin replicate info command to verify the new site replication configuration.
Do not upload any data or otherwise configure the deployment beyond the stated requirements.
Validate that the new MinIO deployment functions normally and has bidirectional connectivity to the other peer sites.
Ensure the new site matches the server version on the existing peer sites
Caution
Warning
The mc admin replicate rm --force command only operates on the online or healthy nodes in the site replication configuration. The removed offline MinIO deployment retains its original replication configuration, such that if the deployment resumes normal operations it would continue replication operations to its configured peer sites.
If you plan to re-use the hardware for the site replication configuration, you must completely wipe the drives for the deployment before re-initializing MinIO and adding the site back to the replication configuration.
Use the mc admin replicate add command to update the replication configuration with the new site:
mc admin replicate add HEALTHY_PEER NEW_PEER
Replace HEALTHY_PEER with the alias of any healthy peer in the replication configuration
Replace NEW_PEER with the alias of the new peer
All healthy peers in the site replication configuration update for the new peer automatically. You can use the mc admin replicate info command to verify the new site replication configuration.
For scenarios where bucket replication was in place prior to the failure, you can use mc replicate resync to restore data to a new site. Create a new site to replace the failed deployment, then synchronize the data from an existing, healthy, bucket replication-enabled deployment to the new site.
Deploy a new MinIO site.
Set up IAM and users as needed.
On the site with data, create a new remote target using the mc admin bucket remote add command and record the ARN from the output.
From the site with the data, use the mc replicate resync start command with the ARN from the previous command to rebuild the bucket on the new site.
Set up bucket replication rule(s) from the new MinIO site to the existing target bucket(s).
(Optional) Delete the bucket replication rules from the target deployment(s) to restore an active-passive replication scenario.
Passive Bucket Replication Resynchronization
Bucket replication can directly restore the site contents by performing a replication from the target bucket(s) to a new MinIO site.
As a passive process, bucket replication may not perform as quickly as desired for a site recovery scenario.
Bucket replication relies on the standard replication scanner queue, which does not take priority over other processes. For recovery procedures with stricter SLA/SLO, use the active bucket replication process with mc replicate resync command as described above.
Bucket replication rules copy the object, its version ID, versions, and other metadata to the target bucket. MinIO can restore the object with all of these attributes to a new MinIO site if bucket replication had already been in use prior to the site loss.
Deploy a new MinIO site.
Set up IAM and users as needed.
On the remaining target bucket deployment(s), create bucket replication rule(s) for each bucket to the new MinIO site.
Wait for replication to complete.
Set up bucket replication rule(s) from the new MinIO site to the existing target bucket(s).
(Optional) Delete the bucket replication rules from the target deployment(s) to restore an active-passive replication scenario.
Do not delete the bucket replication rules from the deployments used to recover data if you prefer to keep an active-active replication between the buckets. In active-active replication, changes to the objects at either location affect the objects at the other location.
Mirroring
MinIO’s mirroring copies an object from any S3 compatible storage system.
Mirroring only copies the latest version of each object and does not include versioning metadata, regardless of the source. You cannot restore those attributes with this method.
Use mc mirror in situations where you need to restore only the latest version of an object. Use bucket replication or site replication where those methods were already in use if you are copying from another MinIO deployment and wish to restore the object’s version history and version metadata.
Deploy a new MinIO site.
Set up IAM and users as needed.
Create buckets on the new site.
Use the mc cp CLI command to copy the contents from the mirror location to the new MinIO site.
Community support is best-effort only and has no SLA or SLO.
Paid subscribers have access to the MinIO Subscription Network, SUBNET, which provides access to health checks, direct-to-engineering support, and license management.
For current licensing levels and pricing, refer to the MinIO SUBNET page.
Tools
The MinIO Client provides several functions to display information about your MinIO deployment or monitor its activity.
For basic information about your MinIO deployment, use mc admin info.
For deeper investigation of S3 calls and responses, use mc admin trace.
Use mc admin logs to display logs from the command line. The command supports type and quantity filters for further limiting logs output.
Upgrades and version support
MinIO regularly releases updates to introduce features, improve performance, address security concerns, or fix bugs. These releases can occur very frequently, and vary by product.
Always test software releases in a development environment before upgrading on a production deployment.
Recommended upgrade schedule
MinIO recommends always installing the most recent release to obtain security enhancements and improvements. We recognize that such a frequent release schedule may make this impractical for some organizations. In such cases, we recommend using MinIO and our related product releases that are no older than six months.
Version Alignment
As the various MinIO products release separately on their own schedules, we recommend the following version alignment practices:
MinIO
Update to the latest release or a release no older than six months.
MinIO Client
Update to the mc release that occurs immediately after the MinIO release, within one or two weeks.
MinIO Operator
Use a MinIO version no earlier than the latest at the time of the Operator release. The MinIO version latest at time of release can be found in the quay.io link in the example tenant kustomization yaml file for the Operator release.
4.5.5: MinIO RELEASE.2022-12-07T00-56-37Z or later
4.5.6: MinIO RELEASE.2023-01-02T09-40-09Z or later
4.5.7: MinIO RELEASE.2023-01-12T02-06-16Z or later
4.5.8: MinIO RELEASE.2023-01-12T02-06-16Z or later
When creating a new tenant, the Operator uses either the latest available MinIO release image or the image you specify when creating the tenant.
You can encrypt the output of the mc support inspect command for enhanced security when transmitting the files to MinIO SUBNET.
Encryption
You can choose to encrypt the output zip file for enhanced security with the --encrypt flag. MinIO provides a binary to decrypt the file.
When the encryption flag, the output provides a decryption key. The output resembles the following:
$ mc support inspect --encrypt play/test123/test*/*/part.*
mc: Encrypted file data successfully downloaded as inspect.ad2b43d8.enc
mc: Decryption key: ad2b43d847fdb14e54c5836200177f7158b3f745433525f5d23c0e0208e50c9948540b54

mc: The decryption key will ONLY be shown here. It cannot be recovered.
mc: The encrypted file can safely be shared without the decryption key.
mc: Even with the decryption key, data stored with encryption cannot be accessed.
As the output says, MinIO only displays the encryption key this one time, and it cannot be displayed or recovered later.
Decryption
MinIO provides a decryption tool to use on the files generated by mc support inspect.
To install the decryption tool, install Go, then run
go install github.com/minio/minio/docs/debugging/inspect@latest
After installing the inspect decryption binary, decrypt the file with the following command:
inspect -key=<decryptionKeyFromOutput> <file.enc>
Replace <decryptionKeyFromOutput> with the decryption key provided when generating the diagnosit file. Replace <file.enc> with the downloaded file name, including a relative or absolute path.
-key flag is optional. If not provided, an interactive prompt asks for the key. The file name includes a portion of the decryption key. This helps verify which key to use for the file.
The decryption process outputs an unencrypted .zip file.