1 - 将 Silo 与 Veeam 搭配使用
在使用 Veeam Backup and Replication 时,可以将 Silo 这类 S3 兼容对象存储用作备份容量层。这会将 Veeam 基础设施中的存储解耦,并让你继续掌控自己的数据。Silo 简洁的部署与管理方式,便于 Veeam 备份管理员自行部署容量分层所需的对象存储。
前置条件
- 安装以下一个或两个产品:支持 S3 兼容对象存储的 Veeam Backup and Replication(例如 9.5.4),以及 Veeam Backup for Office365(VBO)
- 按照部署流程完成 Silo 对象存储部署
- Veeam 要求到对象存储的连接使用 TLS。请按照网络加密指南配置 TLS。
- 必须在 Veeam 之外、且在接入前先创建好 S3 存储桶、Access Key 和 Secret Key。
- 按照
mc 命令参考为 Veeam 对接的 Silo endpoint 配置 Silo 客户端。
为 Veeam Backup and Replication 设置 S3 兼容对象存储
为 Veeam 备份创建 bucket
为 Veeam Backup 创建 bucket,例如:
mc mb myminio/veeambackup
NOTE: 对于启用 Immutability 的 Veeam Backup,请在创建 bucket 时启用 object lock,例如:
mc mb -l myminio/veeambackup
Object Lock 依赖 Silo Server 启用纠删码。更多信息见纠删码文档。
将 Silo 添加为 Veeam 的对象存储
按照 Veeam 文档中的添加对象存储流程,将 Silo 作为 S3 兼容对象存储接入。
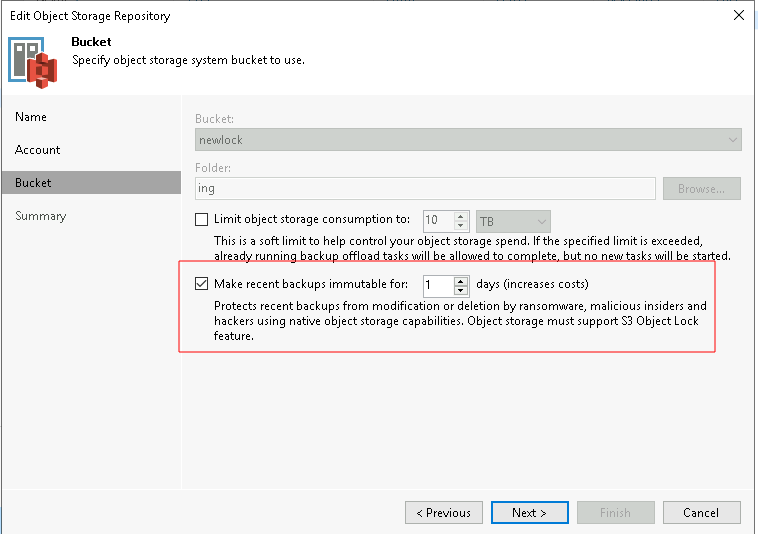
对于启用 Immutability 的 Veeam Backup,选择希望备份保持不可变的天数
创建 Scale-out Backup Repository
- 在 Backup Infrastructure 视图下,点击 Scale-out Repositories,然后在功能区点击 Add Scale-out Repository 按钮。
- 按照屏幕向导完成配置
- 在 Capacity Tier 页面,勾选 Extend scale-out backup repository capacity with object storage 复选框并选择对象存储。如果你希望作业运行后可立即测试备份数据,请在对象存储选择下勾选 “Copy” 并取消勾选 “Move”。
创建备份作业
使用 Veeam Backup and Replication 备份虚拟机
- 在导航窗格的 Home > Jobs > Backup 下,点击功能区中的 Backup Job 按钮并选择 Virtual Machine。然后按屏幕向导继续。
- 在 Storage 页面,选择前面已配置的 Scale-out Backup Repository。
- 继续创建备份作业。在 Summary 页面,勾选 Run the Job when I click Finish 复选框并点击 Finish 按钮。备份作业会立即启动。这会为该作业中的 VM 创建一次 Active Full 备份。
- 由于我们在创建 SOBR 时选择了 Copy 模式,备份在性能层创建后会立即复制到容量层。
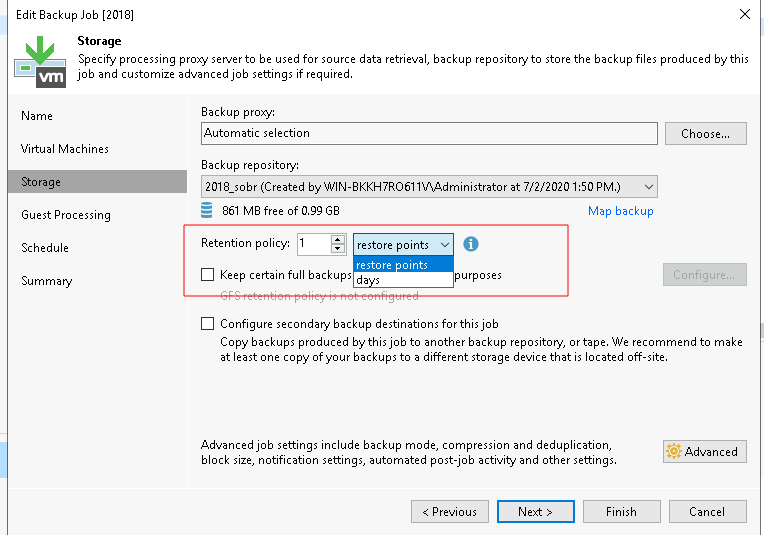
- 对于启用 Immutability 的 Veeam Backup,你可以选择按还原点数量或按天数将备份设为不可变。
使用 VBO 备份 Office 365
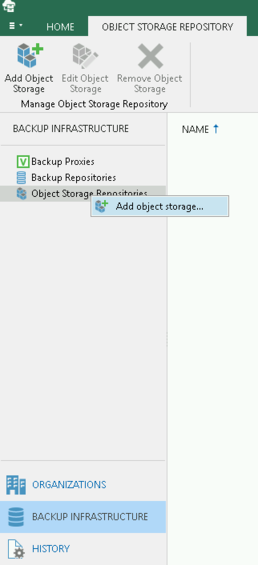
- 在 Backup Infrastructure 下,右键 Object Storage Repositories 并选择 “Add object storage”
- 按照上文 Veeam Backup and Replication 的向导继续执行,这两个产品的步骤相同
- 在 Backup Infrastructure -> Backup Repositories 下,右键并选择 “Add Backup Repository”
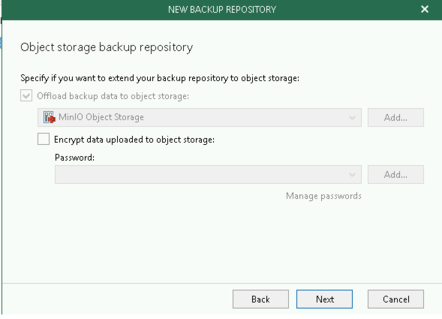
- 按向导操作。在 “Object Storage Backup Repository” 部分,选择你上面创建的 Silo 对象存储
测试设置
下次备份作业运行时,你可以使用 mc admin trace myminio 命令,确认流量正在进入 Silo 节点。对于 Veeam Backup and Replication,需要先等待备份在性能层完成,然后数据才会迁移到 Silo 容量层。
20:09:10.216 [200 OK] s3.GetObject veeam-minio01:9000/vbo/Veeam/Backup365/vbotest/Organizations/6571606ecbc4455dbfe23b83f6f45597/Webs/ca2d0986229b4ec88e3a217ef8f04a1d/Items/efaa67764b304e77badb213d131beab6/f4f0cf600f494c3eb702d8eafe0fabcc.aac07493e6cd4c71845d2495a4e1e19b 139.178.68.158    9.789ms      ↑ 90 B ↓ 8.5 KiB
20:09:10.244 [200 OK] s3.GetObject veeam-minio01:9000/vbo/Veeam/Backup365/vbotest/RepositoryLock/cad99aceb50c49ecb9e07246c3b9fadc_bfd985e5deec4cebaf481847f2c34797 139.178.68.158    16.21ms      ↑ 90 B ↓ 402 B
20:09:10.283 [200 OK] s3.PutObject veeam-minio01:9000/vbo/Veeam/Backup365/vbotest/CommonInfo/WebRestorePoints/18f1aba8f55f4ac6b805c4de653eb781 139.178.68.158    29.787ms     ↑ 1005 B ↓ 296 B
2 - 使用 Silo 的解耦 HDP Spark 和 Hive
1. 云原生架构
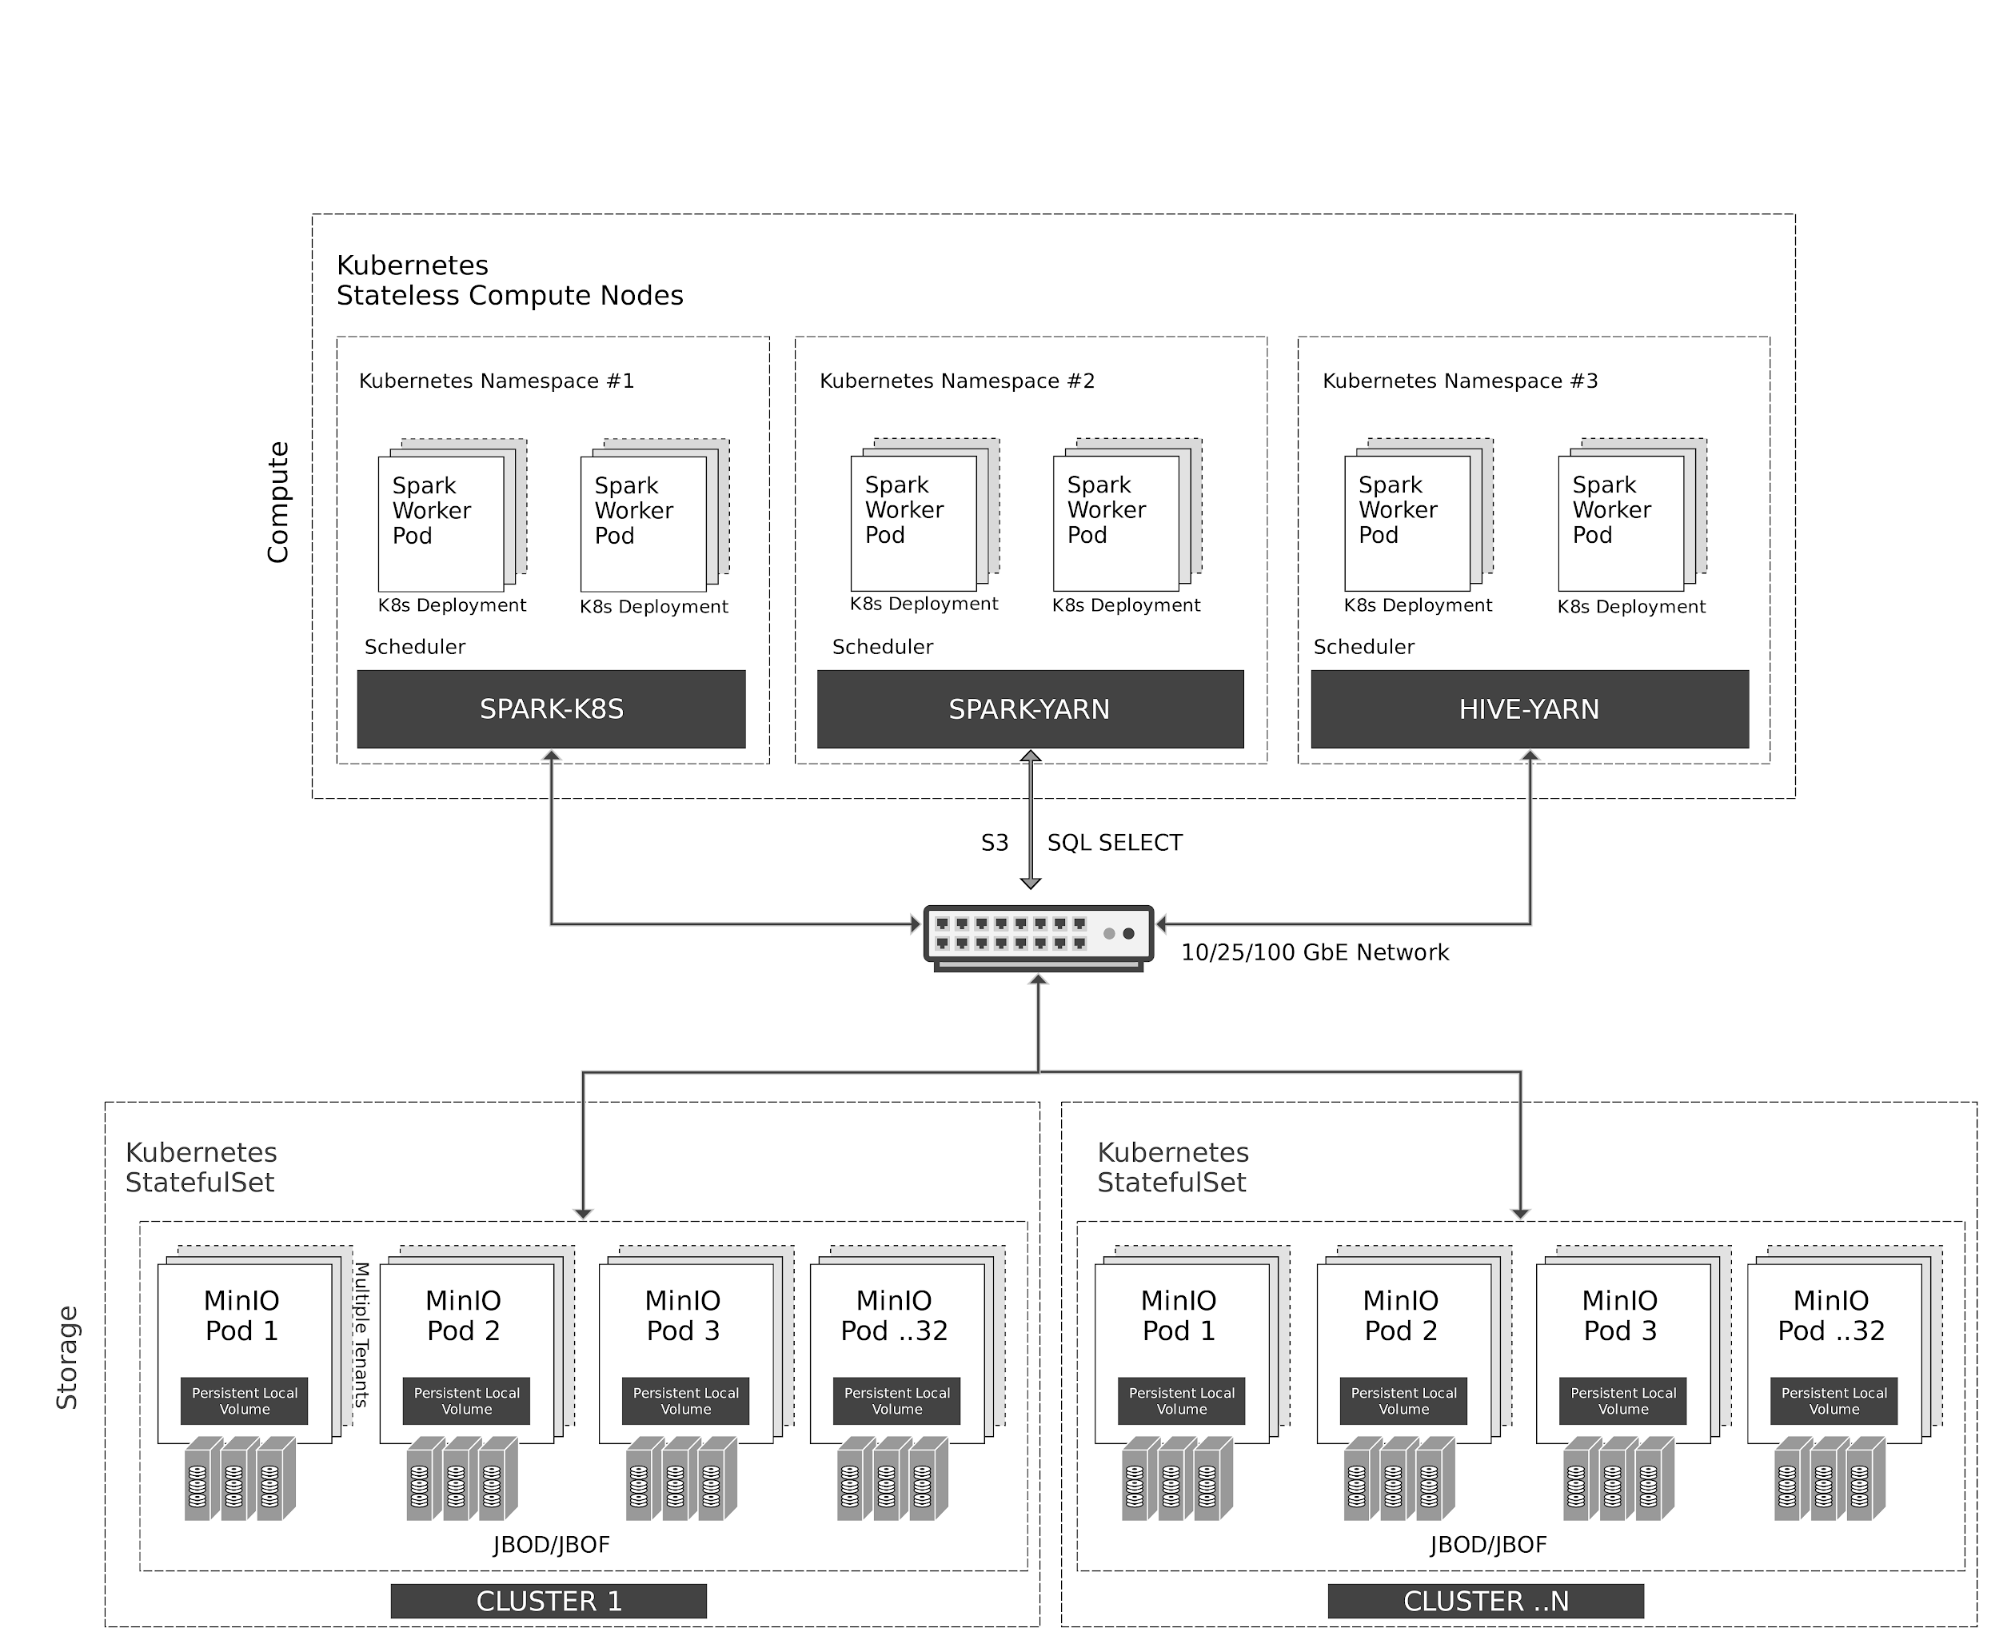
Kubernetes 在计算节点上以弹性方式管理无状态的 Spark 和 Hive 容器。Spark 与 Kubernetes 具有原生调度器集成。出于历史原因,Hive 在 Kubernetes 之上使用 YARN 调度器。
对 MinIO 对象存储的所有访问都通过 S3/SQL SELECT API 完成。除计算节点外,MinIO 容器也由 Kubernetes 以有状态容器方式管理,并将本地存储(JBOD/JBOF)映射为持久化本地卷。该架构支持多租户 MinIO,实现客户间数据隔离。
MinIO 还支持类似 AWS 区域与层级的多集群、多站点联邦。通过 MinIO Information Lifecycle Management(ILM),可以将数据分层到基于 NVMe 的热存储和基于 HDD 的温存储之间。所有数据都采用按对象密钥加密。租户之间的访问控制与身份管理由 MinIO 通过 OpenID Connect 或 Kerberos/LDAP/AD 进行管理。
2. 前置条件
3. 配置 Hadoop、Spark、Hive 使用 MinIO
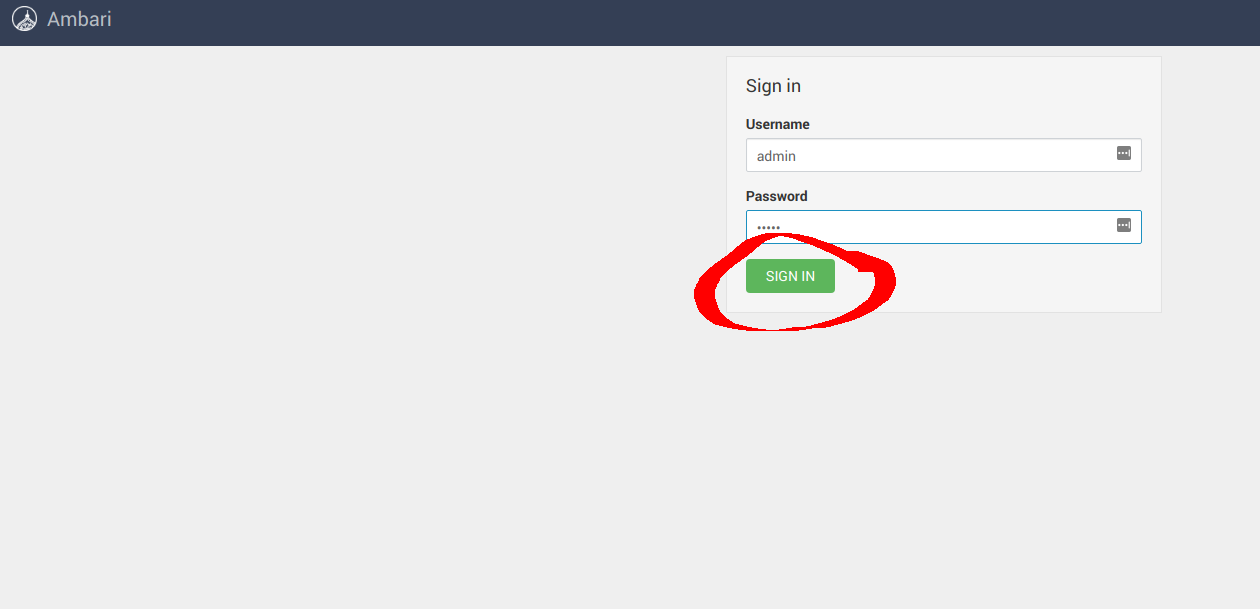
安装成功后,访问 Ambari UI http://<ambari-server>:8080/,并使用默认凭据登录:[username: admin, password: admin]
3.1 配置 Hadoop
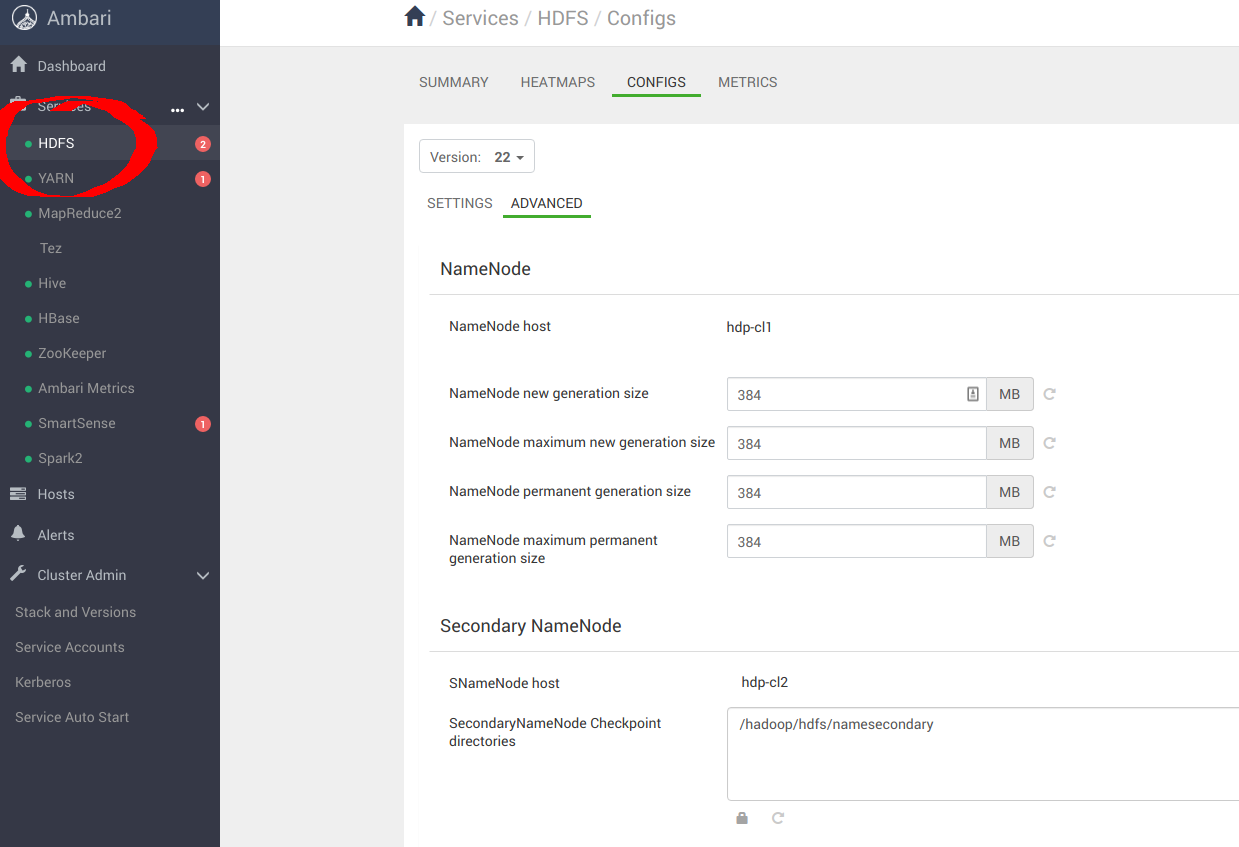
按下图进入 Services -> HDFS -> CONFIGS -> ADVANCED
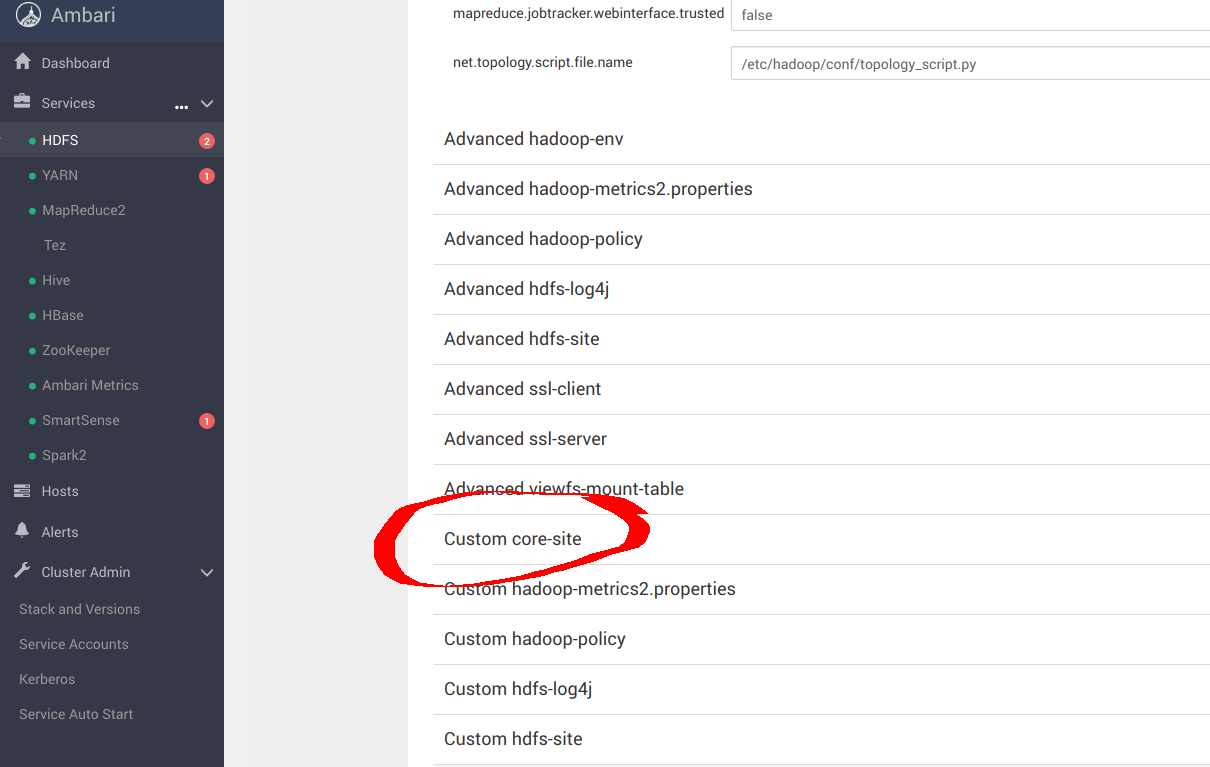
进入 Custom core-site,为 _s3a_ 连接器配置 MinIO 参数
sudo pip install yq
alias kv-pairify='yq ".configuration[]" | jq ".[]" | jq -r ".name + \"=\" + .value"'
以 12 个计算节点、总内存 1.2TiB 的集群为例,为获得最佳结果,需要进行以下设置。向 core-site.xml 添加以下优化项,以便为 MinIO 配置 s3a。其中最重要的选项如下:
cat ${HADOOP_CONF_DIR}/core-site.xml | kv-pairify | grep "mapred"

mapred.maxthreads.generate.mapoutput=2 # Num threads to write map outputs
mapred.maxthreads.partition.closer=0 # Asynchronous map flushers
mapreduce.fileoutputcommitter.algorithm.version=2 # Use the latest committer version
mapreduce.job.reduce.slowstart.completedmaps=0.99 # 99% map, then reduce
mapreduce.reduce.shuffle.input.buffer.percent=0.9 # Min % buffer in RAM
mapreduce.reduce.shuffle.merge.percent=0.9 # Minimum % merges in RAM
mapreduce.reduce.speculative=false # Disable speculation for reducing
mapreduce.task.io.sort.factor=999 # Threshold before writing to drive
mapreduce.task.sort.spill.percent=0.9 # Minimum % before spilling to drive
S3A 是用于访问 S3 及其他兼容 S3 的对象存储(如 MinIO)的连接器。MapReduce 工作负载通常以与 HDFS 相同的方式与对象存储交互。这类工作负载依赖 HDFS 的原子 rename 功能来完成向数据存储写入。对象存储操作天然是原子的,不需要也不实现 rename API。默认的 S3A committer 会通过 copy 和 delete API 模拟 rename。由于写放大,这种交互模式会带来明显的性能损失。例如,Netflix 开发了两个新的 staging committer:Directory staging committer 和 Partitioned staging committer,以充分利用对象存储的原生操作能力。这两个 committer 不需要 rename 操作。除此之外,还对另一个新增的 Magic committer 进行了基准测试。
测试结果显示,Directory staging committer 在三者中速度最快。为获得最佳结果,S3A 连接器应配置以下参数:
cat ${HADOOP_CONF_DIR}/core-site.xml | kv-pairify | grep "s3a"

fs.s3a.access.key=minio
fs.s3a.secret.key=minio123
fs.s3a.path.style.access=true
fs.s3a.block.size=512M
fs.s3a.buffer.dir=${hadoop.tmp.dir}/s3a
fs.s3a.committer.magic.enabled=false
fs.s3a.committer.name=directory
fs.s3a.committer.staging.abort.pending.uploads=true
fs.s3a.committer.staging.conflict-mode=append
fs.s3a.committer.staging.tmp.path=/tmp/staging
fs.s3a.committer.staging.unique-filenames=true
fs.s3a.connection.establish.timeout=5000
fs.s3a.connection.ssl.enabled=false
fs.s3a.connection.timeout=200000
fs.s3a.endpoint=http://minio:9000
fs.s3a.impl=org.apache.hadoop.fs.s3a.S3AFileSystem

fs.s3a.committer.threads=2048 # Number of threads writing to MinIO
fs.s3a.connection.maximum=8192 # Maximum number of concurrent conns
fs.s3a.fast.upload.active.blocks=2048 # Number of parallel uploads
fs.s3a.fast.upload.buffer=disk # Use drive as the buffer for uploads
fs.s3a.fast.upload=true # Turn on fast upload mode
fs.s3a.max.total.tasks=2048 # Maximum number of parallel tasks
fs.s3a.multipart.size=512M # Size of each multipart chunk
fs.s3a.multipart.threshold=512M # Size before using multipart uploads
fs.s3a.socket.recv.buffer=65536 # Read socket buffer hint
fs.s3a.socket.send.buffer=65536 # Write socket buffer hint
fs.s3a.threads.max=2048 # Maximum number of threads for S3A
其余优化选项请参考以下链接:
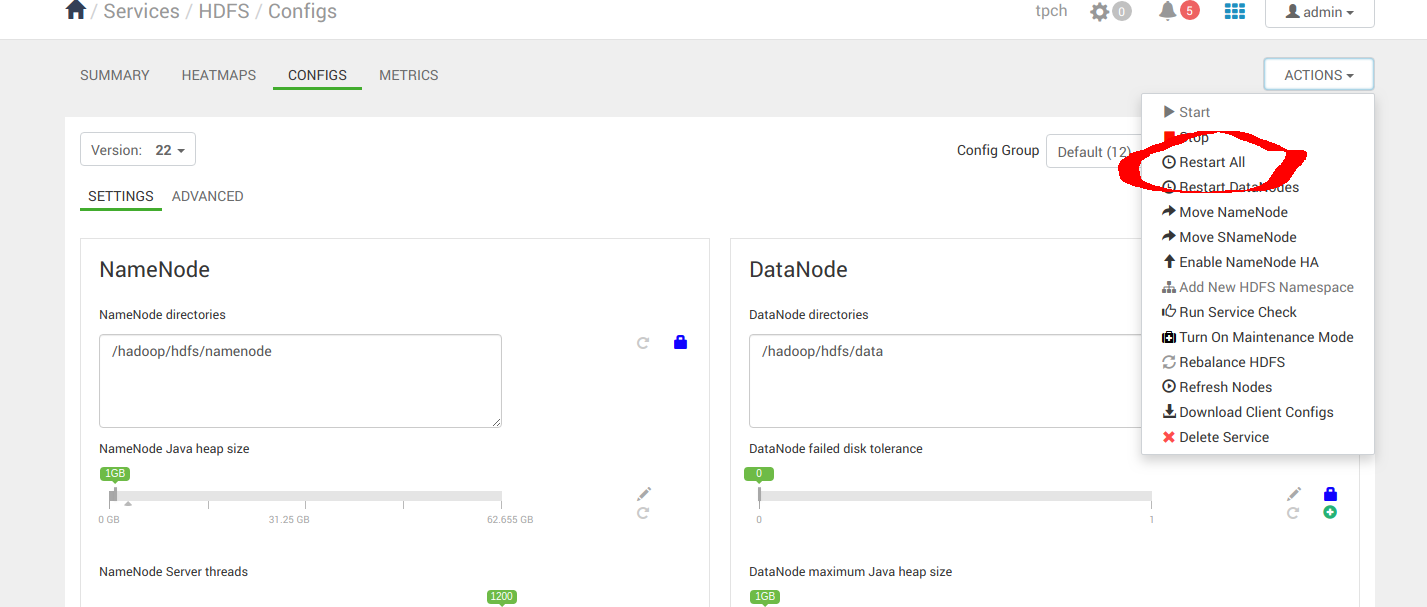
应用配置变更后,继续重启 Hadoop 服务。
3.2 配置 Spark2
按下图进入 Services -> Spark2 -> CONFIGS
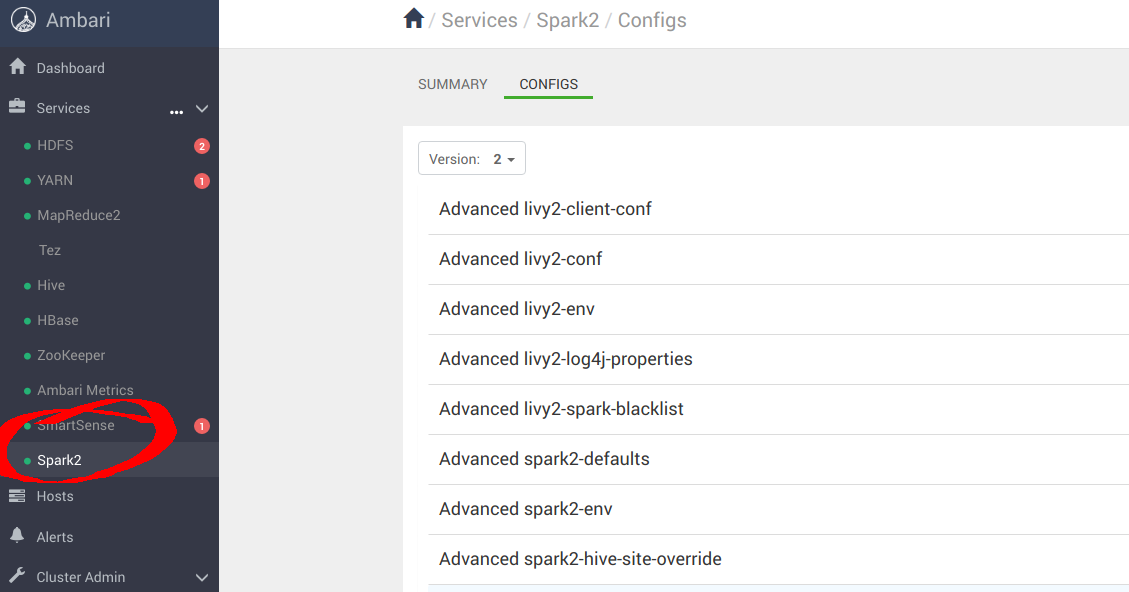
进入“Custom spark-defaults”,为 _s3a_ 连接器配置 MinIO 参数
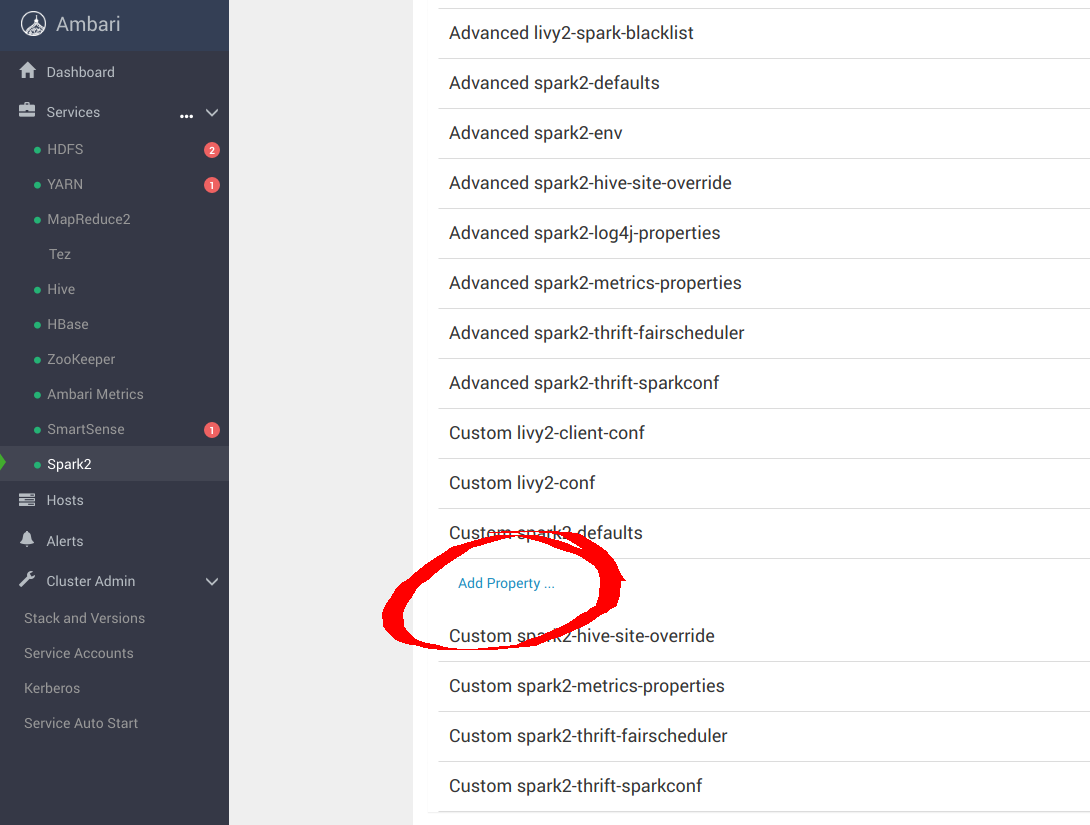
向 spark-defaults.conf 添加以下优化项,以便将 Spark 配置为使用 MinIO。
spark.hadoop.fs.s3a.access.key minio
spark.hadoop.fs.s3a.secret.key minio123
spark.hadoop.fs.s3a.path.style.access true
spark.hadoop.fs.s3a.block.size 512M
spark.hadoop.fs.s3a.buffer.dir ${hadoop.tmp.dir}/s3a
spark.hadoop.fs.s3a.committer.magic.enabled false
spark.hadoop.fs.s3a.committer.name directory
spark.hadoop.fs.s3a.committer.staging.abort.pending.uploads true
spark.hadoop.fs.s3a.committer.staging.conflict-mode append
spark.hadoop.fs.s3a.committer.staging.tmp.path /tmp/staging
spark.hadoop.fs.s3a.committer.staging.unique-filenames true
spark.hadoop.fs.s3a.committer.threads 2048 # number of threads writing to MinIO
spark.hadoop.fs.s3a.connection.establish.timeout 5000
spark.hadoop.fs.s3a.connection.maximum 8192 # maximum number of concurrent conns
spark.hadoop.fs.s3a.connection.ssl.enabled false
spark.hadoop.fs.s3a.connection.timeout 200000
spark.hadoop.fs.s3a.endpoint http://minio:9000
spark.hadoop.fs.s3a.fast.upload.active.blocks 2048 # number of parallel uploads
spark.hadoop.fs.s3a.fast.upload.buffer disk # use disk as the buffer for uploads
spark.hadoop.fs.s3a.fast.upload true # turn on fast upload mode
spark.hadoop.fs.s3a.impl org.apache.hadoop.spark.hadoop.fs.s3a.S3AFileSystem
spark.hadoop.fs.s3a.max.total.tasks 2048 # maximum number of parallel tasks
spark.hadoop.fs.s3a.multipart.size 512M # size of each multipart chunk
spark.hadoop.fs.s3a.multipart.threshold 512M # size before using multipart uploads
spark.hadoop.fs.s3a.socket.recv.buffer 65536 # read socket buffer hint
spark.hadoop.fs.s3a.socket.send.buffer 65536 # write socket buffer hint
spark.hadoop.fs.s3a.threads.max 2048 # maximum number of threads for S3A
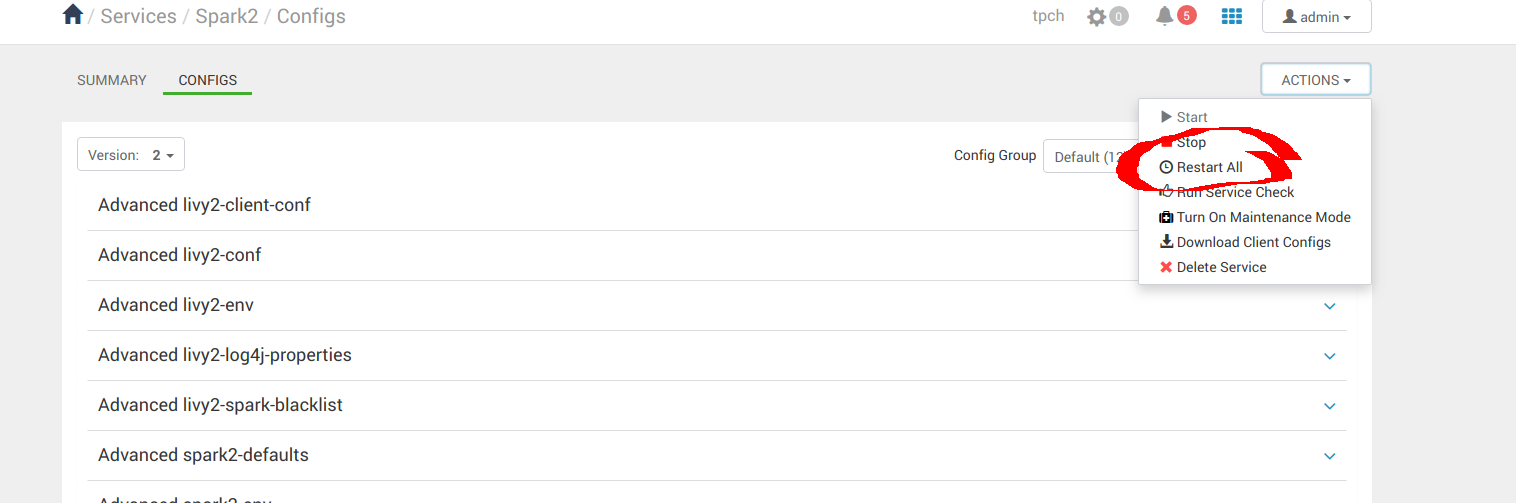
应用配置变更后,继续重启 Spark 服务。
3.3 配置 Hive
按下图进入 Services -> Hive -> CONFIGS-> ADVANCED
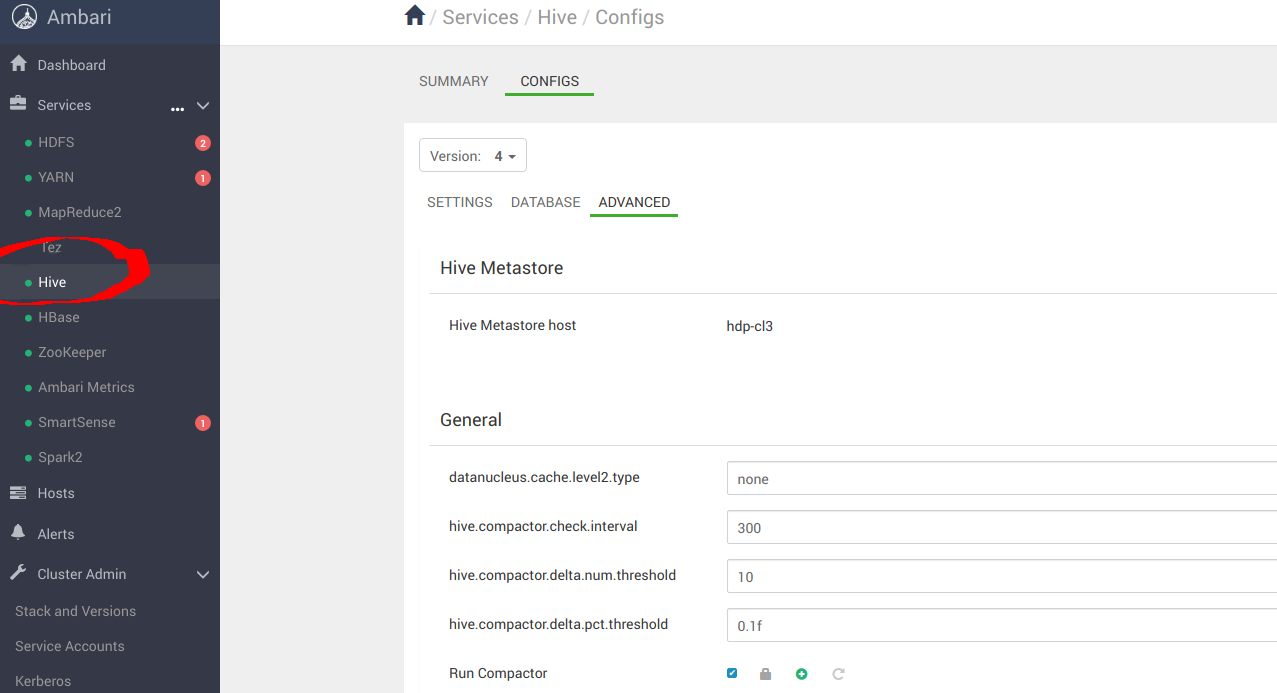
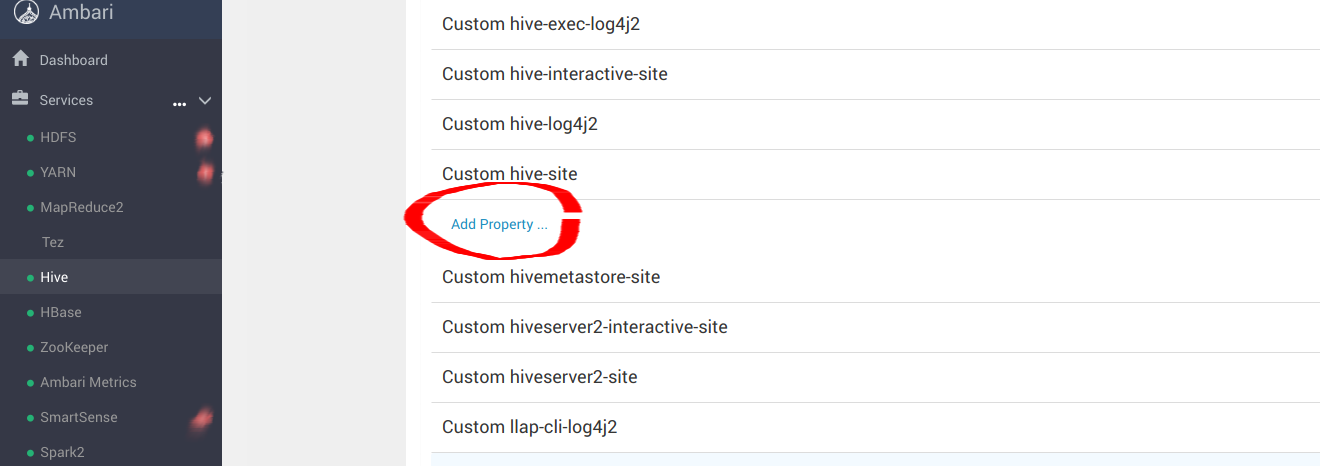
进入“Custom hive-site”,为 _s3a_ 连接器配置 MinIO 参数
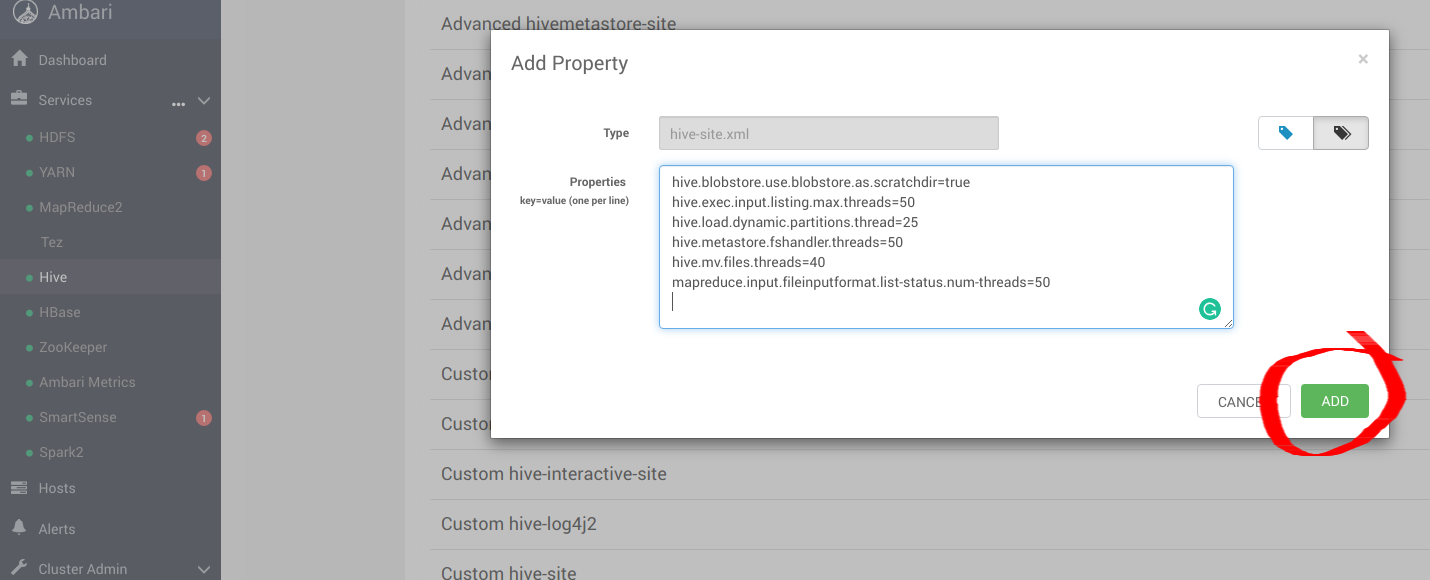
向 hive-site.xml 添加以下优化项,以便将 Hive 配置为使用 MinIO。
hive.blobstore.use.blobstore.as.scratchdir=true
hive.exec.input.listing.max.threads=50
hive.load.dynamic.partitions.thread=25
hive.metastore.fshandler.threads=50
hive.mv.files.threads=40
mapreduce.input.fileinputformat.list-status.num-threads=50
有关这些选项的更多信息,请访问 https://www.cloudera.com/documentation/enterprise/5-11-x/topics/admin_hive_on_s3_tuning.html
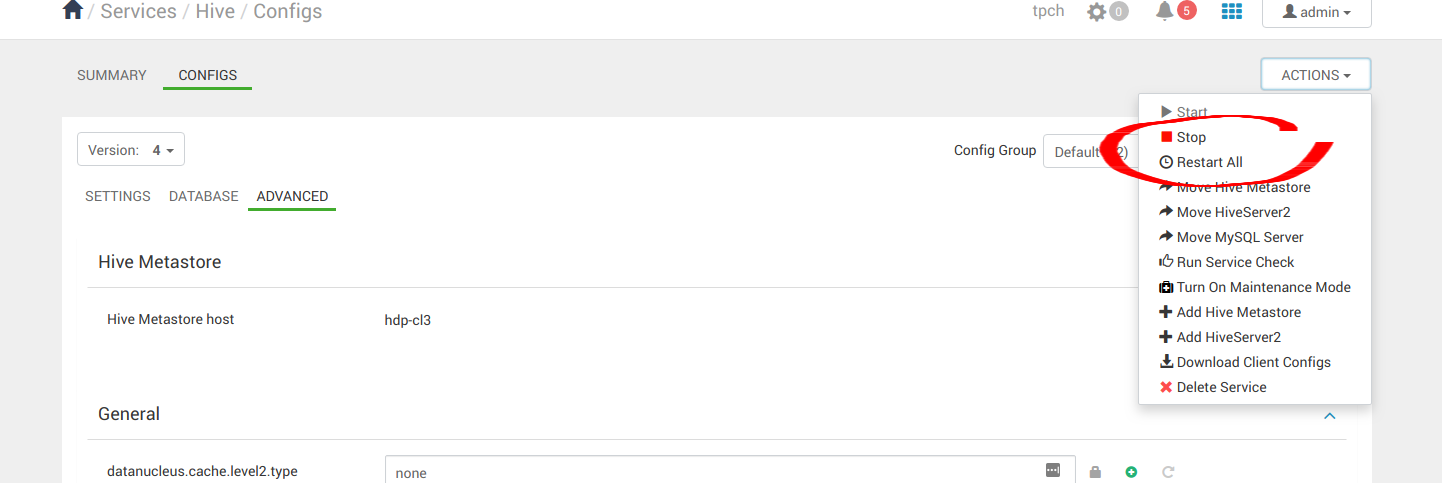
应用配置变更后,继续重启所有 Hive 服务。
4. 运行示例应用
在 Hive、Hadoop 和 Spark 安装完成后,可以继续运行一些示例应用,验证配置是否正确。我们可以使用 Spark Pi 和 Spark WordCount 程序来验证 Spark 安装。也可以进一步了解如何通过命令行和 Spark shell 运行 Spark 作业。
4.1 Spark Pi
通过运行下面这个计算密集型示例来测试 Spark 安装。该示例通过向圆内“投掷飞镖”来计算 pi。程序会在单位正方形((0,0) 到 (1,1))内生成点,并统计落在该正方形内单位圆中的点数,结果即为 pi 的近似值。
按以下步骤运行 Spark Pi 示例:
- 以 ‘spark’ 用户登录。
- 作业运行时,相关库可在中间处理阶段使用 MinIO。
- 进入安装了 Spark client 的节点,并切换到 spark2-client 目录:
cd /usr/hdp/current/spark2-client
su spark
- 以 yarn-client 模式运行 Apache Spark Pi 作业,使用 org.apache.spark 中的代码:
./bin/spark-submit --class org.apache.spark.examples.SparkPi \
    --master yarn-client \
    --num-executors 1 \
    --driver-memory 512m \
    --executor-memory 512m \
    --executor-cores 1 \
    examples/jars/spark-examples*.jar 10
作业应产生如下输出。请关注输出中的 pi 值。
17/03/22 23:21:10 INFO DAGScheduler: Job 0 finished: reduce at SparkPi.scala:38, took 1.302805 s
Pi is roughly 3.1445191445191445
也可以在浏览器中访问 YARN ResourceManager Web UI,点击 job history server 信息来查看作业状态。
4.2 WordCount
WordCount 是一个简单程序,用于统计文本文件中各单词的出现次数。代码会构建一个名为 counts 的 (String, Int) 对数据集,并将该数据集保存到文件。
以下示例将 WordCount 代码提交到 Scala shell。请为 Spark WordCount 示例选择一个输入文件。可以使用任意文本文件作为输入。
- 以 ‘spark’ 用户登录。
- 作业运行时,相关库可在中间处理阶段使用 MinIO。
- 进入安装了 Spark client 的节点,并切换到 spark2-client 目录:
cd /usr/hdp/current/spark2-client
su spark
以下示例使用 log4j.properties 作为输入文件:
4.2.1 将输入文件上传到 HDFS:
hadoop fs -copyFromLocal /etc/hadoop/conf/log4j.properties
          s3a://testbucket/testdata
4.2.2 运行 Spark shell:
./bin/spark-shell --master yarn-client --driver-memory 512m --executor-memory 512m
该命令应产生如下输出(包含额外状态信息):
Spark context Web UI available at http://172.26.236.247:4041
Spark context available as 'sc' (master = yarn, app id = application_1490217230866_0002).
Spark session available as 'spark'.
Welcome to


      ____              __
     / __/__  ___ _____/ /__
    _\ \/ _ \/ _ `/ __/  '_/
   /___/ .__/\_,_/_/ /_/\_\   version 2.1.0.2.6.0.0-598
      /_/

Using Scala version 2.11.8 (Java HotSpot(TM) 64-Bit Server VM, Java 1.8.0_112)
Type in expressions to have them evaluated.
Type :help for more information.

scala>
- 在 scala> 提示符下,输入以下命令提交作业。请将节点名、文件名和文件位置替换为实际值:
scala> val file = sc.textFile("s3a://testbucket/testdata")
file: org.apache.spark.rdd.RDD[String] = s3a://testbucket/testdata MapPartitionsRDD[1] at textFile at <console>:24

scala> val counts = file.flatMap(line => line.split(" ")).map(word => (word, 1)).reduceByKey(_ + _)
counts: org.apache.spark.rdd.RDD[(String, Int)] = ShuffledRDD[4] at reduceByKey at <console>:25

scala> counts.saveAsTextFile("s3a://testbucket/wordcount")
使用以下任一方式查看作业输出:
在 Scala shell 中查看输出:
scala> counts.count()
364
若要在 MinIO 中查看输出,请退出 Scala shell。查看 WordCount 作业状态:
hadoop fs -ls s3a://testbucket/wordcount
输出应类似如下:
Found 3 items
-rw-rw-rw-   1 spark spark          0 2019-05-04 01:36 s3a://testbucket/wordcount/_SUCCESS
-rw-rw-rw-   1 spark spark       4956 2019-05-04 01:36 s3a://testbucket/wordcount/part-00000
-rw-rw-rw-   1 spark spark       5616 2019-05-04 01:36 s3a://testbucket/wordcount/part-00001
3 - AWS CLI 与 Silo 服务端

AWS CLI 是一个用于管理 AWS 服务的统一工具。它也常用于在 AWS S3 中导入和导出数据。它可用于任何兼容 S3 的云存储服务。
在本教程中,我们将学习如何配置并使用 AWS CLI 通过 MinIO Server 管理数据。
1. 前提条件
按照 SILO 安装指南 安装 MinIO Server。
2. 安装
从 https://aws.amazon.com/cli/ 安装 AWS CLI。
3. 配置
要配置 AWS CLI,请执行 aws configure 并填写 MinIO 密钥信息。
本示例中展示的访问凭据属于 https://play.min.io:9000。 这些凭据是公开的。你可以将该服务用于测试和开发。在生产部署中请替换为你自己的 MinIO 密钥。
aws configure
AWS Access Key ID [None]: Q3AM3UQ867SPQQA43P2F
AWS Secret Access Key [None]: zuf+tfteSlswRu7BJ86wekitnifILbZam1KYY3TG
Default region name [None]: us-east-1
Default output format [None]: ENTER
此外,还需要为 MinIO Server 启用 AWS Signature Version ‘4’。
aws configure set default.s3.signature_version s3v4
4. 命令
列出你的存储桶
aws --endpoint-url https://play.min.io:9000 s3 ls
2016-03-27 02:06:30 deebucket
2016-03-28 21:53:49 guestbucket
2016-03-29 13:34:34 mbtest
2016-03-26 22:01:36 mybucket
2016-03-26 15:37:02 testbucket
列出存储桶中的内容
aws --endpoint-url https://play.min.io:9000 s3 ls s3://mybucket
2016-03-30 00:26:53      69297 argparse-1.2.1.tar.gz
2016-03-30 00:35:37      67250 simplejson-3.3.0.tar.gz
创建存储桶
aws --endpoint-url https://play.min.io:9000 s3 mb s3://mybucket
make_bucket: s3://mybucket/
向存储桶添加对象
aws --endpoint-url https://play.min.io:9000 s3 cp simplejson-3.3.0.tar.gz s3://mybucket
upload: ./simplejson-3.3.0.tar.gz to s3://mybucket/simplejson-3.3.0.tar.gz
从存储桶删除对象
aws --endpoint-url https://play.min.io:9000 s3 rm s3://mybucket/argparse-1.2.1.tar.gz
delete: s3://mybucket/argparse-1.2.1.tar.gz
删除存储桶
aws --endpoint-url https://play.min.io:9000 s3 rb s3://mybucket
remove_bucket: s3://mybucket/
4 - 为 Silo 服务端配置 NGINX 代理
以下文档提供了在 Linux 环境中配置 NGINX 将请求代理到 MinIO 的基线方案。 这并非一份关于 NGINX、代理或反向代理的一般性完整指南。 请根据你的基础设施需要调整配置。
本文档基于以下前提:
- 已有 NGINX 部署
- 已有 MinIO 部署
- 一个可唯一标识该 MinIO 部署的 DNS 主机名
将请求代理到 MinIO 服务端 API 和 MinIO Console 有两种模式:
专用 DNS
为 MinIO 服务创建或配置一个专用 DNS 名称。
对于 MinIO Server S3 API,将请求代理到该域名的根路径。 对于 MinIO Console Web GUI,将请求代理到 /minio 子路径。
例如,给定主机名 minio.example.net:
- 将对根路径
https://minio.example.net 的请求代理到监听于 https://minio.local:9000 的 MinIO Server。
- 将对
https://minio.example.net/minio/ui 子路径的请求代理到监听于 https://minio.local:9001 的 MinIO Console。
以下 location 块提供了模板,可在你的环境中进一步定制:
upstream minio_s3 {
   least_conn;
   server minio-01.internal-domain.com:9000;
   server minio-02.internal-domain.com:9000;
   server minio-03.internal-domain.com:9000;
   server minio-04.internal-domain.com:9000;
}

upstream minio_console {
   least_conn;
   server minio-01.internal-domain.com:9001;
   server minio-02.internal-domain.com:9001;
   server minio-03.internal-domain.com:9001;
   server minio-04.internal-domain.com:9001;
}

server {
   listen       80;
   listen  [::]:80;
   server_name  minio.example.net;

   # Allow special characters in headers
   ignore_invalid_headers off;
   # Allow any size file to be uploaded.
   # Set to a value such as 1000m; to restrict file size to a specific value
   client_max_body_size 0;
   # Disable buffering
   proxy_buffering off;
   proxy_request_buffering off;

   location / {
      proxy_set_header Host $http_host;
      proxy_set_header X-Real-IP $remote_addr;
      proxy_set_header X-Forwarded-For $proxy_add_x_forwarded_for;
      proxy_set_header X-Forwarded-Proto $scheme;

      proxy_connect_timeout 300;
      # Default is HTTP/1, keepalive is only enabled in HTTP/1.1
      proxy_http_version 1.1;
      proxy_set_header Connection "";
      chunked_transfer_encoding off;

      proxy_pass https://minio_s3; # This uses the upstream directive definition to load balance
   }

   location /minio/ui/ {
      rewrite ^/minio/ui/(.*) /$1 break;
      proxy_set_header Host $http_host;
      proxy_set_header X-Real-IP $remote_addr;
      proxy_set_header X-Forwarded-For $proxy_add_x_forwarded_for;
      proxy_set_header X-Forwarded-Proto $scheme;
      proxy_set_header X-NginX-Proxy true;

      # This is necessary to pass the correct IP to be hashed
      real_ip_header X-Real-IP;

      proxy_connect_timeout 300;

      # To support websockets in MinIO versions released after January 2023
      proxy_http_version 1.1;
      proxy_set_header Upgrade $http_upgrade;
      proxy_set_header Connection "upgrade";
      # Some environments may encounter CORS errors (Kubernetes + Nginx Ingress)
      # Uncomment the following line to set the Origin request to an empty string
      # proxy_set_header Origin '';

      chunked_transfer_encoding off;

      proxy_pass https://minio_console; # This uses the upstream directive definition to load balance
   }
}
S3 API 签名计算算法 不 支持将 MinIO Server API 托管在 example.net/s3/ 这类路径上的代理方案。
你还必须为 MinIO 部署设置以下环境变量:
子域名
为 MinIO Server S3 API 和 MinIO Console Web GUI 分别创建或配置独立且唯一的子域名。
例如,给定根域 example.net:
- 将对
minio.example.net 子域名的请求代理到监听于 https://minio.local:9000 的 MinIO Server
- 将对
console.example.net 子域名的请求代理到监听于 https://minio.local:9001 的 MinIO Console
以下 location 块提供了模板,可在你的环境中进一步定制:
upstream minio_s3 {
   least_conn;
   server minio-01.internal-domain.com:9000;
   server minio-02.internal-domain.com:9000;
   server minio-03.internal-domain.com:9000;
   server minio-04.internal-domain.com:9000;
}

upstream minio_console {
   least_conn;
   server minio-01.internal-domain.com:9001;
   server minio-02.internal-domain.com:9001;
   server minio-03.internal-domain.com:9001;
   server minio-04.internal-domain.com:9001;
}

server {
   listen       80;
   listen  [::]:80;
   server_name  minio.example.net;

   # Allow special characters in headers
   ignore_invalid_headers off;
   # Allow any size file to be uploaded.
   # Set to a value such as 1000m; to restrict file size to a specific value
   client_max_body_size 0;
   # Disable buffering
   proxy_buffering off;
   proxy_request_buffering off;

   location / {
      proxy_set_header Host $http_host;
      proxy_set_header X-Real-IP $remote_addr;
      proxy_set_header X-Forwarded-For $proxy_add_x_forwarded_for;
      proxy_set_header X-Forwarded-Proto $scheme;

      proxy_connect_timeout 300;
      # Default is HTTP/1, keepalive is only enabled in HTTP/1.1
      proxy_http_version 1.1;
      proxy_set_header Connection "";
      chunked_transfer_encoding off;

      proxy_pass http://minio_s3; # This uses the upstream directive definition to load balance
   }
}

server {

   listen       80;
   listen  [::]:80;
   server_name  console.example.net;

   # Allow special characters in headers
   ignore_invalid_headers off;
   # Allow any size file to be uploaded.
   # Set to a value such as 1000m; to restrict file size to a specific value
   client_max_body_size 0;
   # Disable buffering
   proxy_buffering off;
   proxy_request_buffering off;

   location / {
      proxy_set_header Host $http_host;
      proxy_set_header X-Real-IP $remote_addr;
      proxy_set_header X-Forwarded-For $proxy_add_x_forwarded_for;
      proxy_set_header X-Forwarded-Proto $scheme;
      proxy_set_header X-NginX-Proxy true;

      # This is necessary to pass the correct IP to be hashed
      real_ip_header X-Real-IP;

      proxy_connect_timeout 300;

      # To support websocket
      proxy_http_version 1.1;
      proxy_set_header Upgrade $http_upgrade;
      proxy_set_header Connection "upgrade";

      chunked_transfer_encoding off;

      proxy_pass http://minio_console/; # This uses the upstream directive definition to load balance
   }
}
S3 API 签名计算算法 不 支持将 MinIO Server API 托管在子路径上的代理方案,例如 minio.example.net/s3/。
你还必须为 MinIO 部署设置以下环境变量:
5 - 使用 Pre-signed URL 上传文件
使用 pre-signed URL,客户端可以直接将文件上传到兼容 S3 的云存储服务器(S3),而无需向用户暴露 S3 凭证。
本文介绍如何使用 MinIO JavaScript Library 中的 presignedPutObject API 生成 pre-signed URL。文中通过一个 JavaScript 示例进行演示:由 Express Node.js 服务器暴露一个用于生成 pre-signed URL 的端点,客户端 Web 应用再使用该 URL 将文件上传到 MinIO Server。
1. 创建服务端
服务端由一个 Express Node.js 服务器组成,并暴露名为 /presignedUrl 的端点。该端点使用 Minio.Client 对象生成短时有效的 pre-signed URL,用于将文件上传到 MinIO Server。
// In order to use the MinIO JavaScript API to generate the pre-signed URL, begin by instantiating
// a `Minio.Client` object and pass in the values for your server.
// The example below uses values for play.min.io:9000

const Minio = require('minio')

var client = new Minio.Client({
    endPoint: 'play.min.io',
    port: 9000,
    useSSL: true,
    accessKey: 'Q3AM3UQ867SPQQA43P2F',
    secretKey: 'zuf+tfteSlswRu7BJ86wekitnifILbZam1KYY3TG'
})

// Instantiate an `express` server and expose an endpoint called `/presignedUrl` as a `GET` request that
// accepts a filename through a query parameter called `name`. For the implementation of this endpoint,
// invoke [`presignedPutObject`](https://github.com/minio/minio-js/blob/master/docs/zh_CN/API.md#presignedputobjectbucketname-objectname-expiry-callback)
// on the `Minio.Client` instance to generate a pre-signed URL, and return that URL in the response:

// express is a small HTTP server wrapper, but this works with any HTTP server
const server = require('express')()

server.get('/presignedUrl', (req, res) => {
    client.presignedPutObject('uploads', req.query.name, (err, url) => {
        if (err) throw err
        res.end(url)
    })
})

server.get('/', (req, res) => {
    res.sendFile(__dirname + '/index.html');
})

server.listen(8080)
2. 创建客户端 Web 应用
客户端 Web 应用的用户界面包含一个选择器字段,允许用户选择要上传的文件,以及一个用于触发名为 upload 的 onclick 处理函数的按钮:
<input type="file" id="selector" multiple>
<button onclick="upload()">Upload</button>

<div id="status">No uploads</div>

<script type="text/javascript">
  // `upload` iterates through all files selected and invokes a helper function called `retrieveNewURL`.
  function upload() {
        // Get selected files from the input element.
        var files = document.querySelector("#selector").files;
        for (var i = 0; i < files.length; i++) {
            var file = files[i];
            // Retrieve a URL from our server.
            retrieveNewURL(file, (file, url) => {
                // Upload the file to the server.
                uploadFile(file, url);
            });
        }
    }

    // `retrieveNewURL` accepts the name of the current file and invokes the `/presignedUrl` endpoint to
    // generate a pre-signed URL for use in uploading that file:
    function retrieveNewURL(file, cb) {
        fetch(`/presignedUrl?name=${file.name}`).then((response) => {
            response.text().then((url) => {
                cb(file, url);
            });
        }).catch((e) => {
            console.error(e);
        });
    }

    // ``uploadFile` accepts the current filename and the pre-signed URL. It then uses `Fetch API`
    // to upload this file to S3 at `play.min.io:9000` using the URL:
    function uploadFile(file, url) {
        if (document.querySelector('#status').innerText === 'No uploads') {
            document.querySelector('#status').innerHTML = '';
        }
        fetch(url, {
            method: 'PUT',
            body: file
        }).then(() => {
            // If multiple files are uploaded, append upload status on the next line.
            document.querySelector('#status').innerHTML += `<br>Uploaded ${file.name}.`;
        }).catch((e) => {
            console.error(e);
        });
    }
</script>
注意: 本示例使用了 File API、QuerySelector API、fetch API 和 Promise API。
6 - 使用 Certbot 为 Silo 生成 Let’s Encrypt 证书
Let’s Encrypt 是一个新的免费、自动化且开源的证书颁发机构(Certificate Authority)。
Certbot 是一个基于控制台的 Let’s Encrypt 证书生成工具。
在本教程中,我们将使用 Certbot 生成 Let’s Encypt 证书。随后将把该证书部署到 MinIO Server 中使用。
1. 前置条件
2. 依赖要求
- 在执行
certbot 时,https 使用的 443 端口需要处于开放且可用状态。
- Certbot 执行时需要 root 访问权限,因为只有 root 可以绑定 1024 以下的端口。
- 本教程将使用我们自己的域名
myminio.com 作为示例。请在你的环境中替换为你自己的域名。
3. 操作步骤
第 1 步:安装 Certbot
请按照 https://certbot.eff.org/ 上的文档安装 Certbot。
第 2 步:生成 Let’s Encrypt 证书
# certbot certonly --standalone -d myminio.com --staple-ocsp -m [email protected] --agree-tos
第 3 步:验证证书
列出保存在 /etc/letsencrypt/live/myminio.com 目录中的证书。
$ ls -l /etc/letsencrypt/live/myminio.com
total 4
lrwxrwxrwx 1 root root  37 Aug  2 09:58 cert.pem -> ../../archive/myminio.com/cert4.pem
lrwxrwxrwx 1 root root  38 Aug  2 09:58 chain.pem -> ../../archive/myminio.com/chain4.pem
lrwxrwxrwx 1 root root  42 Aug  2 09:58 fullchain.pem -> ../../archive/myminio.com/fullchain4.pem
lrwxrwxrwx 1 root root  40 Aug  2 09:58 privkey.pem -> ../../archive/myminio.com/privkey4.pem
-rw-r--r-- 1 root root 543 May 10 22:07 README
第 4 步:使用证书在 MinIO Server 上配置 SSL。
通过 Certbot 生成的证书和密钥需要放置在用户的主目录中。
$ cp /etc/letsencrypt/live/myminio.com/fullchain.pem /home/user/.minio/certs/public.crt
$ cp /etc/letsencrypt/live/myminio.com/privkey.pem /home/user/.minio/certs/private.key
第 5 步:更改证书的所有权。
$ sudo chown user:user /home/user/.minio/certs/private.key
$ sudo chown user:user /home/user/.minio/certs/public.crt
第 6 步:使用 HTTPS 启动 MinIO Server。
如果你不打算以 root 权限运行 MinIO,则需要通过以下命令为 MinIO 赋予监听小于 1024 端口的能力:
sudo setcap 'cap_net_bind_service=+ep' ./minio
现在,你可以在 “443” 端口上启动 MinIO Server。
$ ./minio server --address ":443" /mnt/data
如果你使用的是 MinIO 的 dockerized 版本,那么你需要
$ sudo docker run -p 443:443 -v /home/user/.minio:/root/.minio/ -v /home/user/data:/data docker.io/pgsty/silo:RELEASE.2026-09-16T00-00-00Z server --address ":443" /data
