# 使用 Silo 的解耦 HDP Spark 和 Hive
LLMS 索引: [llms.txt](/zh/llms.txt)
---
## **1. 云原生架构** {#id1}
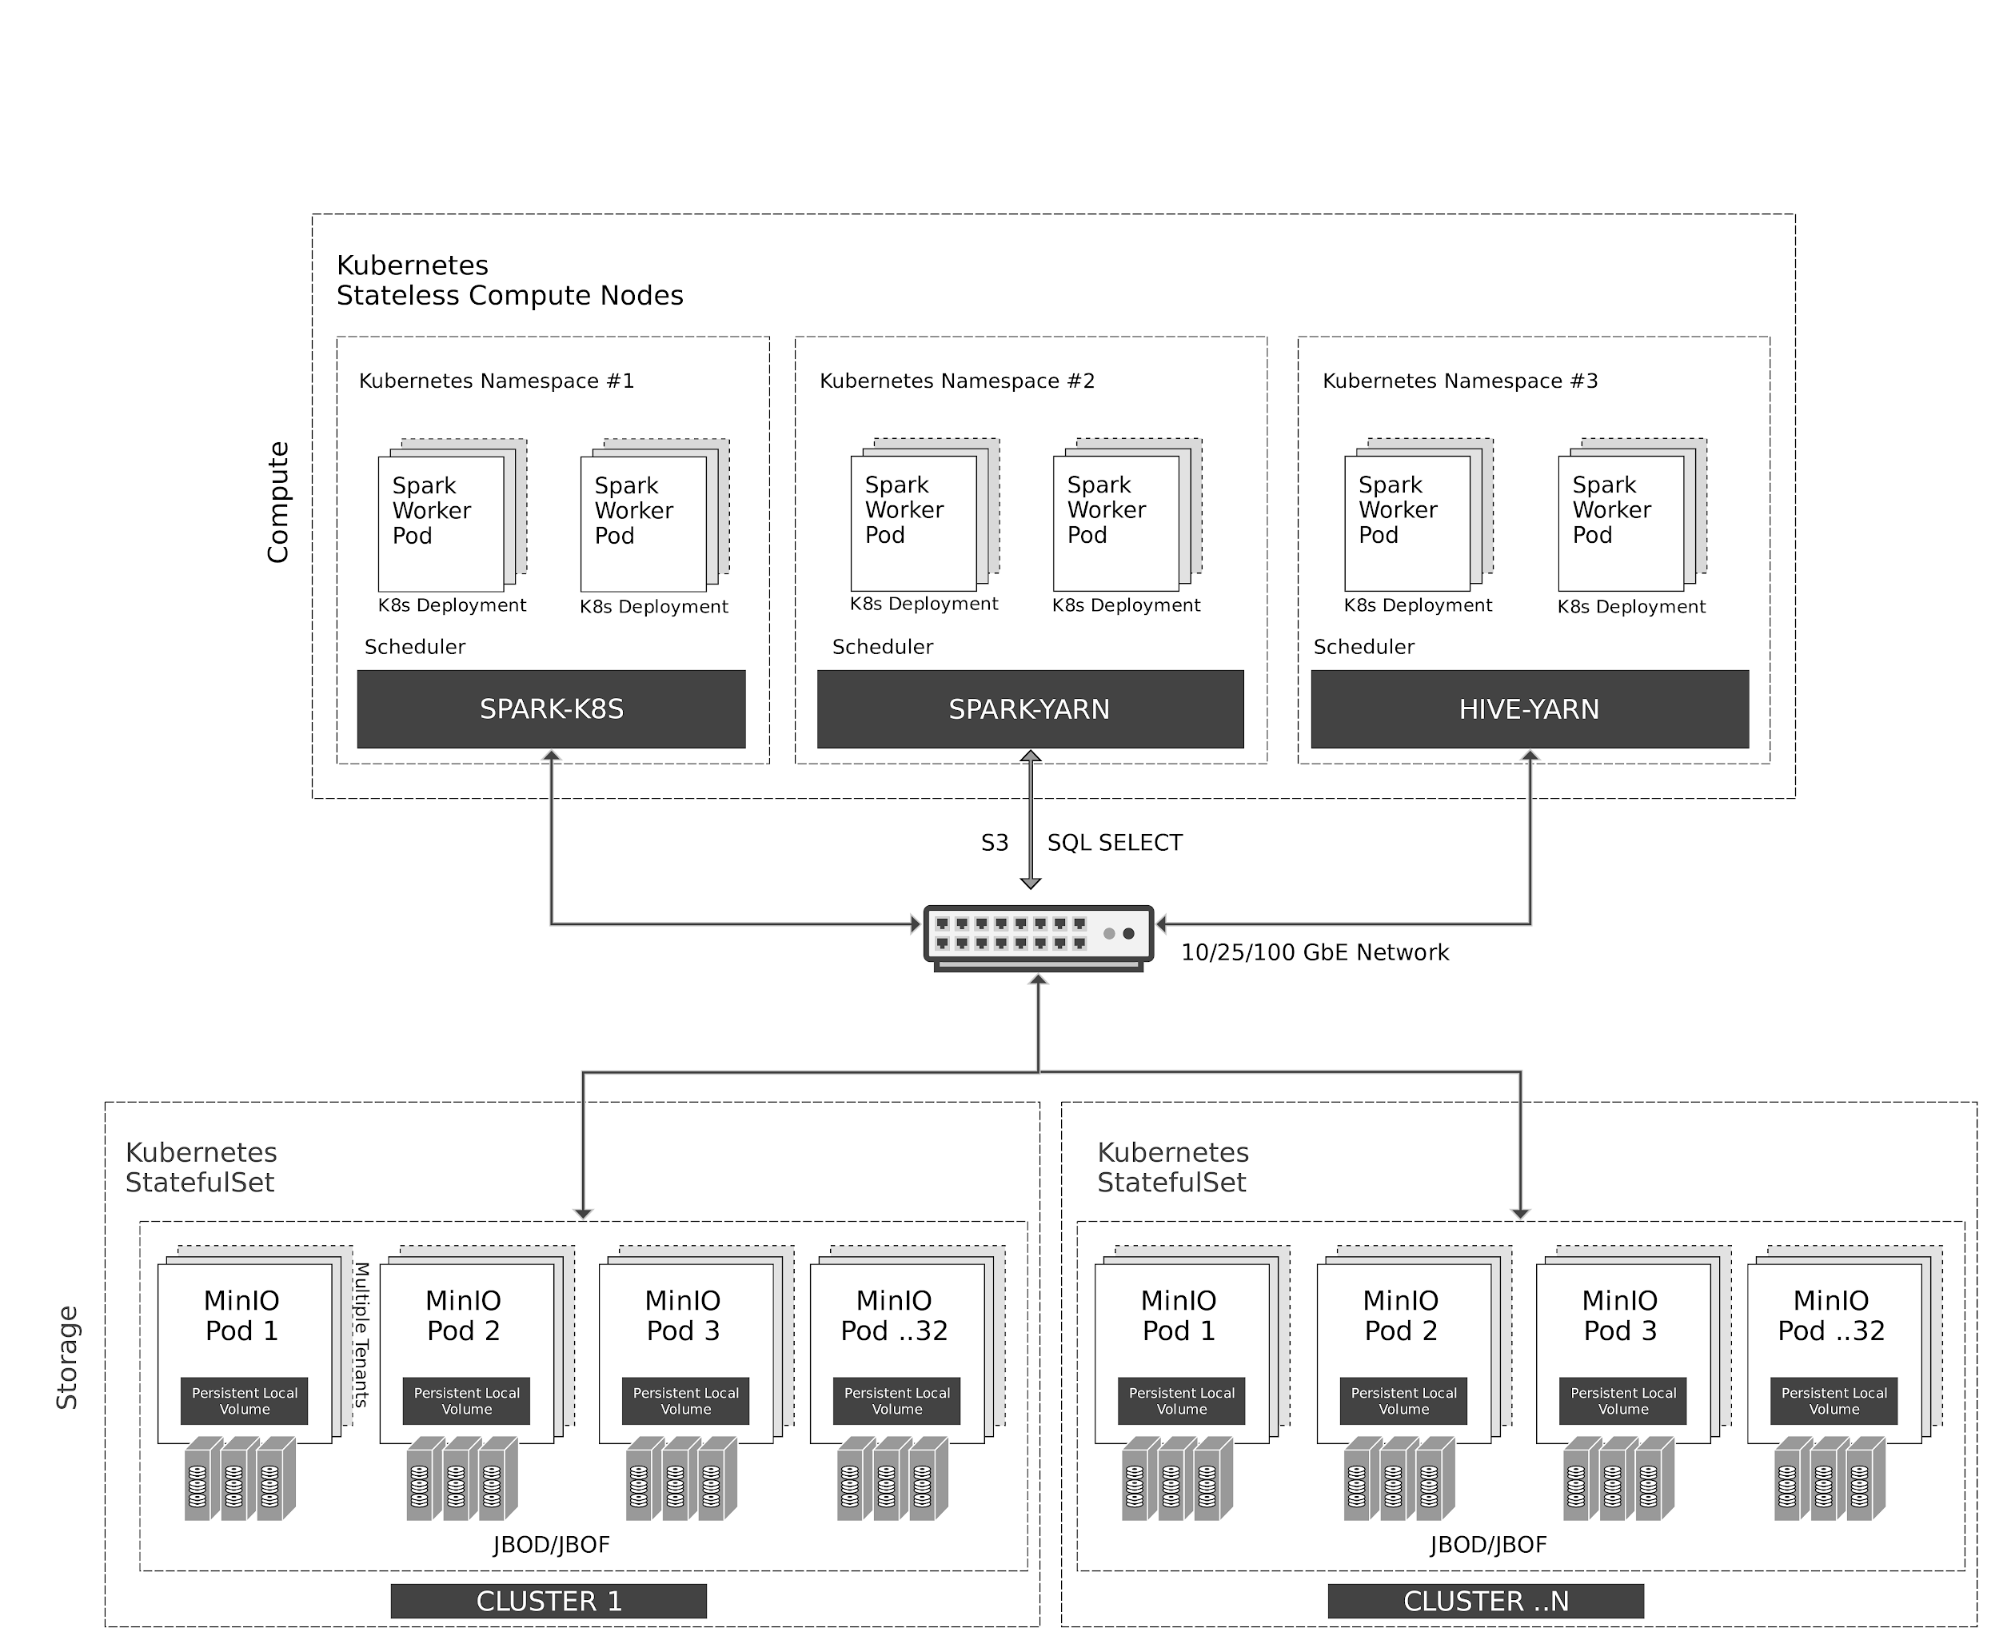
Kubernetes 在计算节点上以弹性方式管理无状态的 Spark 和 Hive 容器。Spark 与 Kubernetes 具有原生调度器集成。出于历史原因,Hive 在 Kubernetes 之上使用 YARN 调度器。
对 MinIO 对象存储的所有访问都通过 S3/SQL SELECT API 完成。除计算节点外,MinIO 容器也由 Kubernetes 以有状态容器方式管理,并将本地存储(JBOD/JBOF)映射为持久化本地卷。该架构支持多租户 MinIO,实现客户间数据隔离。
MinIO 还支持类似 AWS 区域与层级的多集群、多站点联邦。通过 MinIO Information Lifecycle Management(ILM),可以将数据分层到基于 NVMe 的热存储和基于 HDD 的温存储之间。所有数据都采用按对象密钥加密。租户之间的访问控制与身份管理由 MinIO 通过 OpenID Connect 或 Kerberos/LDAP/AD 进行管理。
## **2. 前置条件** {#id2}
- 按照本[指南](https://docs.hortonworks.com/HDPDocuments/Ambari-2.7.1.0/bk_ambari-installation/content/ch_Installing_Ambari.html)安装 Hortonworks Distribution。
- [Setup Ambari](https://docs.hortonworks.com/HDPDocuments/Ambari-2.7.1.0/bk_ambari-installation/content/set_up_the_ambari_server.html),该步骤会自动设置 YARN
- [Installing Spark](https://docs.hortonworks.com/HDPDocuments/HDP3/HDP-3.0.1/installing-spark/content/installing_spark.html)
- 使用以下任一指南安装 MinIO Distributed Server。
- [Deployment based on Kubernetes](https://silo.pgsty.com/zh/operations/deployments/kubernetes/)
- [Deployment based on MinIO Helm Chart](https://silo.pgsty.com/zh/operations/deployments/k8s-deploy-operator-helm-on-kubernetes/)
## **3. 配置 Hadoop、Spark、Hive 使用 MinIO** {#hadoopsparkhive-minio}
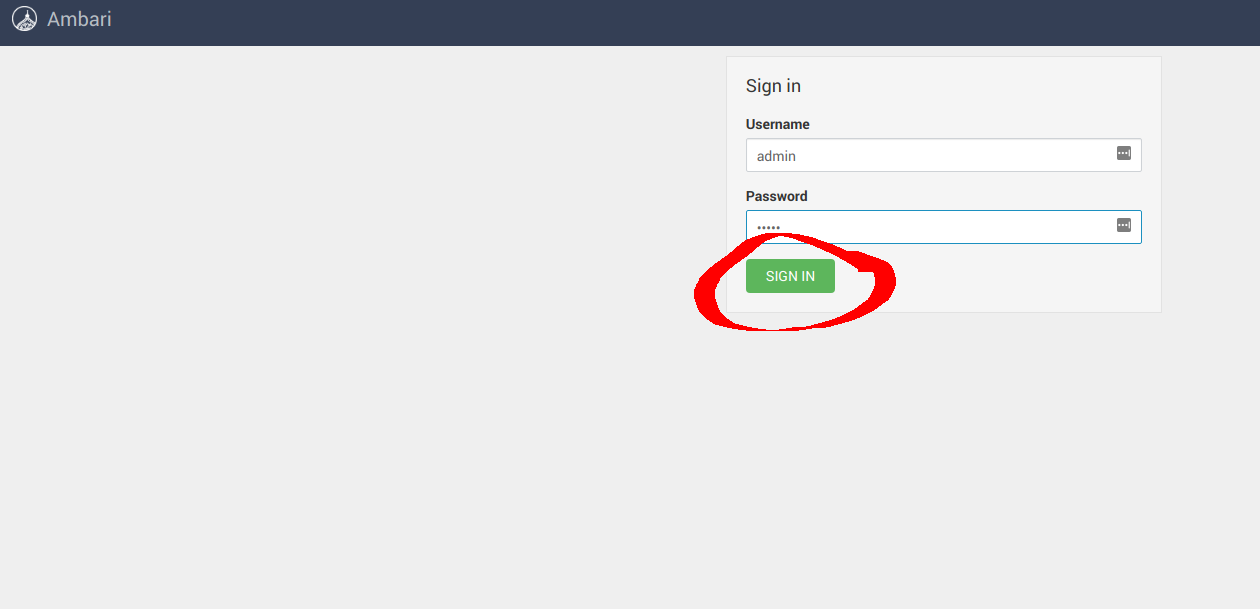
安装成功后,访问 Ambari UI `http://:8080/`,并使用默认凭据登录:\[***username: admin, password: admin***\]
### **3.1 配置 Hadoop** {#hadoop}
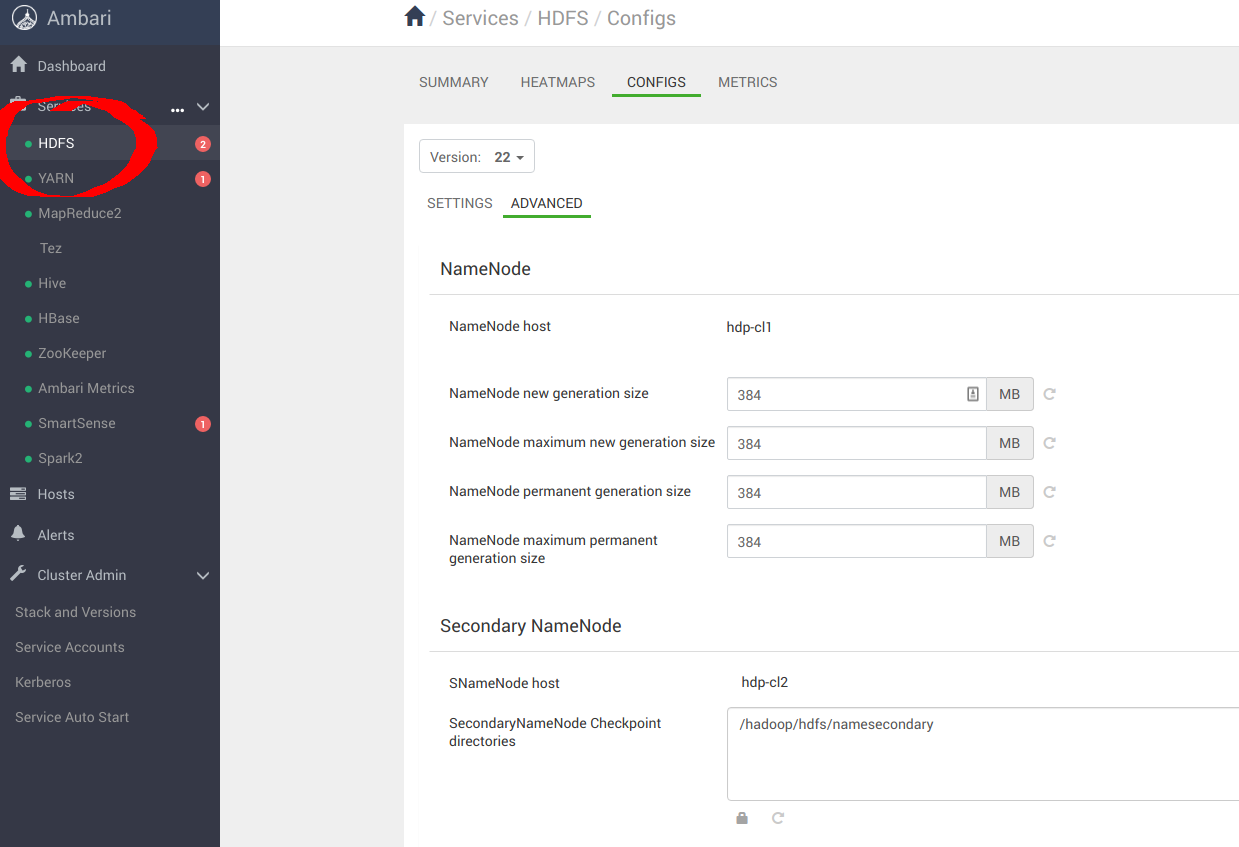
按下图进入 **Services** -> **HDFS** -> **CONFIGS** -> **ADVANCED**
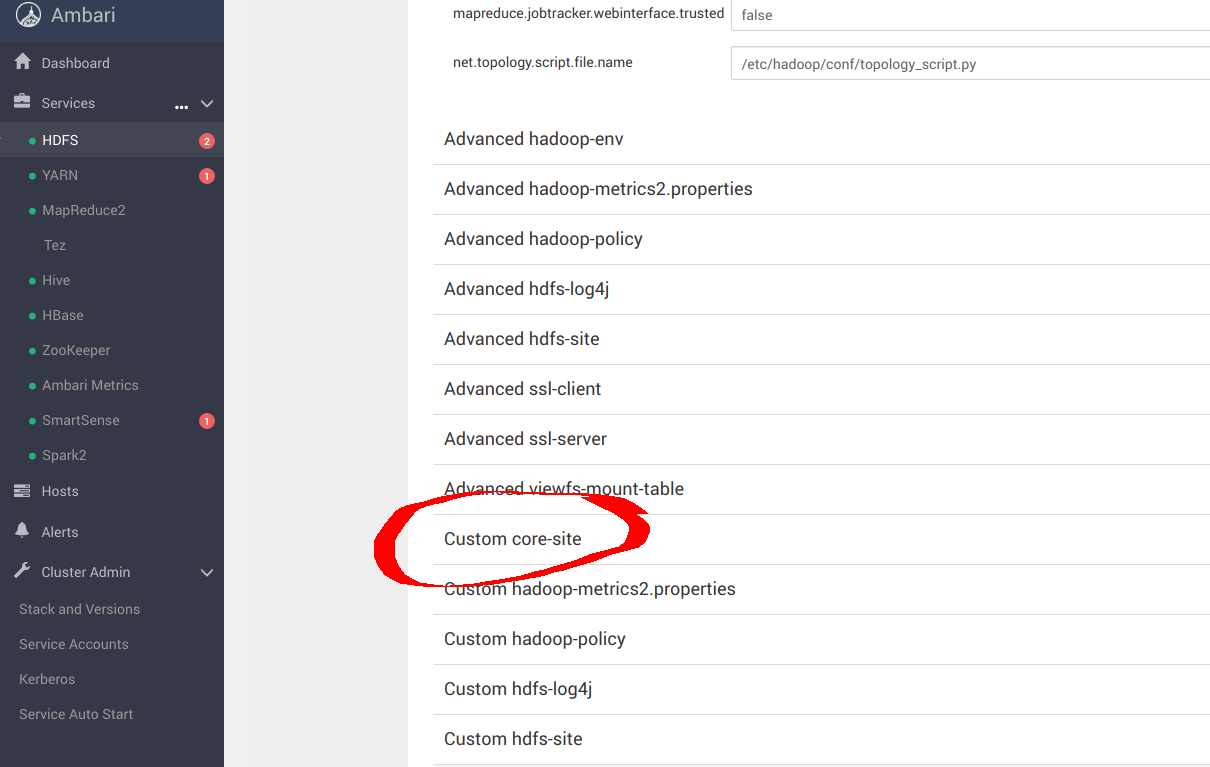
进入 **Custom core-site**,为 `_s3a_` 连接器配置 MinIO 参数
```text
sudo pip install yq
alias kv-pairify='yq ".configuration[]" | jq ".[]" | jq -r ".name + \"=\" + .value"'
```
以 12 个计算节点、总内存 *1.2TiB* 的集群为例,为获得最佳结果,需要进行以下设置。向 *core-site.xml* 添加以下优化项,以便为 **MinIO** 配置 *s3a*。其中最重要的选项如下:
```text
cat ${HADOOP_CONF_DIR}/core-site.xml | kv-pairify | grep "mapred"
mapred.maxthreads.generate.mapoutput=2 # Num threads to write map outputs
mapred.maxthreads.partition.closer=0 # Asynchronous map flushers
mapreduce.fileoutputcommitter.algorithm.version=2 # Use the latest committer version
mapreduce.job.reduce.slowstart.completedmaps=0.99 # 99% map, then reduce
mapreduce.reduce.shuffle.input.buffer.percent=0.9 # Min % buffer in RAM
mapreduce.reduce.shuffle.merge.percent=0.9 # Minimum % merges in RAM
mapreduce.reduce.speculative=false # Disable speculation for reducing
mapreduce.task.io.sort.factor=999 # Threshold before writing to drive
mapreduce.task.sort.spill.percent=0.9 # Minimum % before spilling to drive
```
S3A 是用于访问 S3 及其他兼容 S3 的对象存储(如 MinIO)的连接器。MapReduce 工作负载通常以与 HDFS 相同的方式与对象存储交互。这类工作负载依赖 HDFS 的原子 rename 功能来完成向数据存储写入。对象存储操作天然是原子的,不需要也不实现 rename API。默认的 S3A committer 会通过 copy 和 delete API 模拟 rename。由于写放大,这种交互模式会带来明显的性能损失。例如,*Netflix* 开发了两个新的 staging committer:Directory staging committer 和 Partitioned staging committer,以充分利用对象存储的原生操作能力。这两个 committer 不需要 rename 操作。除此之外,还对另一个新增的 Magic committer 进行了基准测试。
测试结果显示,Directory staging committer 在三者中速度最快。为获得最佳结果,S3A 连接器应配置以下参数:
```text
cat ${HADOOP_CONF_DIR}/core-site.xml | kv-pairify | grep "s3a"
fs.s3a.access.key=minio
fs.s3a.secret.key=minio123
fs.s3a.path.style.access=true
fs.s3a.block.size=512M
fs.s3a.buffer.dir=${hadoop.tmp.dir}/s3a
fs.s3a.committer.magic.enabled=false
fs.s3a.committer.name=directory
fs.s3a.committer.staging.abort.pending.uploads=true
fs.s3a.committer.staging.conflict-mode=append
fs.s3a.committer.staging.tmp.path=/tmp/staging
fs.s3a.committer.staging.unique-filenames=true
fs.s3a.connection.establish.timeout=5000
fs.s3a.connection.ssl.enabled=false
fs.s3a.connection.timeout=200000
fs.s3a.endpoint=http://minio:9000
fs.s3a.impl=org.apache.hadoop.fs.s3a.S3AFileSystem
fs.s3a.committer.threads=2048 # Number of threads writing to MinIO
fs.s3a.connection.maximum=8192 # Maximum number of concurrent conns
fs.s3a.fast.upload.active.blocks=2048 # Number of parallel uploads
fs.s3a.fast.upload.buffer=disk # Use drive as the buffer for uploads
fs.s3a.fast.upload=true # Turn on fast upload mode
fs.s3a.max.total.tasks=2048 # Maximum number of parallel tasks
fs.s3a.multipart.size=512M # Size of each multipart chunk
fs.s3a.multipart.threshold=512M # Size before using multipart uploads
fs.s3a.socket.recv.buffer=65536 # Read socket buffer hint
fs.s3a.socket.send.buffer=65536 # Write socket buffer hint
fs.s3a.threads.max=2048 # Maximum number of threads for S3A
```
其余优化选项请参考以下链接:
- [https://hadoop.apache.org/docs/current/hadoop-aws/tools/hadoop-aws/index.html](https://hadoop.apache.org/docs/current/hadoop-aws/tools/hadoop-aws/index.html)
- [https://hadoop.apache.org/docs/r3.1.1/hadoop-aws/tools/hadoop-aws/committers.html](https://hadoop.apache.org/docs/r3.1.1/hadoop-aws/tools/hadoop-aws/committers.html)
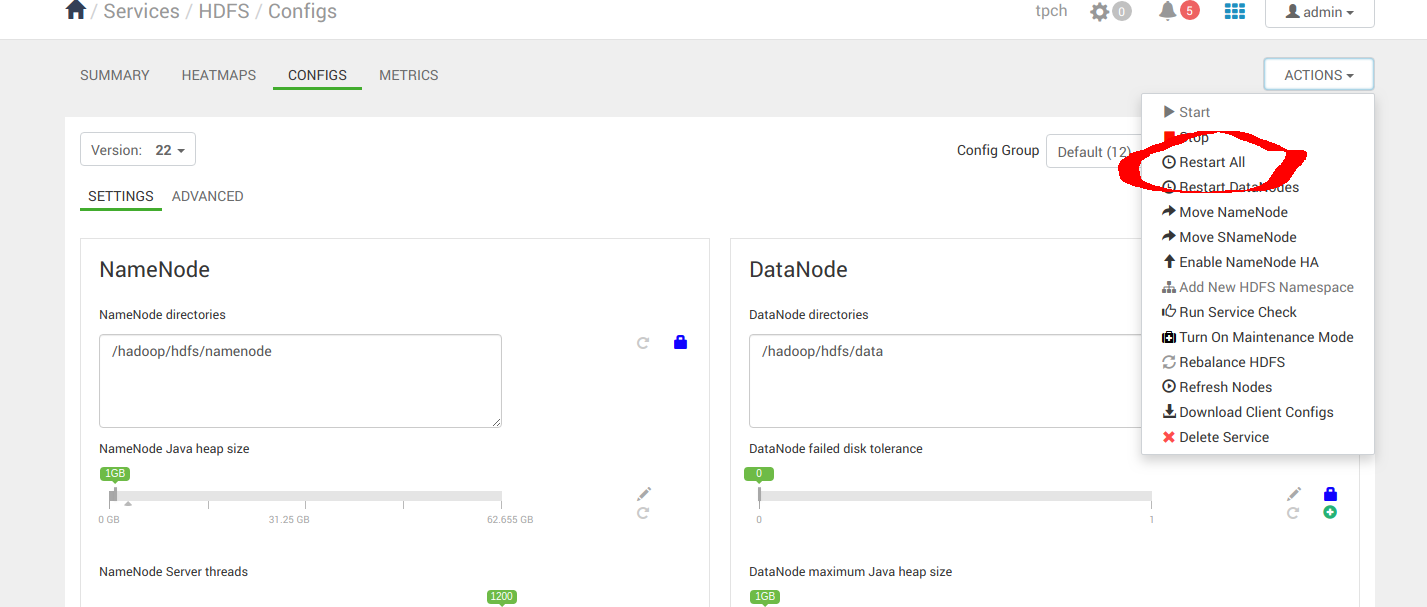
应用配置变更后,继续重启 **Hadoop** 服务。
### **3.2 配置 Spark2** {#spark2}
按下图进入 **Services** -> **Spark2** -> **CONFIGS**
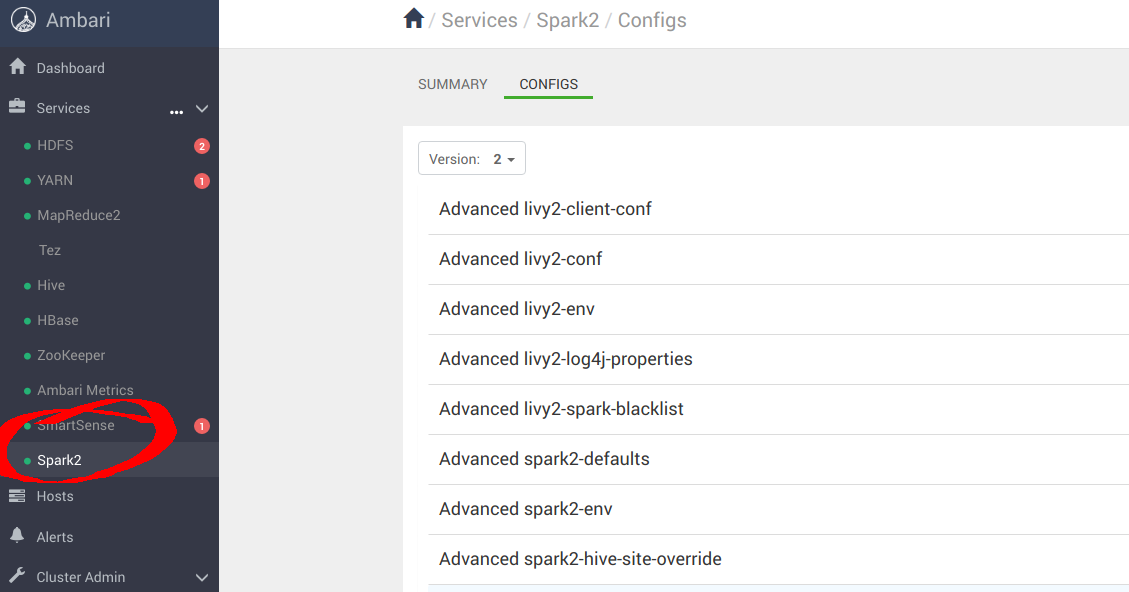
进入“**Custom spark-defaults**”,为 `_s3a_` 连接器配置 MinIO 参数
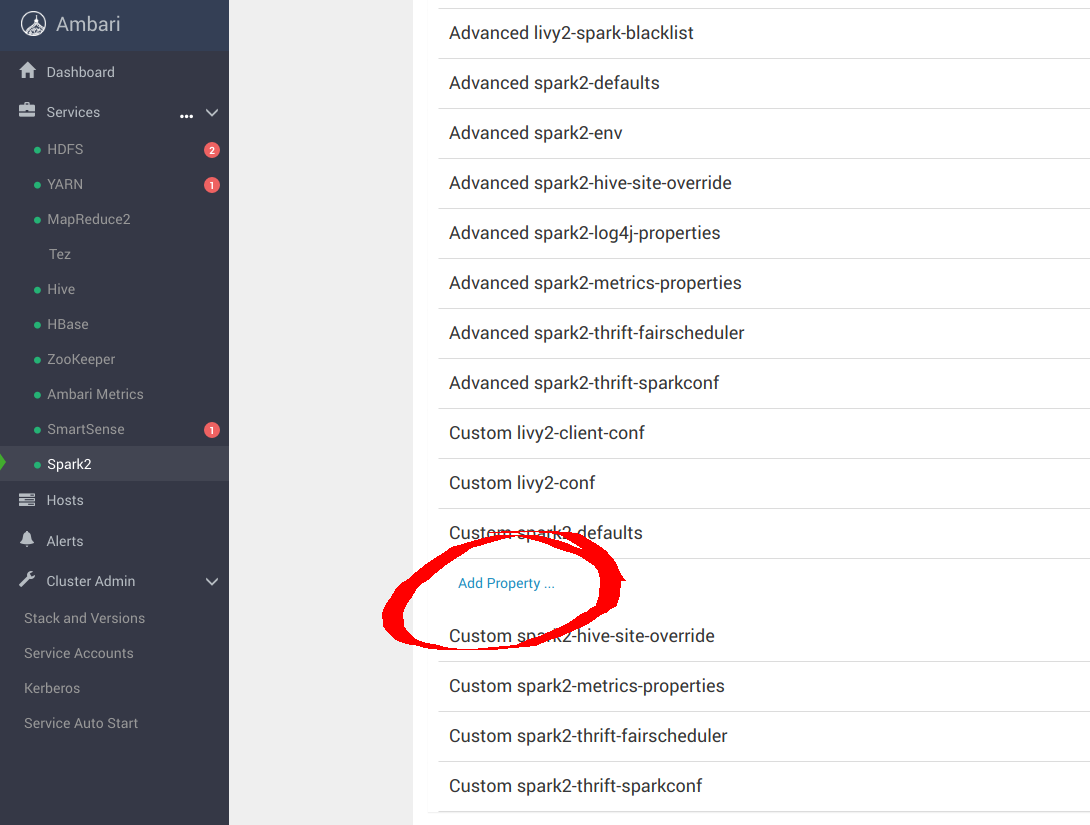
向 *spark-defaults.conf* 添加以下优化项,以便将 Spark 配置为使用 **MinIO**。
```text
spark.hadoop.fs.s3a.access.key minio
spark.hadoop.fs.s3a.secret.key minio123
spark.hadoop.fs.s3a.path.style.access true
spark.hadoop.fs.s3a.block.size 512M
spark.hadoop.fs.s3a.buffer.dir ${hadoop.tmp.dir}/s3a
spark.hadoop.fs.s3a.committer.magic.enabled false
spark.hadoop.fs.s3a.committer.name directory
spark.hadoop.fs.s3a.committer.staging.abort.pending.uploads true
spark.hadoop.fs.s3a.committer.staging.conflict-mode append
spark.hadoop.fs.s3a.committer.staging.tmp.path /tmp/staging
spark.hadoop.fs.s3a.committer.staging.unique-filenames true
spark.hadoop.fs.s3a.committer.threads 2048 # number of threads writing to MinIO
spark.hadoop.fs.s3a.connection.establish.timeout 5000
spark.hadoop.fs.s3a.connection.maximum 8192 # maximum number of concurrent conns
spark.hadoop.fs.s3a.connection.ssl.enabled false
spark.hadoop.fs.s3a.connection.timeout 200000
spark.hadoop.fs.s3a.endpoint http://minio:9000
spark.hadoop.fs.s3a.fast.upload.active.blocks 2048 # number of parallel uploads
spark.hadoop.fs.s3a.fast.upload.buffer disk # use disk as the buffer for uploads
spark.hadoop.fs.s3a.fast.upload true # turn on fast upload mode
spark.hadoop.fs.s3a.impl org.apache.hadoop.spark.hadoop.fs.s3a.S3AFileSystem
spark.hadoop.fs.s3a.max.total.tasks 2048 # maximum number of parallel tasks
spark.hadoop.fs.s3a.multipart.size 512M # size of each multipart chunk
spark.hadoop.fs.s3a.multipart.threshold 512M # size before using multipart uploads
spark.hadoop.fs.s3a.socket.recv.buffer 65536 # read socket buffer hint
spark.hadoop.fs.s3a.socket.send.buffer 65536 # write socket buffer hint
spark.hadoop.fs.s3a.threads.max 2048 # maximum number of threads for S3A
```
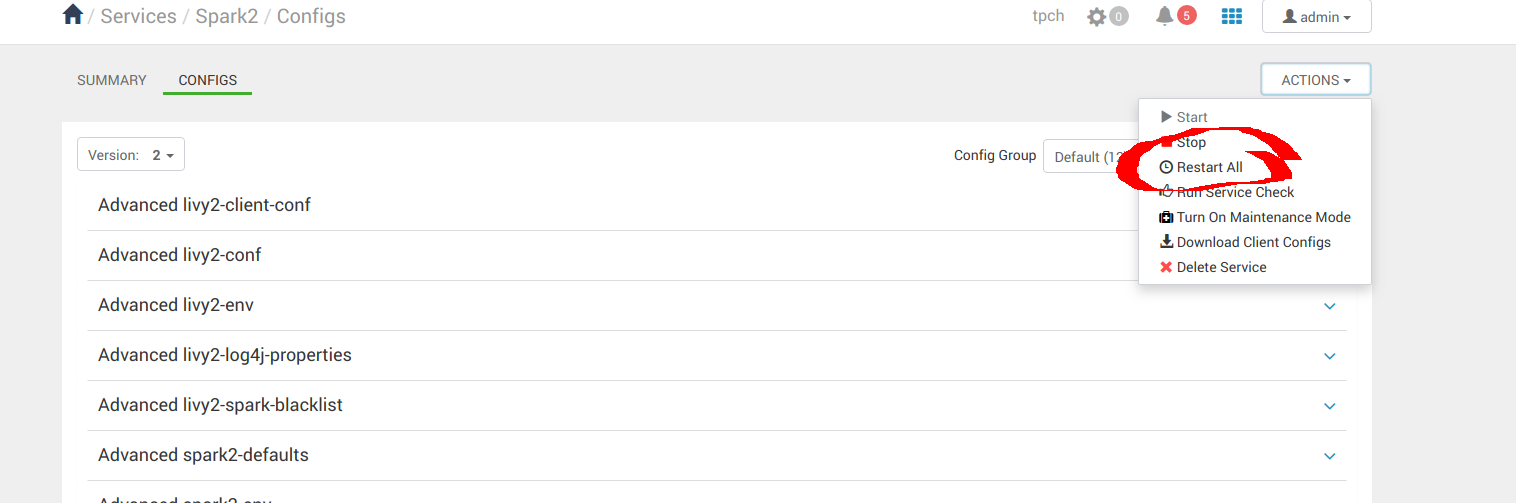
应用配置变更后,继续重启 **Spark** 服务。
### **3.3 配置 Hive** {#hive}
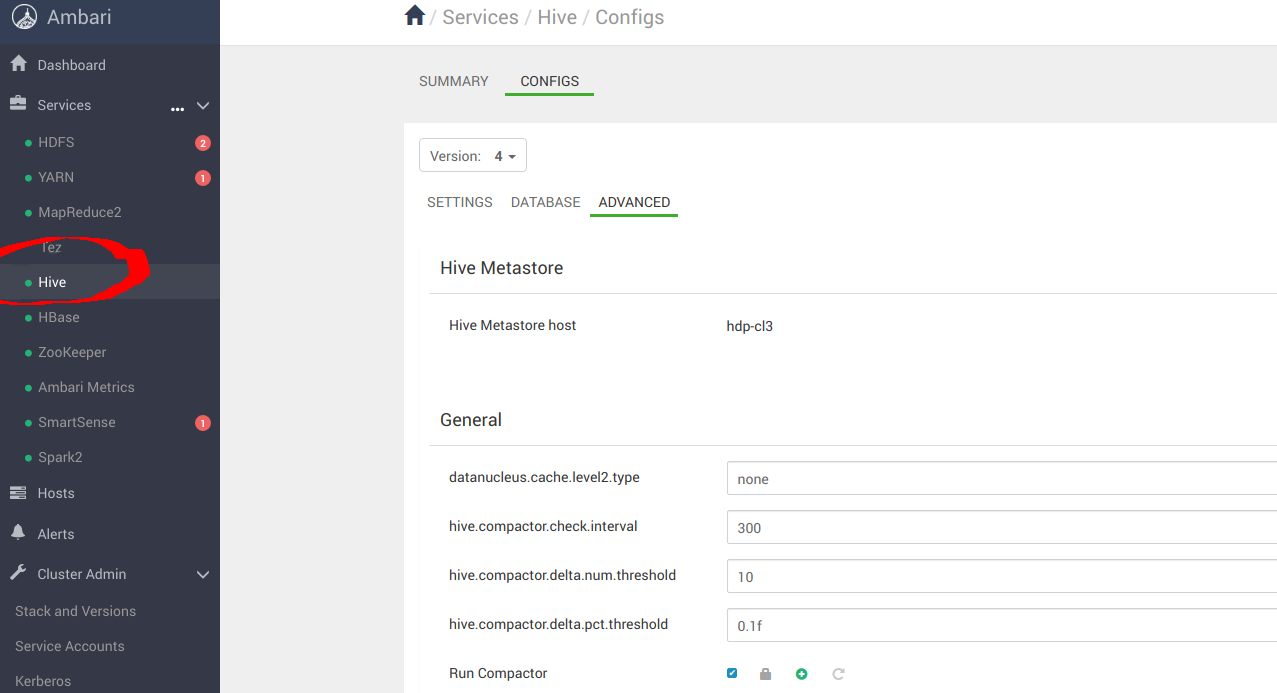
按下图进入 **Services** -> **Hive** -> **CONFIGS**-> **ADVANCED**
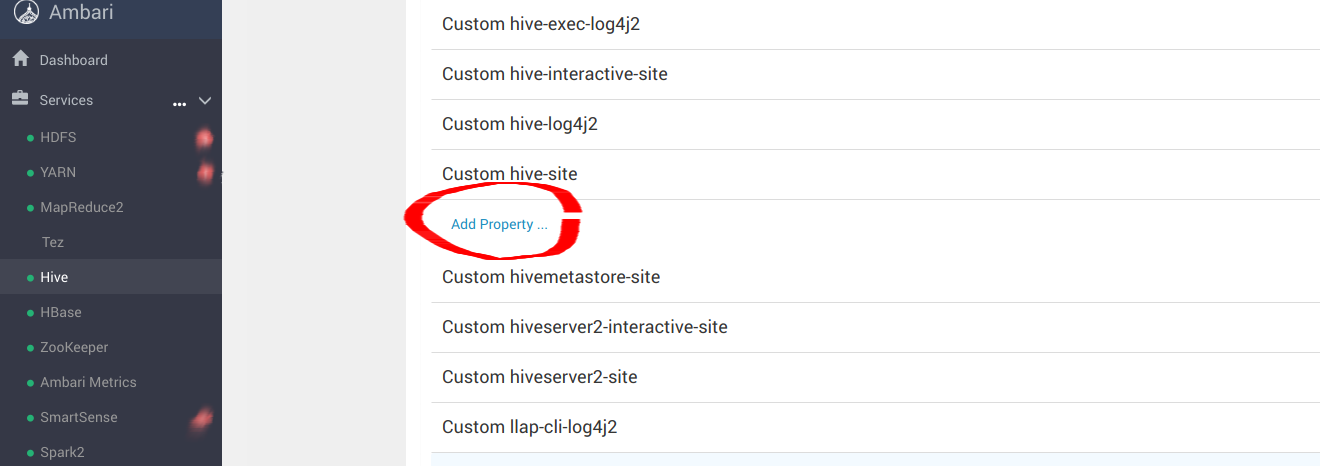
进入“**Custom hive-site**”,为 `_s3a_` 连接器配置 MinIO 参数
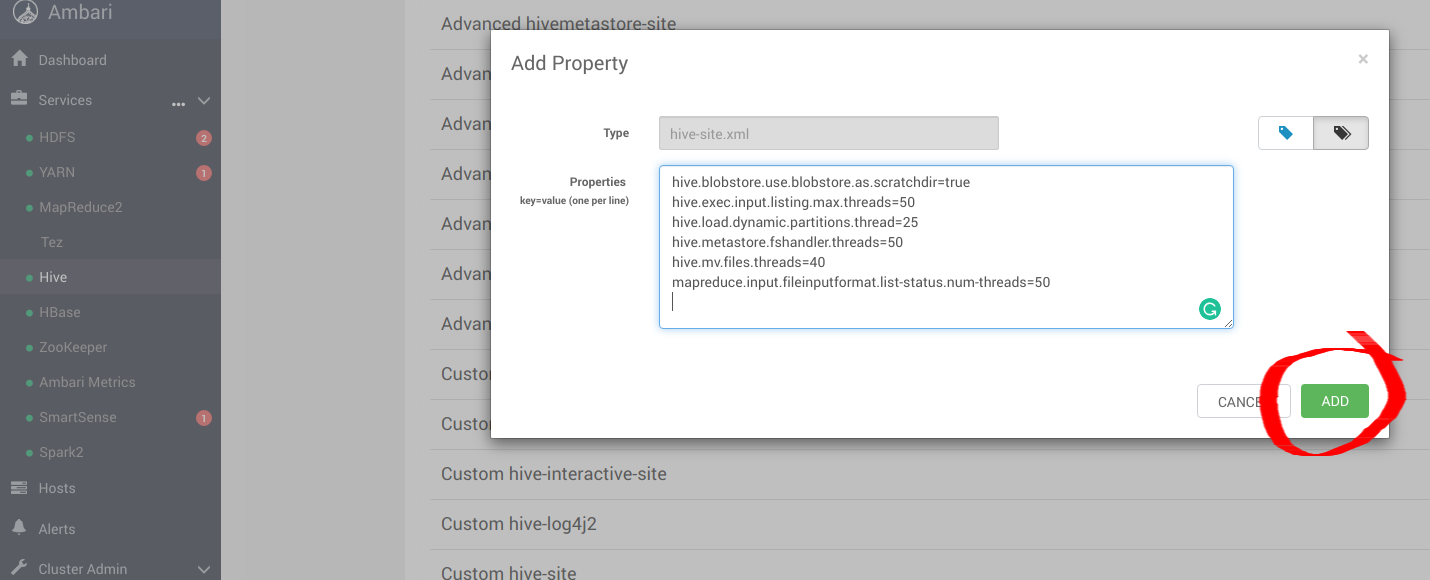
向 `hive-site.xml` 添加以下优化项,以便将 Hive 配置为使用 **MinIO**。
```text
hive.blobstore.use.blobstore.as.scratchdir=true
hive.exec.input.listing.max.threads=50
hive.load.dynamic.partitions.thread=25
hive.metastore.fshandler.threads=50
hive.mv.files.threads=40
mapreduce.input.fileinputformat.list-status.num-threads=50
```
有关这些选项的更多信息,请访问 [https://www.cloudera.com/documentation/enterprise/5-11-x/topics/admin_hive_on_s3_tuning.html](https://www.cloudera.com/documentation/enterprise/5-11-x/topics/admin_hive_on_s3_tuning.html)
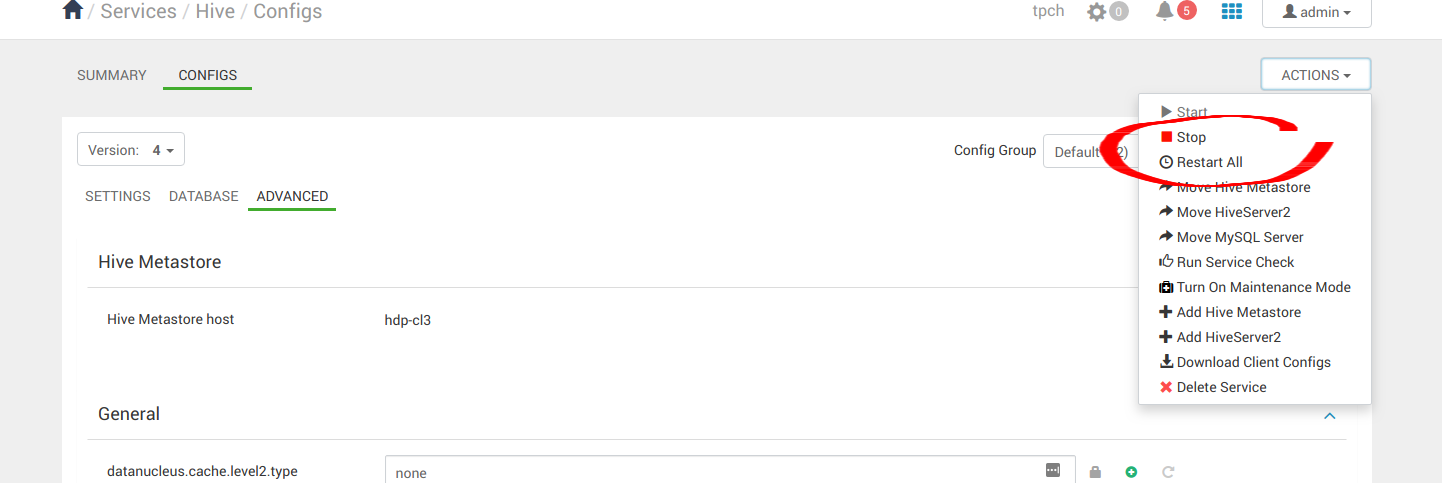
应用配置变更后,继续重启所有 Hive 服务。
## **4. 运行示例应用** {#id3}
在 Hive、Hadoop 和 Spark 安装完成后,可以继续运行一些示例应用,验证配置是否正确。我们可以使用 Spark Pi 和 Spark WordCount 程序来验证 Spark 安装。也可以进一步了解如何通过命令行和 Spark shell 运行 Spark 作业。
### **4.1 Spark Pi** {#spark-pi}
通过运行下面这个计算密集型示例来测试 Spark 安装。该示例通过向圆内“投掷飞镖”来计算 pi。程序会在单位正方形((0,0) 到 (1,1))内生成点,并统计落在该正方形内单位圆中的点数,结果即为 pi 的近似值。
按以下步骤运行 Spark Pi 示例:
- 以 **‘spark’** 用户登录。
- 作业运行时,相关库可在中间处理阶段使用 **MinIO**。
- 进入安装了 Spark client 的节点,并切换到 spark2-client 目录:
```text
cd /usr/hdp/current/spark2-client
su spark
```
- 以 yarn-client 模式运行 Apache Spark Pi 作业,使用 **org.apache.spark** 中的代码:
```text
./bin/spark-submit --class org.apache.spark.examples.SparkPi \
--master yarn-client \
--num-executors 1 \
--driver-memory 512m \
--executor-memory 512m \
--executor-cores 1 \
examples/jars/spark-examples*.jar 10
```
作业应产生如下输出。请关注输出中的 pi 值。
```text
17/03/22 23:21:10 INFO DAGScheduler: Job 0 finished: reduce at SparkPi.scala:38, took 1.302805 s
Pi is roughly 3.1445191445191445
```
也可以在浏览器中访问 YARN ResourceManager Web UI,点击 job history server 信息来查看作业状态。
### **4.2 WordCount** {#wordcount}
WordCount 是一个简单程序,用于统计文本文件中各单词的出现次数。代码会构建一个名为 counts 的 (String, Int) 对数据集,并将该数据集保存到文件。
以下示例将 WordCount 代码提交到 Scala shell。请为 Spark WordCount 示例选择一个输入文件。可以使用任意文本文件作为输入。
- 以 **‘spark’** 用户登录。
- 作业运行时,相关库可在中间处理阶段使用 **MinIO**。
- 进入安装了 Spark client 的节点,并切换到 spark2-client 目录:
```text
cd /usr/hdp/current/spark2-client
su spark
```
以下示例使用 *log4j.properties* 作为输入文件:
#### **4.2.1 将输入文件上传到 HDFS:** {#hdfs}
```text
hadoop fs -copyFromLocal /etc/hadoop/conf/log4j.properties
s3a://testbucket/testdata
```
#### **4.2.2 运行 Spark shell:** {#spark-shell}
```text
./bin/spark-shell --master yarn-client --driver-memory 512m --executor-memory 512m
```
该命令应产生如下输出(包含额外状态信息):
```text
Spark context Web UI available at http://172.26.236.247:4041
Spark context available as 'sc' (master = yarn, app id = application_1490217230866_0002).
Spark session available as 'spark'.
Welcome to
____ __
/ __/__ ___ _____/ /__
_\ \/ _ \/ _ `/ __/ '_/
/___/ .__/\_,_/_/ /_/\_\ version 2.1.0.2.6.0.0-598
/_/
Using Scala version 2.11.8 (Java HotSpot(TM) 64-Bit Server VM, Java 1.8.0_112)
Type in expressions to have them evaluated.
Type :help for more information.
scala>
```
- 在 *scala>* 提示符下,输入以下命令提交作业。请将节点名、文件名和文件位置替换为实际值:
```text
scala> val file = sc.textFile("s3a://testbucket/testdata")
file: org.apache.spark.rdd.RDD[String] = s3a://testbucket/testdata MapPartitionsRDD[1] at textFile at :24
scala> val counts = file.flatMap(line => line.split(" ")).map(word => (word, 1)).reduceByKey(_ + _)
counts: org.apache.spark.rdd.RDD[(String, Int)] = ShuffledRDD[4] at reduceByKey at :25
scala> counts.saveAsTextFile("s3a://testbucket/wordcount")
```
使用以下任一方式查看作业输出:
在 Scala shell 中查看输出:
```text
scala> counts.count()
364
```
若要在 MinIO 中查看输出,请退出 Scala shell。查看 WordCount 作业状态:
```text
hadoop fs -ls s3a://testbucket/wordcount
```
输出应类似如下:
```text
Found 3 items
-rw-rw-rw- 1 spark spark 0 2019-05-04 01:36 s3a://testbucket/wordcount/_SUCCESS
-rw-rw-rw- 1 spark spark 4956 2019-05-04 01:36 s3a://testbucket/wordcount/part-00000
-rw-rw-rw- 1 spark spark 5616 2019-05-04 01:36 s3a://testbucket/wordcount/part-00001
```